3.31. Set Global Configurations
DigitMarket™ API Manager allows you to set global configurations from its Global Configuration menu. Configurations that the user can set include:
- Publisher portal environment settings, such as options to show or hide Sandbox environment and renaming the Production environment
- Approval workflows for APIs, API Packs, Usage Plans and Usage Policies
- Default fault codes and fault messages for SOAP and REST API errors
Common Tasks
Following common task is identified for this section:
Navigating to the Global Configuration screen
To navigate to the Global Configuration screen:
- In the main navigation menu, click Global Configuration.
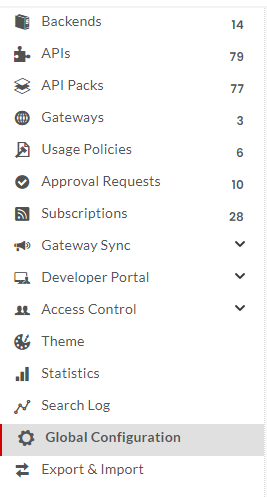
Fig. 3.564 Navigation menu - Global Configuration
The Global Configuration screen displays.
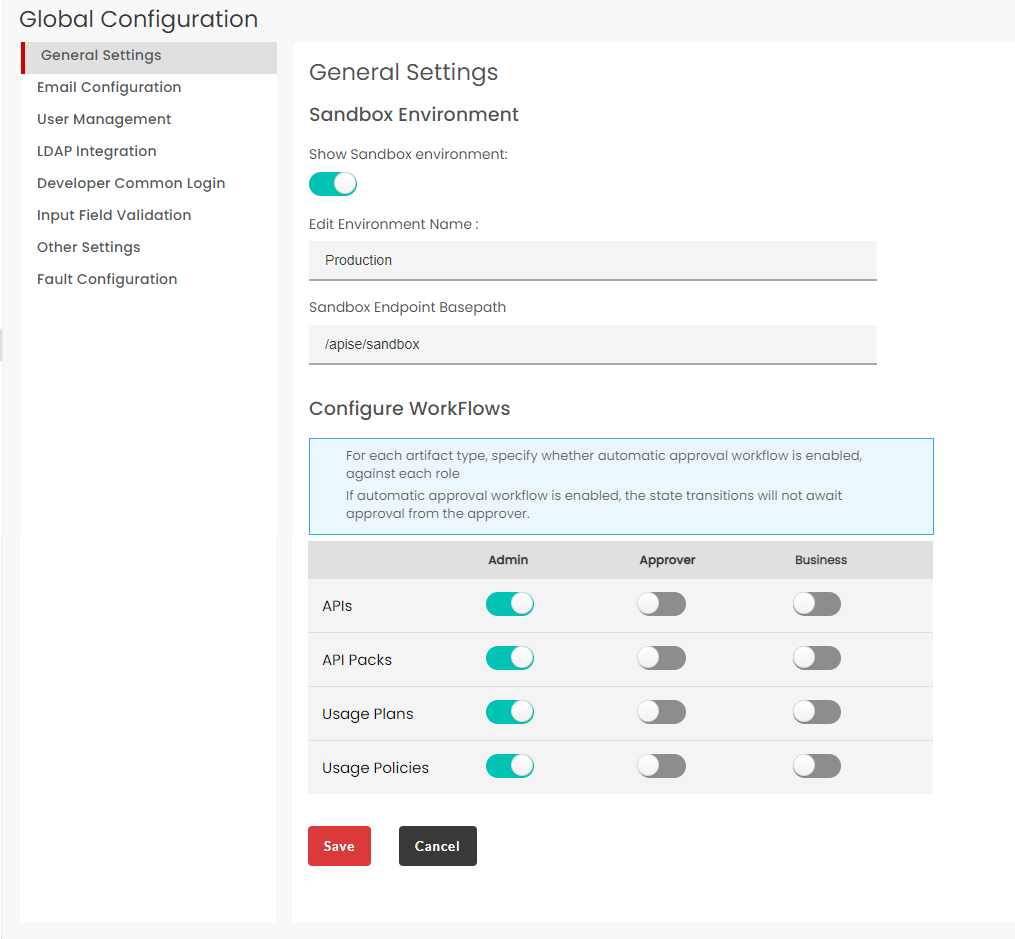
Fig. 3.565 Global Configuration screen
3.31.1. General Settings
To configure Environment settings:
Navigate to the Global Configuration screen.
Click the General Settings tab to display the Environment settings screen.
Fig. 3.566 Settings tab
In Primary Environment, in the Edit Environment Name box, type a new name for the Production environment name if you want to name the default name of ‘Production’ to any other name of your choice. Doing this changes the environment name in the Endpoints tab of the API Configuration screen.
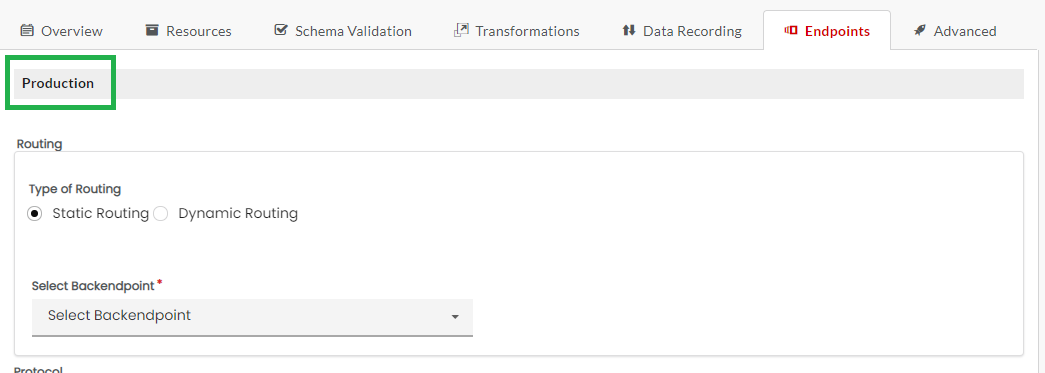
Fig. 3.567 Edit Environment Name
In Sandbox Environment, click to disable the Show Sandbox environment toggle button, which is enabled by default, to stop displaying the Sandbox section in the Endpoints tab of the API Configuration screen.
In Sandbox Environment, in the Sandbox Endpoint Basepath box, type/edit the base path for the Endpoint used for the Sandbox environment.
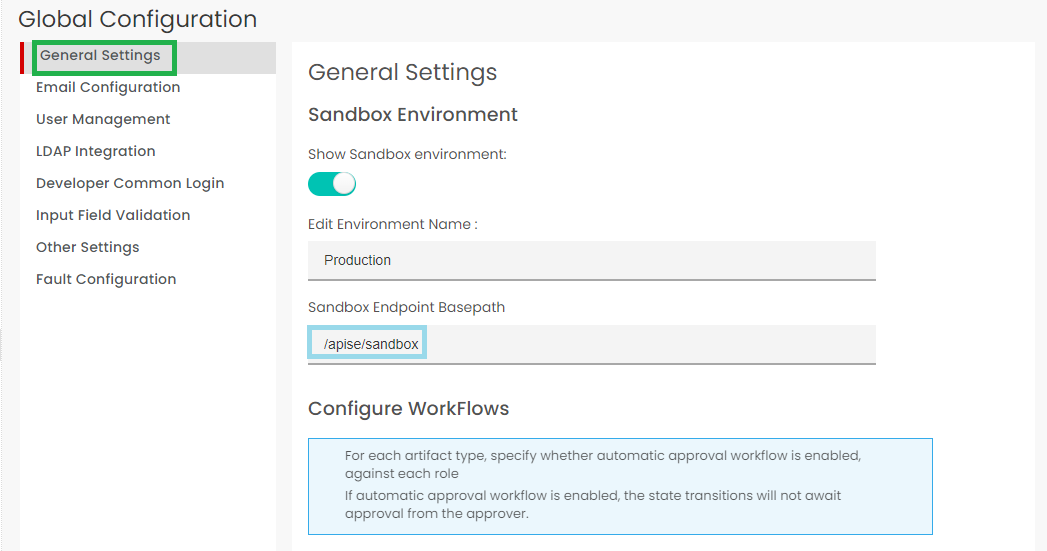
Fig. 3.568 Edit Environment Name
Click Submit to save changes.
3.31.1.1. Configure Approval Workflows
Approval workflows allow the user to configure whether or not an artifact, i.e., APIs, API Packs, Usage Plans, and Usage Policies will require approval to advance to the next state in the artifact life cycle. If the automatic approval workflow is enabled, the artifact will not require an approval and the artifact progresses to the next state in the life cycle automatically. On the other hand, if approval workflow is not set to automatic, each state of the artifact life cycle will require approval to advance to the next state in its life cycle.
Refer Life cycle of Artifacts and Approval Workflows to learn more about artifact life cycle.
Refer Manage Approvals for more information about managing approvals.
To configure workflows for approvals:
Navigate to the Global Configuration screen.
Click the Settings tab to display the Environment settings screen.
In the Configure WorkFlows section, drag the toggle button to enable/disable approvals for Admin/Approver/Business users for artifacts APIs/API Packs/Usage Plans/Usage Policies.
The toggle button is turned off and displays grey by default. Click the toggle button to enable a corresponding user and artifact. You can toggle states; green to allow automatic approval and grey to disable automatic approval workflow.
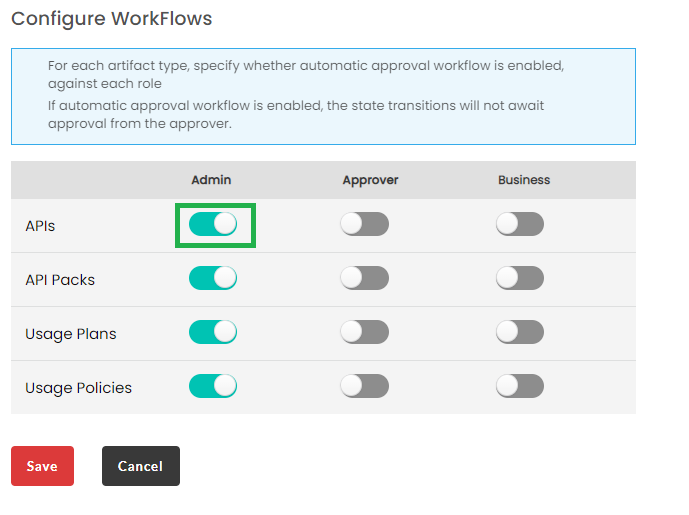
Fig. 3.569 Enable/disable approvals
Click Submit to save changes.
3.31.2. Email configuration
The email configuration feature is used to configure mail related details such as host, port, sender email id etc. from the application instead of manually running the queries into the database. These details can be modified based on the client requirements. Email notification will be triggered based on the server configuration details.
Click the Email configuration tab to display the Email configuration settings screen.

Fig. 3.570 Email configuration
To turn on email notification, click Turn email notification toggle button. Click the toggle again to disable this option.
Under Configuration section, populate the mandatory details.
- Host: Enter the host ip addres.
- Port: Enter the port number for the outgoing email.
- Server Name: Enter the login credential of the server account.
- Password: Enter the password of the server account. By default, the password will be hidden.
- From Email id(s): Enter the email id from which the email notification will be sent.
- Cc Email id(s): Enter the additional email ids that need to be cc’d while sending the email notification.
- Bcc Email id(s): Enter the additional email ids that need to be bcc’d while sending the email notification.
- Signature: Enter a signature to be appended to the email notification.
- Enable TLS: Click this toggle button to enable security protocol TLS (Transport Layer Security) for the mail server configuration. Click this toggle button again to disable TLS.
- Enable SMPTP: Click this toggle button to enable communication protocol SMPTP (Simple Mail Transfer Protocol) for the mail server configuration. Click this toggle button again to disable SMPTP.
- Click Save to save the changes.
3.31.3. User Management
User management section is used to customize certain functionalities of the application for users who operate under an account. Account and password settings for users are configured under this section.
Click the User Management tab to display the User Management settings screen.
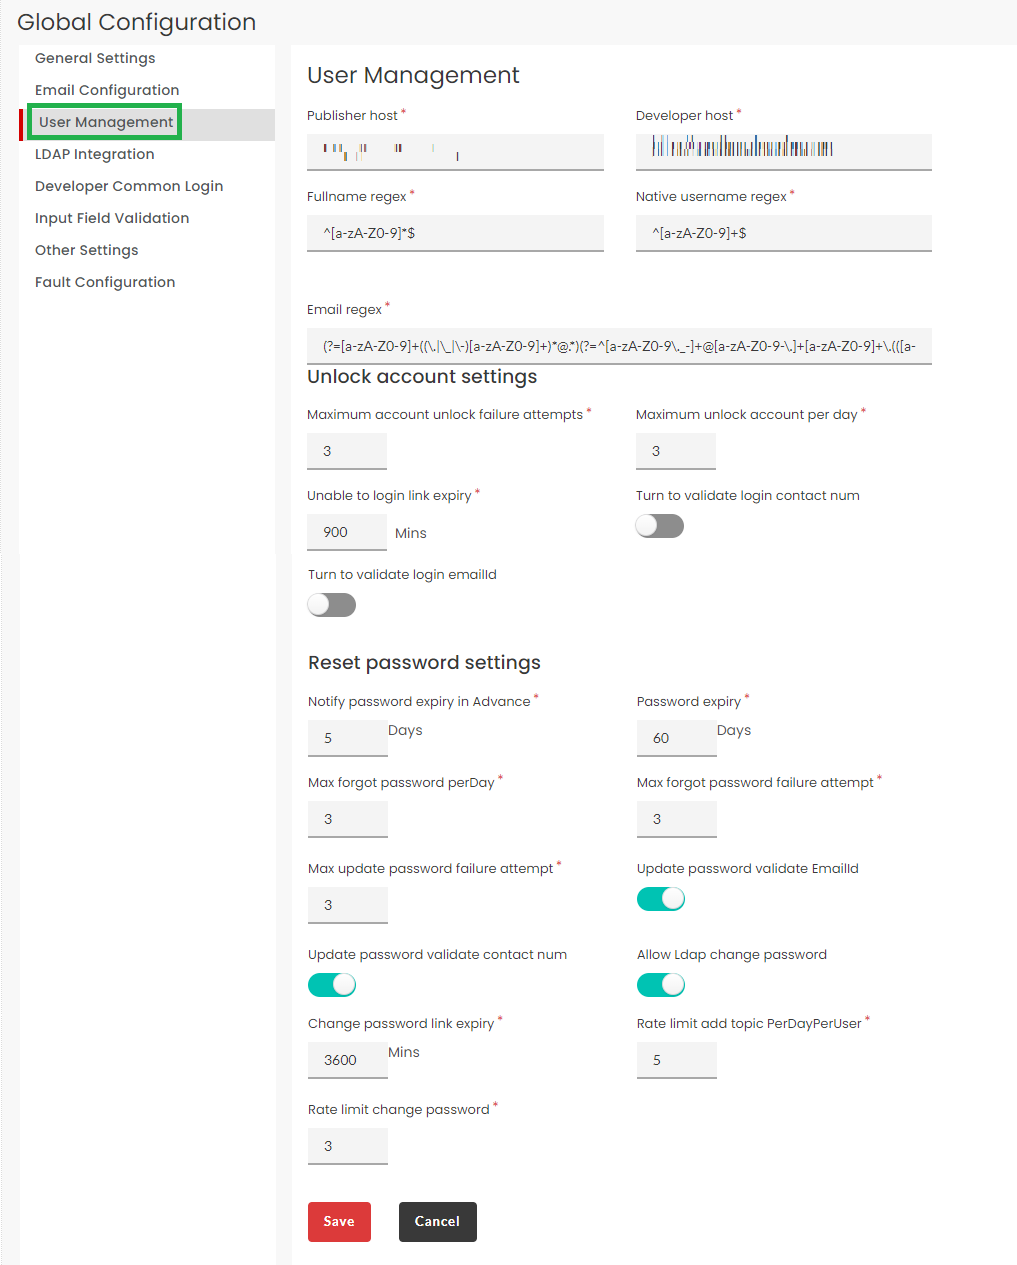
Fig. 3.571 User Management
- Under User Management section, populate the mandatory details.
- Publisher host: Enter the publisher host server name. This is the server that will send email for publisher portal.
- Developer host: Enter the developer host server name. This is the Server that will send email for developer portal.
- Fullname regex: Enter regular expressions that can be used in a full name, such as ^[A-Za-z]+$.
- Native username regex: Enter regular expressions that can be used in a native username, such as ^[A-Za-z]+$.
- Email regex: Enter regular expressions that can be used in an email , such as ^[A-Za-z]+$.
Unlock account settings
- Maximum account unlock failure attempts: Enter the maximum number of wrong attempts to unlock user’s account.
- Maximum unlock account per day: Enter the maximum number of wrong attempts within a day to unlock user’s account.
- Unable to login link expiry: Enter the time duration (in minutes) after which Unable to login link will expire.
- Turn to validate login contact num: Click this toggle button to enable login contact number validation during user’s account unlock procedure. Click the toggle again to disable this option.
- Turn to validate login emailId: Click this toggle button to enable login email id validation during user’s account unlock procedure. Click the toggle again to disable this option.
Reset password settings
- Notify password expiry in Advance: Enter the time duration (in days) prior which user will be notified before their password expires.
- Password expiry: Enter the time duration (in days) after which user’s password will expire.
- Max forgot password per Day: Enter the maximum number of wrong attempts within a day to reset user’s password.
- Max forgot password failure attempt: Enter the maximum number of wrong attempts to reset user’s password.
- Max update password failure attempt: Enter the maximum number of wrong attempts to update user’s password within an hour.
- Update password validate Email Id: Click this toggle button to enable login email id validation during user’s password reset procedure. Click the toggle again to disable this option.
- Update password validate contact num: Click this toggle button to enable login contact number validation during user’s password reset procedure. Click the toggle again to disable this option.
- Allow Ldap change password: Click this toggle button to enable to change user’s ldap password. Click the toggle again to disable this option.
- Change password link expiry: Enter the time duration (in minutes) after which Change password link will expire.
- Rate limit add topic PerDayPerUser: Enter the rate limit for the topic per day per user for developer portal.
- Rate limit change password: Enter the rate limit change password per user for developer portal.
- Click Save to save the changes.
3.31.4. LDAP Integration
LDAP integration section allows your application instance to fetch user data from your existing LDAP server in order to streamline certain administrative tasks. LDAP Configuration and LDAP server attributes are configured under this section.
Click the LDAP Integration tab to display the LDAP Integration settings screen.
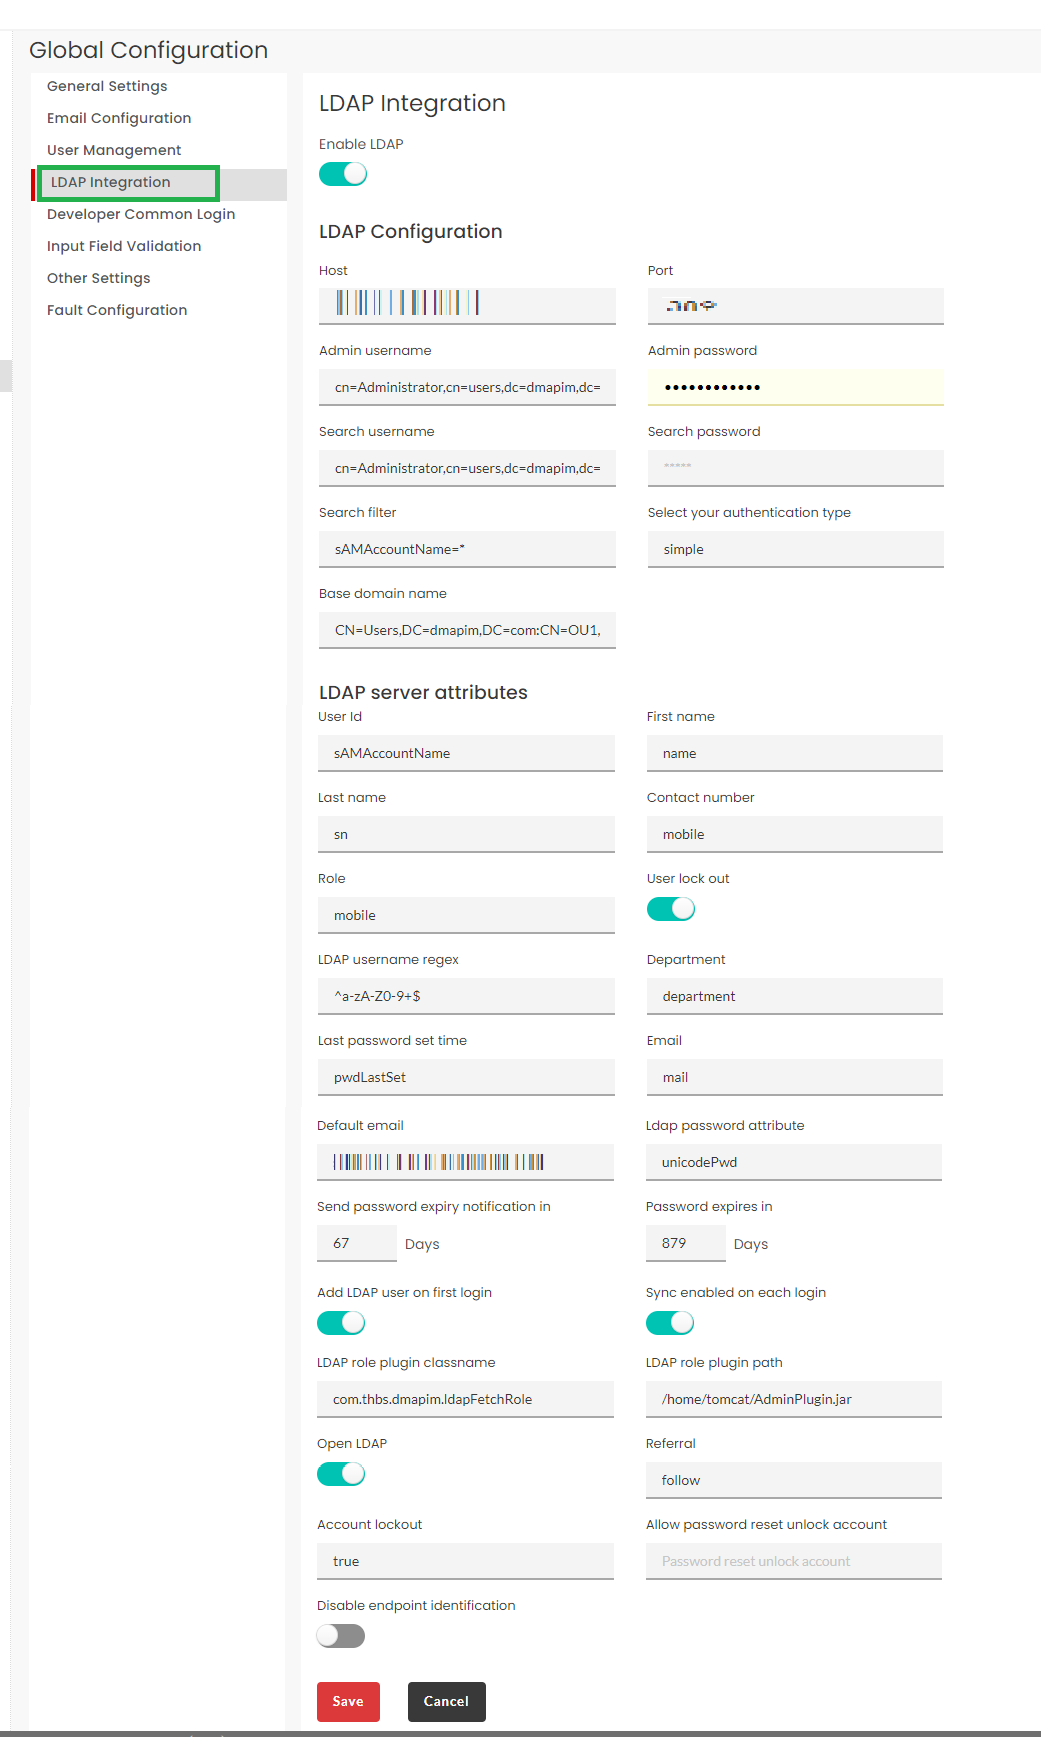
Fig. 3.572 LDAP Integration
To enable LDAP for users, click Enable LDAP toggle button. Click the toggle again to disable this option. Enabling this option will allow LDAP users to be added to the application database.
Under LDAP Configuration section, populate the mandatory details.
- Host: Enter the LDAP host server name.
- Port: Enter the port used by LDAP server.
- Admin username: Enter the username for accessing LDAP server account to update a user’s LDAP password.
- Admin password: Enter the password for accessing LDAP server account to update a user’s LDAP password.
- Search username: Enter the username to connect to the LDAP server.
- Search password: Enter the password to connect to the LDAP server.
- Search filter: Enter the key for the attribute ‘Search filter’ that will fetch user details from the LDAP server, based on the filter applied.
- Select your authentication type: Select the type of authentication required for accessing LDAP server.
- Base domain name: Enter the name of the base organization unit under which an LDAP user is registered.
LDAP server attributes
- User Id: Enter the key for the attribute ‘User Id’ that will fetch the user’s user id from the LDAP server.
- First name: Enter the key for the attribute ‘First name’ that will fetch the user’s first name from the LDAP server.
- Last name: Enter the key for the attribute ‘Last name’ that will fetch the user’s last name from the LDAP server.
- Contact number: Enter the key for the attribute ‘Contact number’ that will fetch the user’s contact number from the LDAP server.
- Role: Enter the role assigned to the user using LDAP plugin.
- User lock out: Click this toggle button to enable lock feature for LDAP user. Click the toggle again to disable this option.
- LDAP username regex: Enter regular expressions that can be used in an LDAP username attribute, such as ^[A-Za-z]+$.
- Department: Enter the key for the attribute ‘Department’ that will fetch the user’s department from the LDAP server.
- Last password set time: Enter the key for the attribute to fetch the time when the user’s LDAP password was last set.
- Email: Enter the key for the attribute ‘Email’ that will fetch the user’s email from the LDAP server.
- Default email: Enter the key for the attribute ‘Default Email’ that will fetch the user’s default email from the LDAP server.
- Password: Enter the key for the attribute ‘Password’ that will fetch the user’s password from the LDAP server.
- Send password expiry notification in: Enter the time duration (in days) prior which user will be notified before their password expires. This value should be less that
- Password expires in: Enter the time duration (in days) after which user’s password will expire.
- Add LDAP user on first login: Click this toggle button to enable to automatically add LDAP user to application database when they login to the application for the first time. Click the toggle again to disable this option.
- Sync enabled on each login: Click this toggle button to enable LDAP data to sync with application database on each login. Click the toggle again to disable this option.
- LDAP role plugin classname: Enter the class name for the LDAP role plugin.
- LDAP role plugin path: Enter the path for the LDAP role plugin.
- Open LDAP: Click this toggle button to allow users to manage data on the LDAP server. Click the toggle again to disable this option.
- Referral: Enter the reference to the LDAP request that requires a response.
- Account lockout: Enter the value to check whether the user’s account is locked or not.
- Allow password reset unlock account: Enter the value to allow a particular base organization’s users to reset password and unlock account.
- Disable endpoint identification: Click this toggle button to enable Disable endpoint identification feature for LDAP users. Click the toggle again to disable this option.
- Click Save to save the changes.
3.31.5. Developer Common Login
Having a developer common login allows users to login to Developer portal without requiring the domain details. Under the Developer Common Login section, you can customize the error messages that are displayed at the time of user login.
Click the Developer Common Login tab to display the Developer Common Login settings screen.
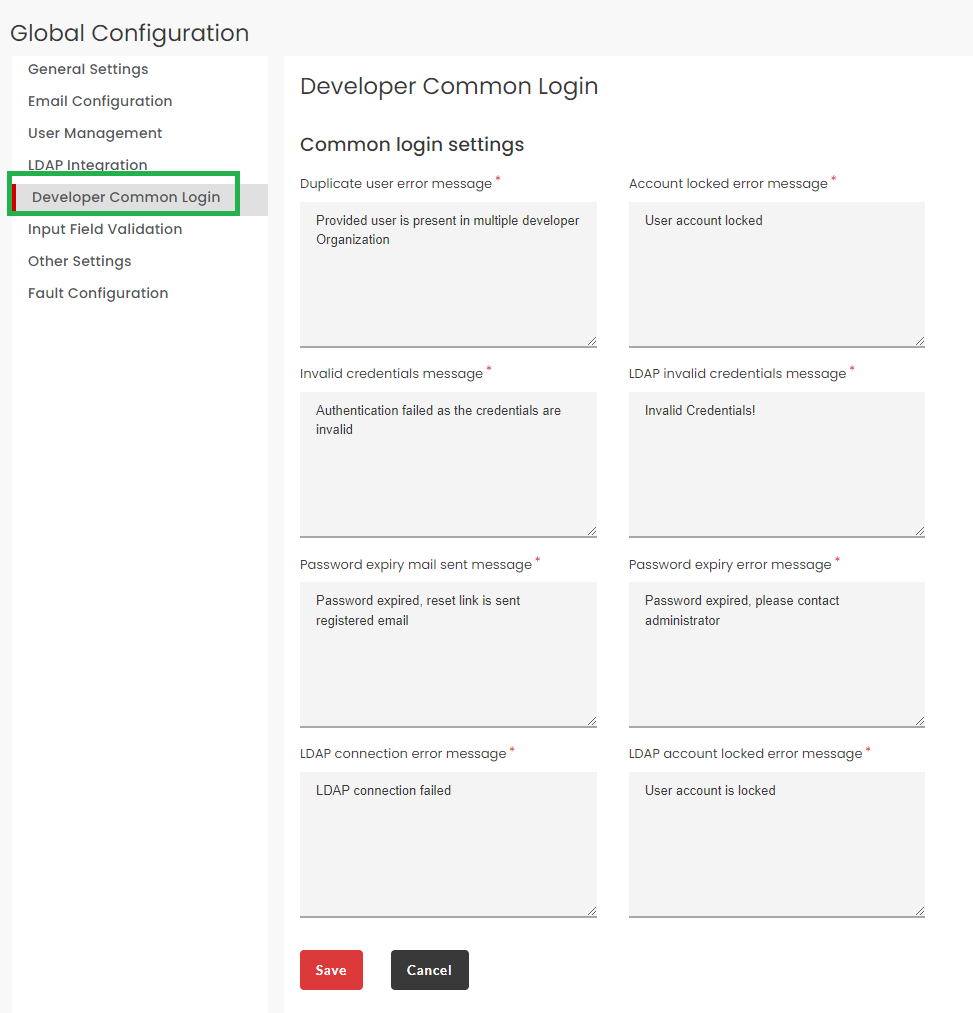
Fig. 3.573 Developer Common Login
Enter the customized messages for developer common login page for the following scenarios:
- Duplicate user error message: This error message is displayed when another user having the same username already exists.
- Account locked error message: This error message is displayed when user’s account gets locked.
- Invalid credentials message: This error message is displayed when user uses invalid credentials to login.
- LDAP invalid credentials message: This error message is displayed when LDAP user uses invalid credentials to login.
- Password expiry mail sent message: This message is displayed when password expiry link has been sent to an LDAP user’s mail id. This message is displayed only to LDAP users whose LDAP password has expired and if the Allow Ldap change password option is enabled.
- Password expiry error message: This error message is displayed when an LDAP user’s password has expired and if the Allow Ldap change password option is disabled.
- LDAP connection error message: This error message is displayed when the application is unable to connect to the LDAP server.
- LDAP account locked error message: This error message is displayed when LDAP user’s account has been locked.
- Click Save to save the changes.
3.31.6. Input Field Validation
At the time of propagation of a subscription when the user defines the type of authentication, input field validation is required. In this section you can provide the headers for authentication type while propagating a subscription.
Click the Input Field Validation tab to display the Input Field Validation screen.
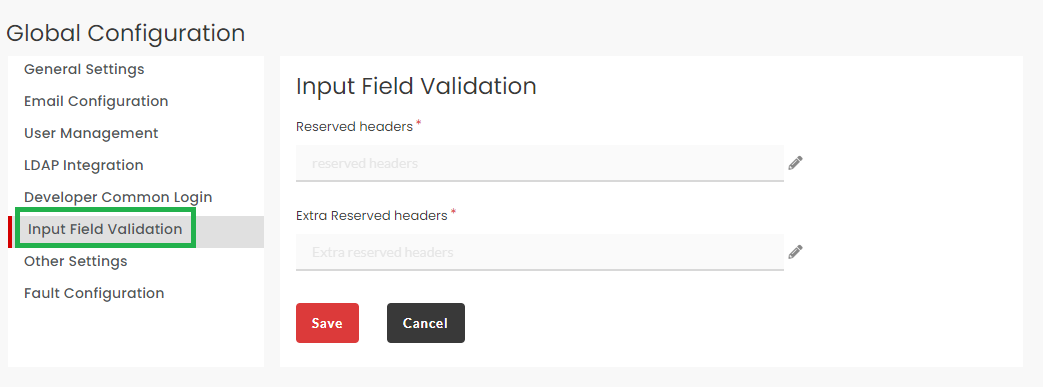
Fig. 3.574 Input Field Validation
- Click the edit icon
 to enter the Reserved headers.
 - Click the edit icon to enter the Extra Reserved headers.
- Click Save to save the changes.
3.31.7. Other Settings
Click the Other Settings tab to display the Other Settings screen.
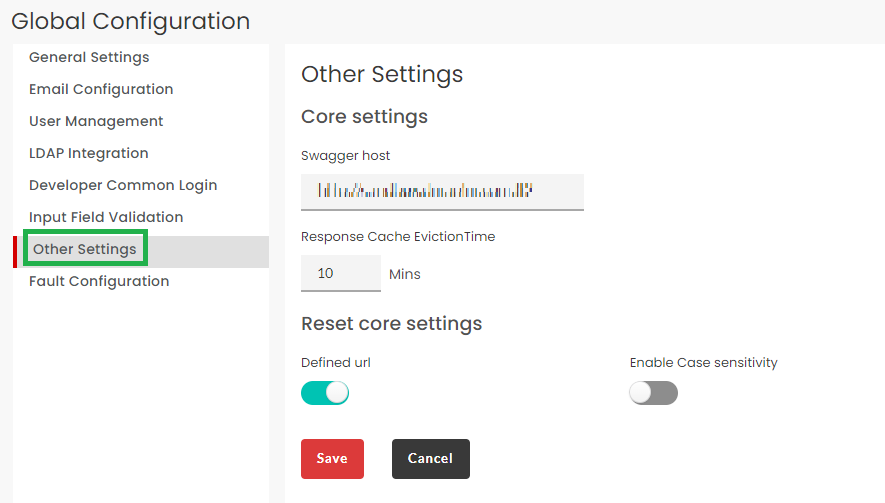
Fig. 3.575 Other Settings
Under Core Settings, enter Swagger host.
Enter the Response Cache EvictionTime. This will be the default response cache eviction time duration for newly added resources/operations at the time of API creation.
Under Core Settings, click Defined url toggle button to enable the defined url option at the time of login. Click the toggle again to disable this option.
Under Core Settings, click Enable Case sensitivity toggle button to enable case sensitivity option at the time of login. Click the toggle again to disable this option.
3.31.8. Fault Configuration
Errors or Faults can occur during the invocation of API calls. The kind of errors that the client can encounter vary from failed authentication to errors resulting from badly formed messages. Returning the error data can help client applications identify and resolve runtime errors.
DigitMarket™ API Manager allows the user to customize the fault configuration for gateway faults. A publisher organization can have the fault structure configured at a global level. This fault configuration, in turn, will be mimicked by each Gateway of the publisher organization. When you save and propagate changes in the fault configuration, the changes are made operational in each Gateway.
Note
If the organization has multiple Gateways, modifications can be made at Global Configuration. The changes will be reflected in all the Gateways present in the sub-organization if the gateway isn’t overridden. All the Gateways needs to be propagated.
In the event of an error at runtime, the Gateway returns the saved fault codes and messages to the user’s machines.
DigitMarket™ API Manager allows the user to set the fault configuration for gateway faults for REST and SOAP services at:
- Gateway Level
- Plan Level
- Resource/Operation Level
Note
Default Fault Configuration for a Publisher organization is configured at Global Level.
Gateway Level
Gateway level fault configuration can be configured at Global Level. Each and every Gateway can configure its own fault configuration. Publisher organizations having more than one Gateway can configure fault configuration at one Gateway and the same can be propagated to other Gateways. Gateway level fault configuration can be overridden at each Gateway. Gateway level scenarios be overridden only at Global level and Gateway level.
Plan Level
Plan level fault configuration can be configured at Global Level. This is applicable to all Gateways of the organization. It can be overridden at Gateway level for each Gateway, Plan level fault configuration can be configured at Global Level. This is applicable to all Gateways of the organization. It can be overridden at Gateway level for each Gateway, Plan level and at Subscription level.
Plan level Fault configuration (Fault Structure/Content-Type/Fault Message) precedence hierarchy is: Subscription level > Plan level > Gateway level
Resource Level
Resource/Operation level fault configuration can be configured at Global Level. This is applicable to all Gateways of the organization. When creating a new API version the Gateway level fault configuration will be applicable on all the resources/operations of the API, but it can be overridden at API Version level and for each API resource/operation. It can also be overridden at plan level for all/each plan(s) and at subscription level for all/each resource(s)/operation(s) of the subscription.
When adding a resource to a plan, the fault configuration from the API version resource/operation will be applicable, but it can be overridden at plan resource/operation level for all/each resource(s)/operation(s) of the plan.
Note
A Resource that is not in a plan will be of no use as this will always lead to an unauthorized request scenario.
When a subscription for a plan is created and published, the fault configuration from plan resource/operation level will be applicable for the subscription resource/operation fault configuration, but it can be overridden at subscription level for all/each resource(s)/operation(s) of the subscription.
Resource/Operation level fault configuration (Fault Structure/Content-Type/Fault Message) precedence hierarchy is: Subscription level for each resource > Subscription level for all resources > Plan level for each resource > Plan level for all resources > API Version level for each resource > API Version level for all resources > Gateway level configuration
Setting up the fault configuration in DigitMarket™ API Manager invloves configuring Fault Content Type, Fault Structure and Fault Message.
Fault Content Type
Fault content type defines the format in which the fault structure will be returned. For REST services, you can define the content type in JSON, XML and Plain Text. Fault content type can be configured at Gateway Level, Plan Level and Resource Level. If not overwritten, the default fault configuration will be sent as a response. Content type for SOAP is by default is XML, hence the fault response will be returned in XML.
Fault Content Type precedence hierarchy is: Accept header > Content-Type header > Payload type > Configured value
Fault Structure
Fault structure is the template/schema that will return the errors for various gateway faults. This fault template will be used to display the fault response. For REST services, you can define the fault template in JSON, XML and Plain Text. Fault structure can be configured at Gateway Level, Plan Level and Resource Level. If not overwritten, the default fault configuration will be sent as a response. For SOAP services, you can define the fault template only in XML.
The fault structure can be overridden at API Version level, Resource/Operation level, Plan level for all/each Resource, Subscription level for all/each Resources. The overwritten fault structures will be picked only if the Allow override has been selected under the Select Fault Template dropdown in Gateway fault configuration for each Plan level and Resource level fault scenarios.
Fault Message
Fault Messages are a list of fault scenarios with corresponding Response Codes, HTTP Codes and Fault Message Content. Based on the fault scenario and the content type you select, the appropriate fault message content will be delivered to the user’s machine. Response Code, HTTP Code and the Fault Message Content for a fault scenario are configurable for both REST and SOAP fault errors.
3.31.8.1. Setting Fault Configuration for REST APIs
You can configure the fault structure template, content type and fault messages for Gateway faults for REST APIs. You can configure a default fault configuration at Global Level, and you can overwrite that default fault configuration at Gateway level, API Version level, Plan level, Operation level and Subscription level.
To set the Default REST Fault Configuration at Global Level:
Navigate to the Global Configuration page.
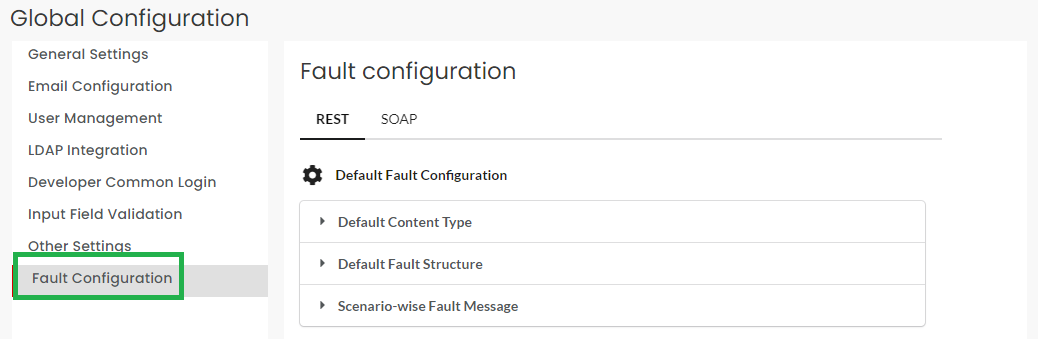
Fig. 3.576 Fault Configuration
Click the Fault Configuration tab and then click the REST sub-tab to open the Default Fault Configuration section.
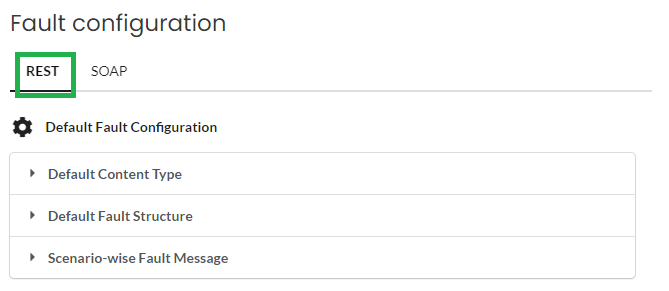
Fig. 3.577 Fault Configuration for REST
Click to expand the Default Content Type accordion tab. At Global Level, you can configure the Default Content Type for Gateway/Plan/Resource Level in JSON/XML/PlainText.
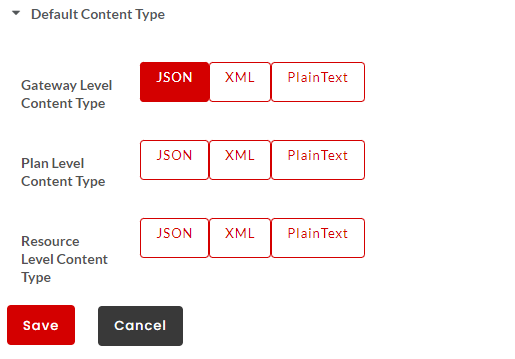
Fig. 3.578 Default Content Type
Click to select the required Content Type (JSON/XML/PlainText) option to be configured at Gateway/Plan/Resource level and click Save to save the changes.
Next, click to expand the Default Fault Structure accordion tab. At Global Level, you can configure the Default Fault Structure for Gateway/Plan/Resource Level in JSON/XML/PlainText.

Fig. 3.579 Default Fault Structure
(Optional) Edit the JSON/XML/PlainText Fault box to make any required changes to the Default Fault Structure at Gateway/Plan/Resource Level and then click Save to save the changes.
Next, click to expand the Scenario-wise Fault Message accordion tab. At Global Level, you can configure the Default Fault Message for Gateway/Plan/Resource Level in JSON/XML/PlainText.
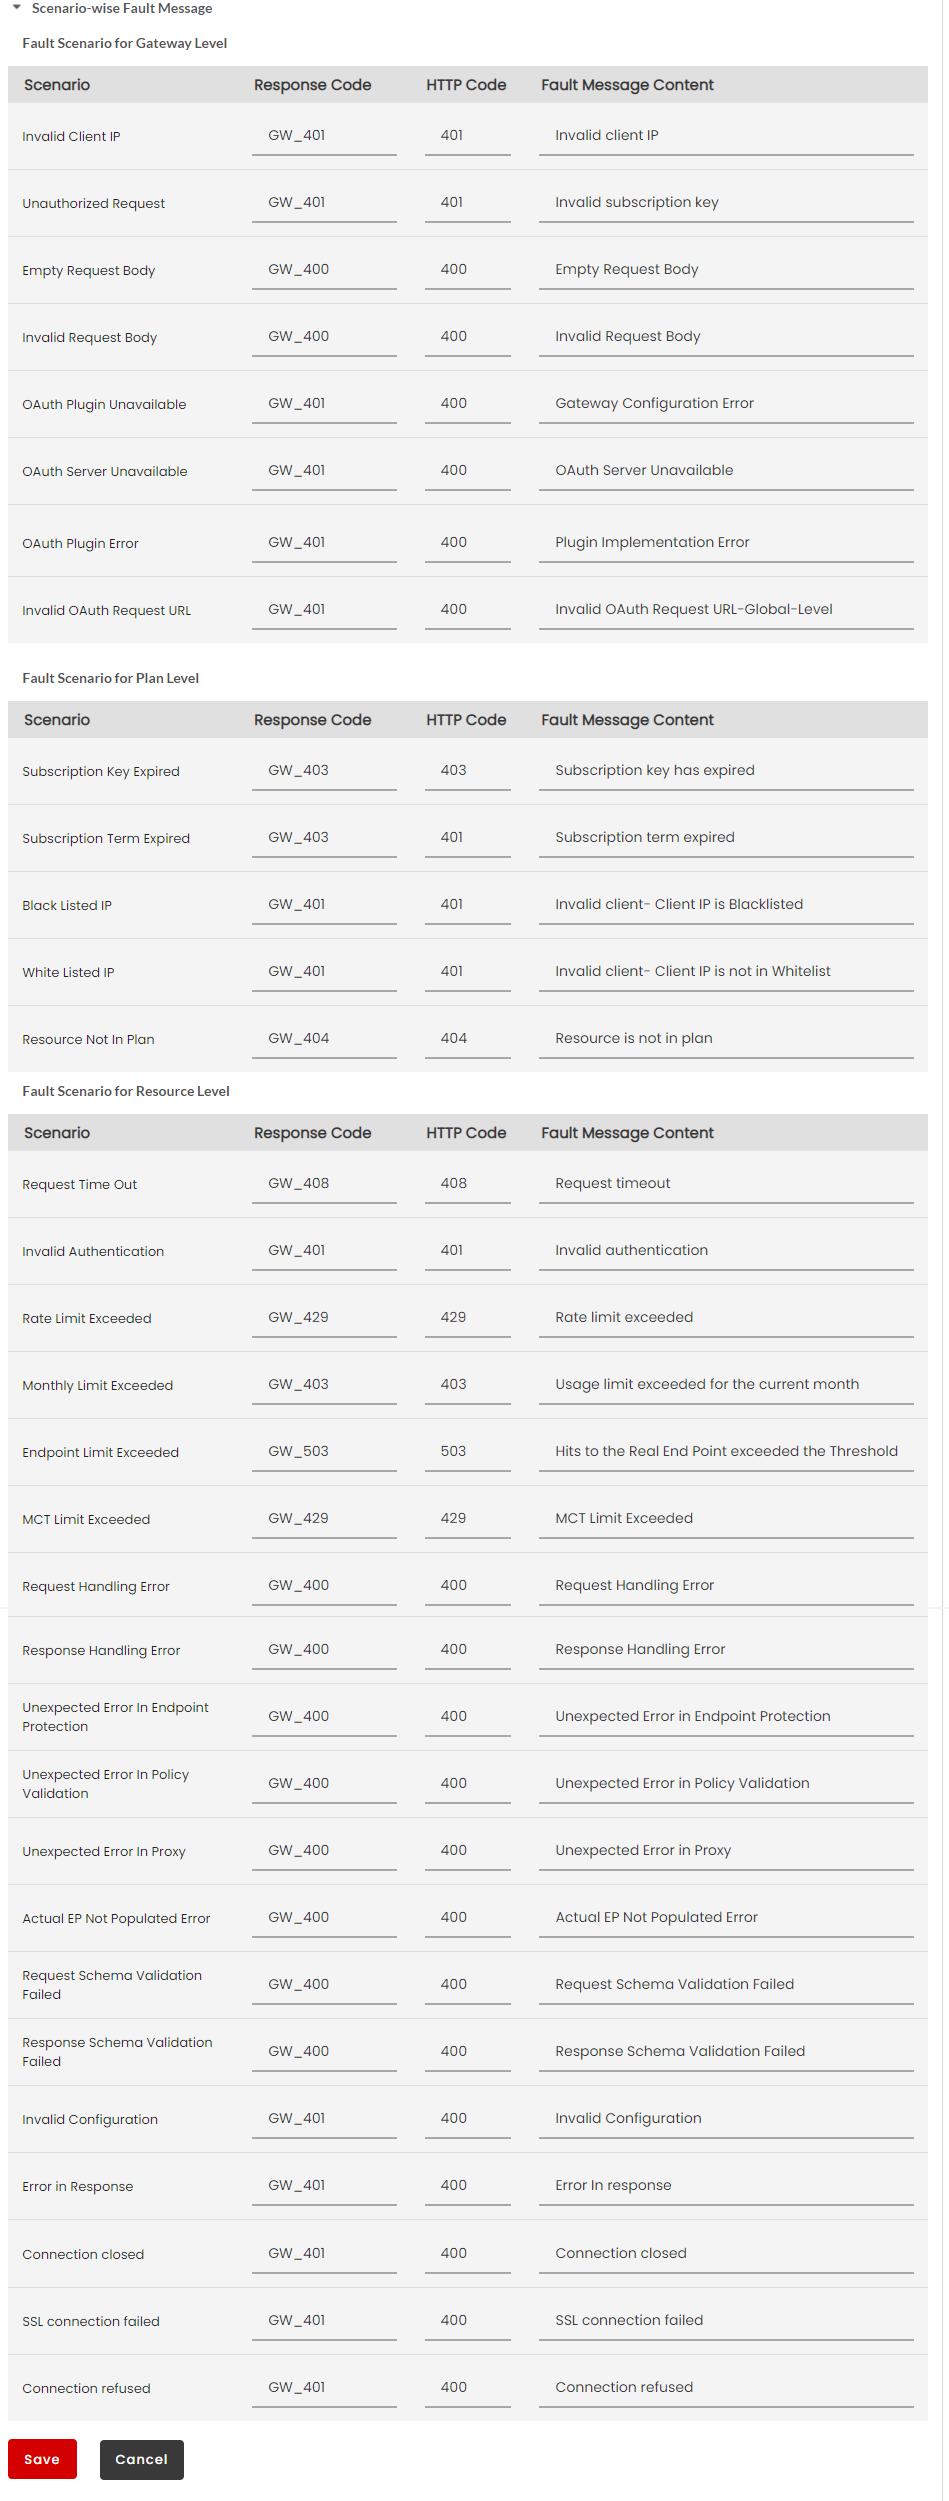
Fig. 3.580 Default Fault Message
(Optional) Click the Response Code box corresponding to the Fault scenario to type in a different fault code in the box.
(Optional) Click the HTTP Code box corresponding to the Fault scenario to type in a different HTTP code in the box.
(Optional) Click the Fault Message Content box corresponding to the Fault scenario to type in a different Fault Message in the box.
Click Save to save the changes.
Click Close to exit the Fault Configuration window.
After any changes in the Fault configuration at Gateway/Global configuration, gateway needs to be re-propagated.
To set the REST Fault Configuration at Gateway Level:
Navigate to the Gateways page.
Click the Fault Configuration
 icon and then click the REST tab to open the Gateway Fault Configuration window.
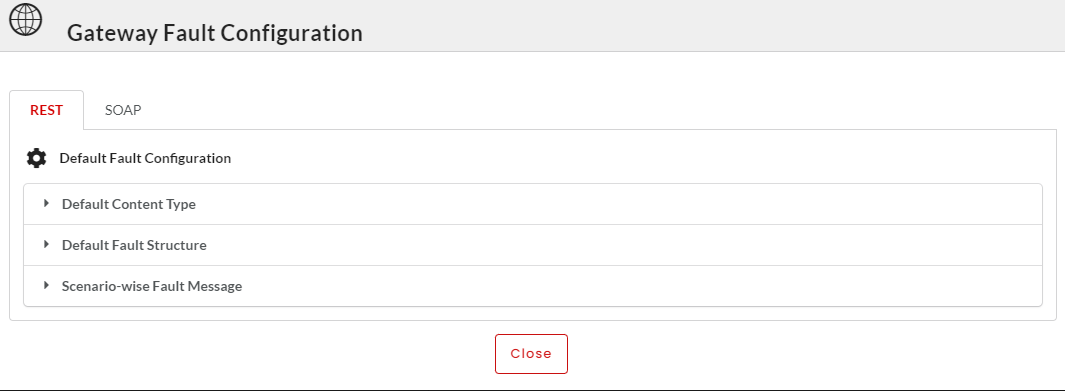
Fig. 3.581 Gateway Fault Configuration
Click to expand the Default Content Type accordion tab. At Gateway Level, you can overwrite the Gateway/Plan/Resource Level Content Type that was configured at Global level. Move the Overwrite toggler to the right to activate overwrite and do the inverse to retain the Default Content Type settings. Upon enabling Overwrite, the Content Type options for Gateway/Plan/Resource level will be enabled.
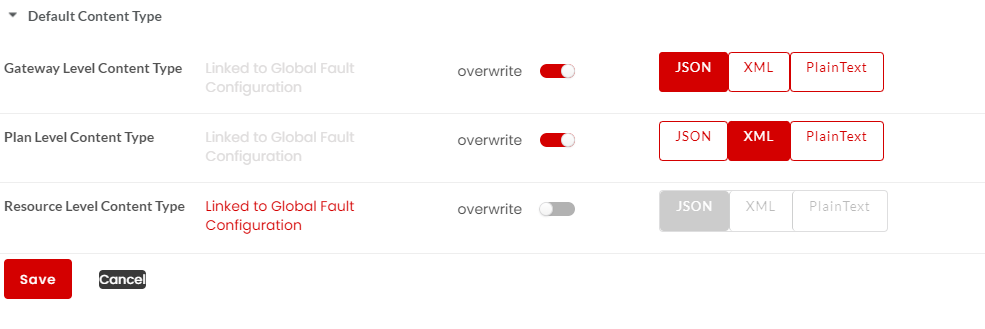
Fig. 3.582 Gateway Content Type
Click the required Content Type (JSON/XML/PlainText) option to select to be configured at Gateway/Plan/Resource Level and then click Save.
Next, click to expand the Fault Structure accordion tab. At Gateway Level, you can overwrite the Gateway/Plan/Resource Level Fault Structure that was configured at Global level. Move the Overwrite toggler to the right to activate overwrite and do the inverse to retain the Default Fault Structure settings. Upon enabling Overwrite, the Fault Structure options for Gateway/Plan/Resource level will be enabled.
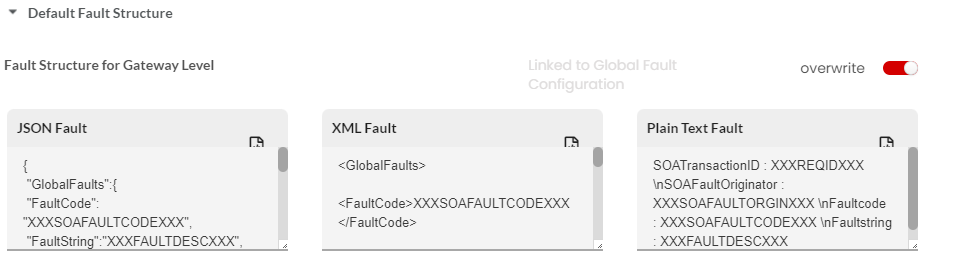
Fig. 3.583 Gateway Fault Structure
(Optional) Edit the JSON/XML/PlainText Fault box to make any required changes to the Fault template at Gateway/Plan/Resource Level and then click Save to save the changes.
Next, click to expand the Scenario-wise Fault Message accordion tab. At Gateway Level, you can overwrite the Gateway/Plan/Resource Level Fault Message that was configured at Global level. Move the Overwrite toggler to the right to activate overwrite and do the inverse to retain the default Fault Message settings. Upon enabling Overwrite, the Fault Message options for Gateway/Plan/Resource level will be enabled.
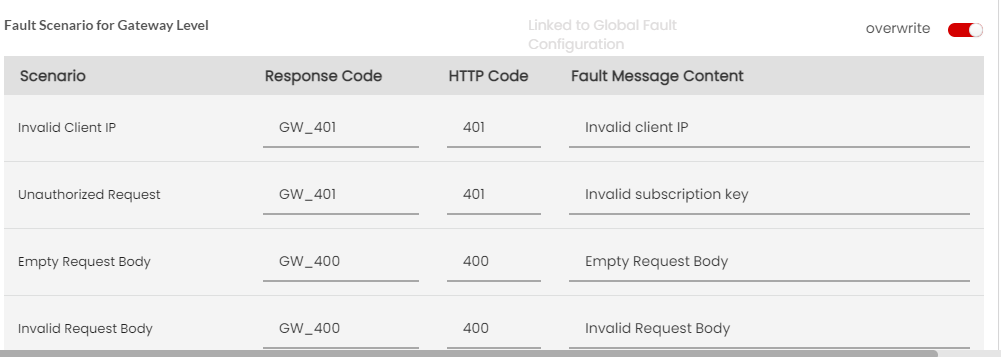
Fig. 3.584 Scenario-wise Fault Message
(Optional) Click the Response Code box corresponding to the Fault scenario to type in a different fault code in the box.
(Optional) Click the HTTP Code box corresponding to the Fault scenario to type in a different HTTP code in the box.
(Optional) Click the Fault Message Content box corresponding to the Fault scenario to type in a different Fault Message in the box.
Click Save. This will overwrite the default Fault Message settings.
Click Close to exit the Fault Configuration window.
After any changes in the Fault configuration at Gateway/Global configuration, gateway needs to be re-propagated.
To set the REST Fault Configuration at API Version Level:
Navigate to the REST API Configuration page.
Click Advanced tab and then click REST Fault Configuration tab.
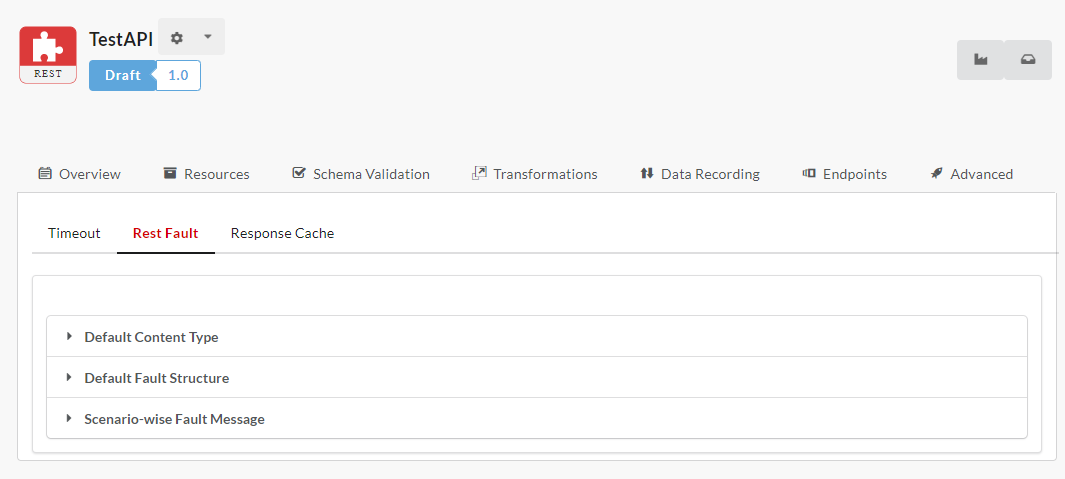
Fig. 3.585 REST Fault Configuration
Click to expand the Default Content Type accordion tab. You can overwrite the configured Content Type at API Version Level and for each Resource. Move the Overwrite toggler to the right to activate overwrite and do the inverse to retain the default Content Type settings. Upon enabling Overwrite, the Content Type options at Version Level and for each Resource will be enabled.
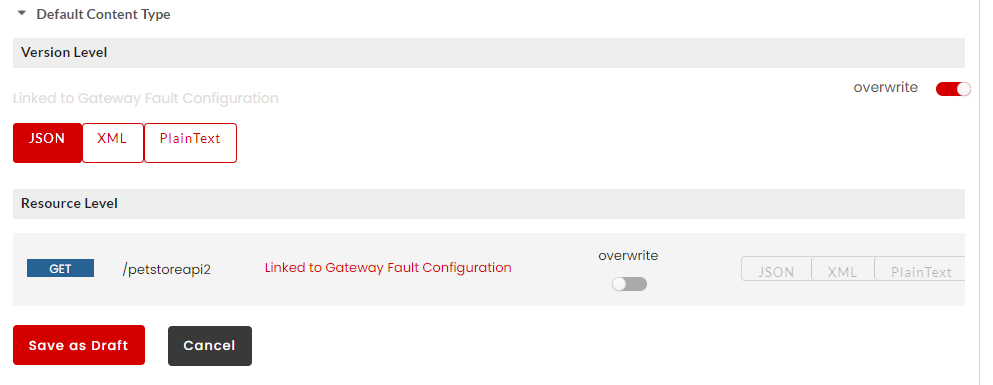
Fig. 3.586 Default Content Type
Click to select the required Content Type (JSON/XML/PlainText) option to be configured at API Version Level and for each Resource and then click Save. This will overwrite the Default Content Type settings.
Next, click to expand the Fault Structure accordion tab. You can overwrite the configured Fault Structure at API Version Level and for each Resource. Move the Overwrite toggler to the right to activate overwrite and do the inverse to retain the default Fault Structure settings. Upon enabling Overwrite, the Fault Structure options at Version Level and for each Resource will be enabled.
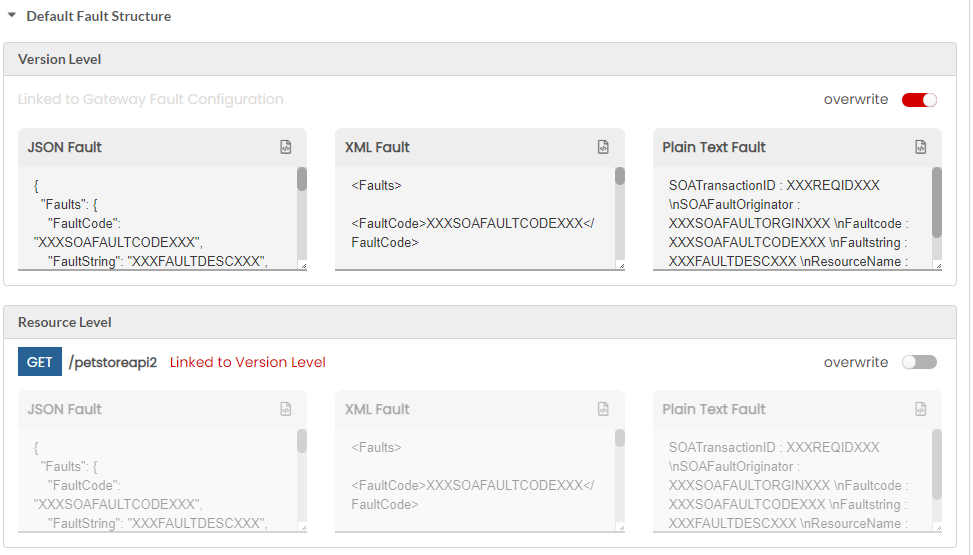
Fig. 3.587 Fault Structure
(Optional) Edit the JSON/XML/PlainText Fault box to make any required changes to the Fault template at API Version Level and for each Resource and then click Save to save the changes.
Next, click to expand the Scenario-wise Fault Message accordion tab. You can overwrite the configured Fault Message at API Version Level and for each Resource. Move the Overwrite toggler to the right to activate overwrite and do the inverse to retain the default Fault Message settings. Upon enabling Overwrite, the Fault Message options at Version Level and for each Resource will be enabled.
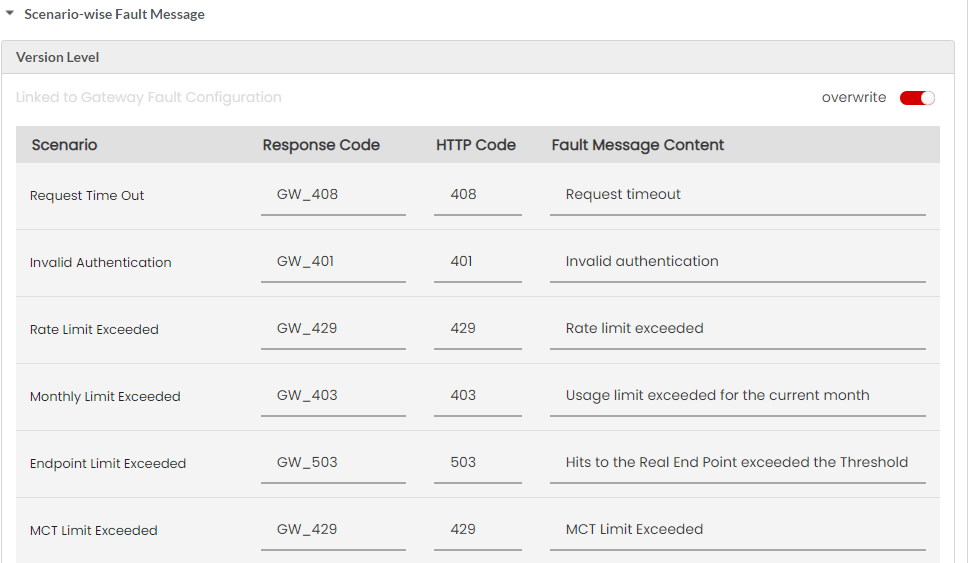
Fig. 3.588 Fault Message
(Optional) Click the Response Code box corresponding to the Fault scenario to type in a different fault code in the box.
(Optional) Click the HTTP Code box corresponding to the Fault scenario to type in a different HTTP code in the box.
(Optional) Click the Fault Message Content box corresponding to the Fault scenario to type in a different Fault Message in the box.
Click Save. This will overwrite the default Fault Message settings.
Click Close to exit the Fault Configuration window.
To set the REST Fault Configuration at Plan Level:
Navigate to the REST API Configuration page.
Click Usage Plans tab and then click the Plan Name.
Fig. 3.589 Fault Configuration
Note
Fault configuration can be set only for Plans in Draft state.
Click Fault Configuration accordion tab and then click Content Type. You can overwrite the configured Content Type at Plan level and for all/individual Resources. Move the Overwrite toggler to the right to activate overwrite and do the inverse to retain the default Content Type settings. Upon enabling Overwrite, the Content Type options at Plan Level and for all/individual Resources will be enabled.
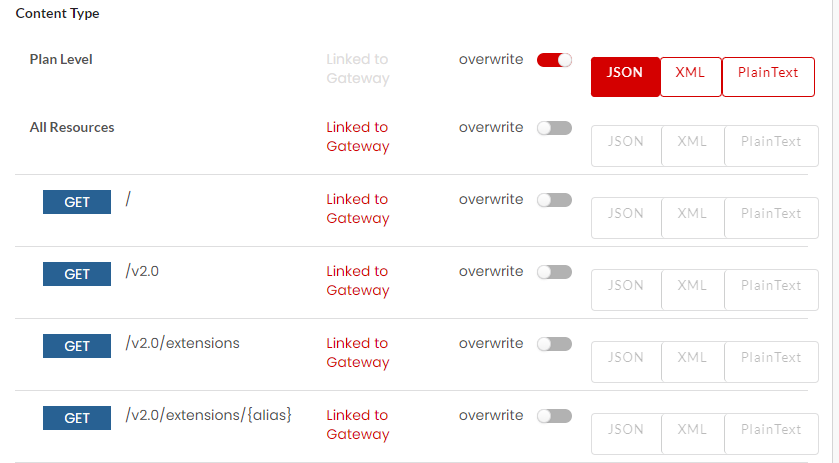
Fig. 3.590 Content Type
Click to select the required Content Type (JSON/XML/PlainText) option to be configured at Plan Level and for each all/individual Resources and then click Save as Draft. This will overwrite the default Content Type settings.
Next, click Fault Structure accordian tab. You can overwrite the configured Fault Structure at Plan level and for all/individual Resources. Move the Overwrite toggler to the right to activate overwrite and do the inverse to retain the default Fault Structure settings. Upon enabling Overwrite, the Fault Structure options at Plan Level and for all/individual Resources will be enabled.
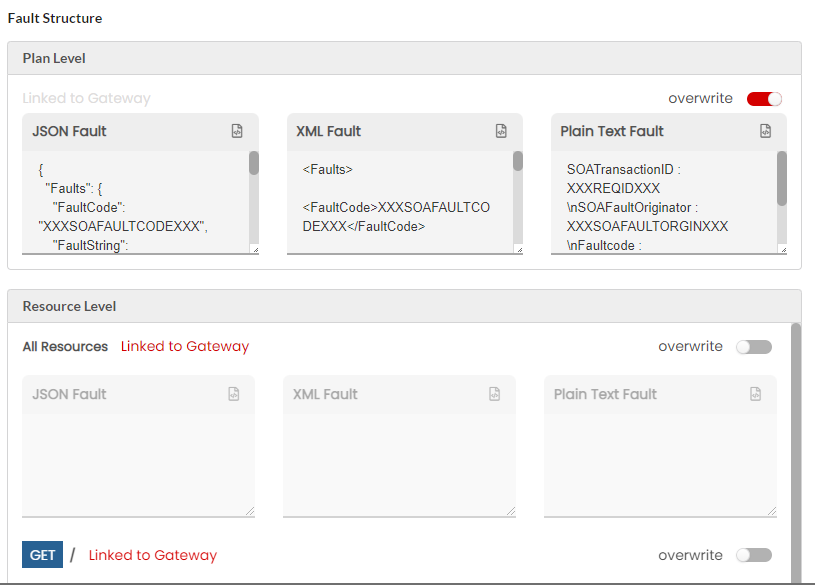
Fig. 3.591 Fault Structure
(Optional) Edit the JSON/XML/PlainText Fault box to make any required changes to the Fault template at Plan Level and for all/individual Resources and then click Save as Draft to save the changes.
Next, click Scenario-wise Fault Message. You can overwrite the configured Fault Message at Plan Level and for all/individual Resources. Move the Overwrite toggler to the right to activate overwrite and do the inverse to retain the default Fault Message settings. Upon enabling Overwrite, the Fault Message options at Plan Level and for all/individual resources will be enabled.
Note
If Fault Configuration is overwritten for All Resources of a Plan, then the fault configuration of All Resources will be applicable for each Resource.
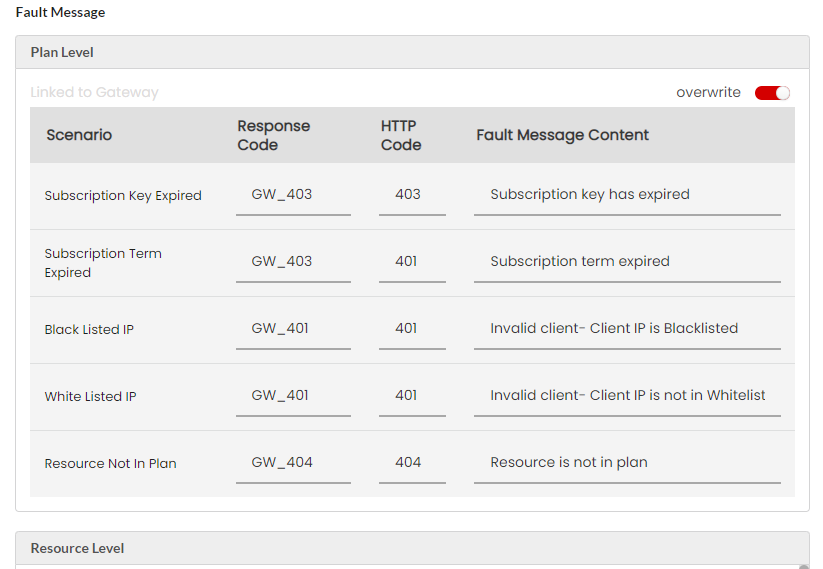
Fig. 3.592 Fault Message
(Optional) Click the Response Code box corresponding to the Fault scenario to type in a different fault code in the box.
(Optional) Click the HTTP Code box corresponding to the Fault scenario to type in a different HTTP code in the box.
(Optional) Click the Fault Message Content box corresponding to the Fault scenario to type in a different Fault Message in the box.
Click Save as Draft. This will overwrite the default Fault Message settings.
To set the REST Fault Configuration at Subscription Level:
Navigate to the Subscriptions page.
Click on a REST pack to select it and then click Settings sub-tab.
Scroll down to the Fault Configuration section.
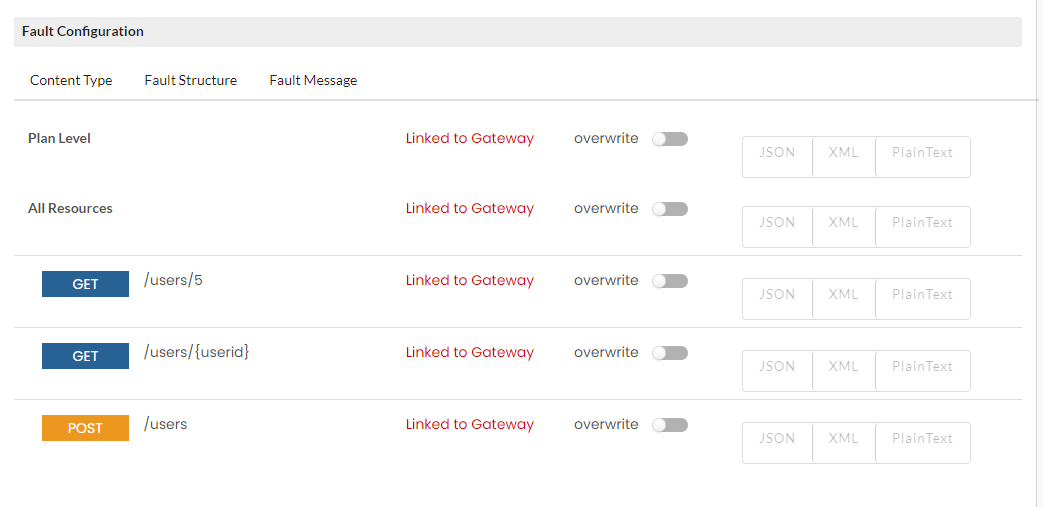
Fig. 3.593 Fault Configuration
Note
Fault configuration can be set only for active subscriptions.
Under Fault Configuration section, click Content Type tab. You can overwrite the configured Content Type at Plan Level and for all/individual Resources. Move the Overwrite toggler to the right to activate overwrite and do the inverse to retain the default Content Type settings. Upon enabling Overwrite, the Content Type options at Plan Level and for all/individual Resources will be enabled.
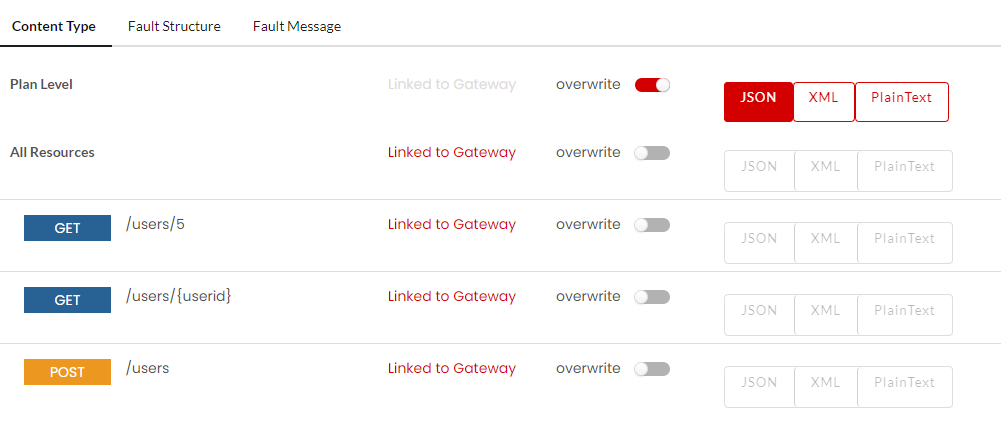
Fig. 3.594 Content Type
Click to select the required Content Type JSON/XML/PlainText to be configured at Plan Level and for each all/individual Resources and then click Submit. This will overwrite the default Content Type settings.
Next, click Fault Structure tab. You can overwrite the configured Fault Structure at Plan level and for all/individual Resources. Move the Overwrite toggler to the right to activate overwrite and do the inverse to retain the default Fault Structure settings. Upon enabling Overwrite, the Fault Structure options at Plan Level and for all/individual Resources will be enabled.
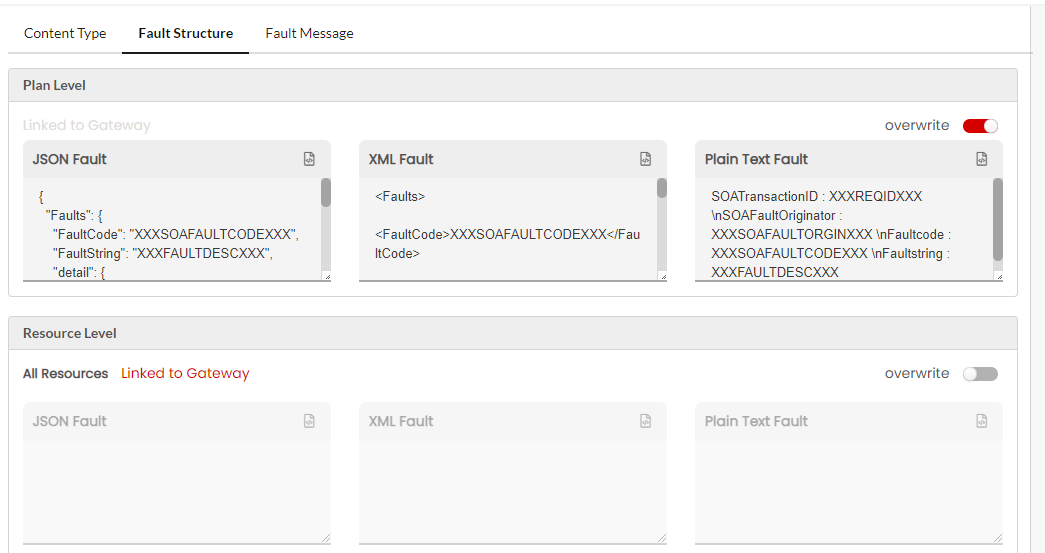
Fig. 3.595 Fault Structure
(Optional) Edit the JSON/XML/Plain Text Fault box to make any required changes to the Fault template at Plan level and for all/individual resources and then click Submit to save the changes.
Next, click Fault Message. You can overwrite the configured Fault Message at Plan level and for all/individual resources. Move the toggler to the right to activate overwrite and do the inverse to retain the default Fault Message settings. Upon enabling Overwrite, the Fault Message options at Plan Level and for all/individual Resources will be enabled.
Note
If Fault Configuration is overwritten for All Resources of a Subscription, then the fault configuration of All Resources will be applicable for each Resource.
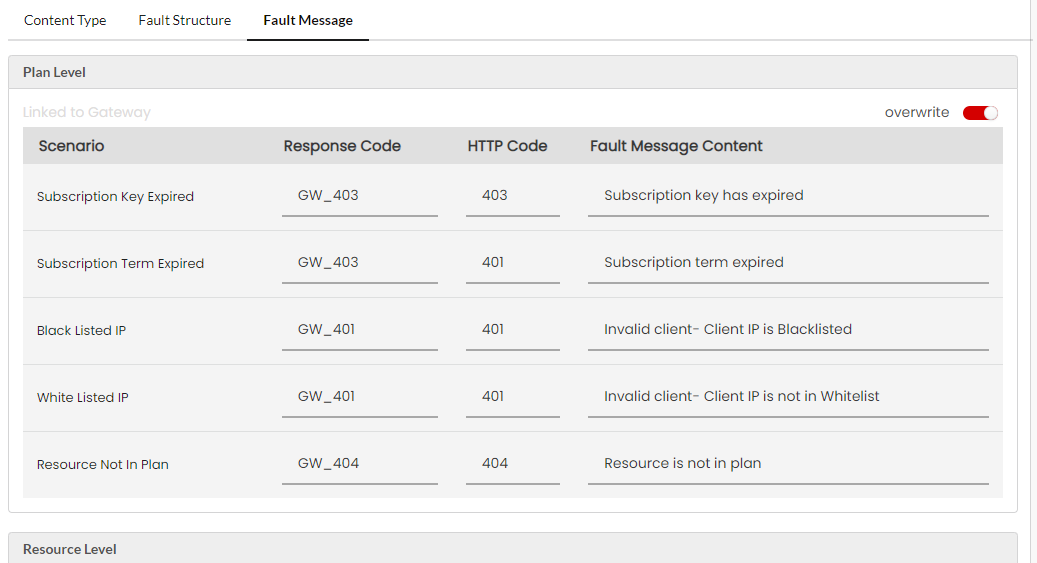
Fig. 3.596 Fault Message
(Optional) Click the Response Code box corresponding to the Fault scenario to type in a different fault code in the box.
(Optional) Click the HTTP Code box corresponding to the Fault scenario to type in a different HTTP code in the box.
(Optional) Click the Fault Message Content box corresponding to the Fault scenario to type in a different Fault Message in the box.
Click Submit. This will overwrite the default Fault Message settings.
3.31.8.2. Setting Fault Configuration for SOAP APIs
DMAPIM allows the user to configure the fault structure template and fault messages for gateway faults for SOAP APIs. You can configure a default fault configuration at Global Level, and you can overwrite that default fault configuration at Gateway level, API Version level, Plan level, Operation level and Subscription level.
To set the Default SOAP Fault Configuration at Global Level:
Navigate to the Global Configuration page.
Fig. 3.597 Fault Configuration
Click the Fault Configuration tab and then click the SOAP sub-tab to open the Default Fault Configuration section.
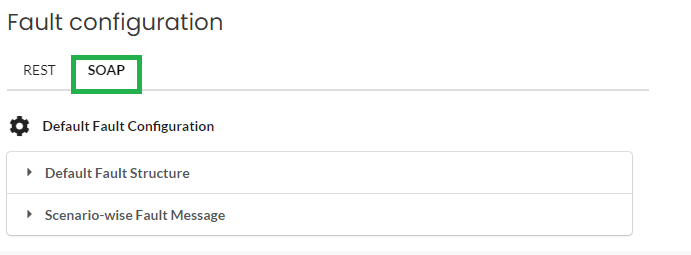
Fig. 3.598 Default Fault Configuration
Click to expand the Default Fault Structure accordion tab. At Global Level, you can configure the Default Fault Structure for Gateway/Plan/Resource Level in XML.
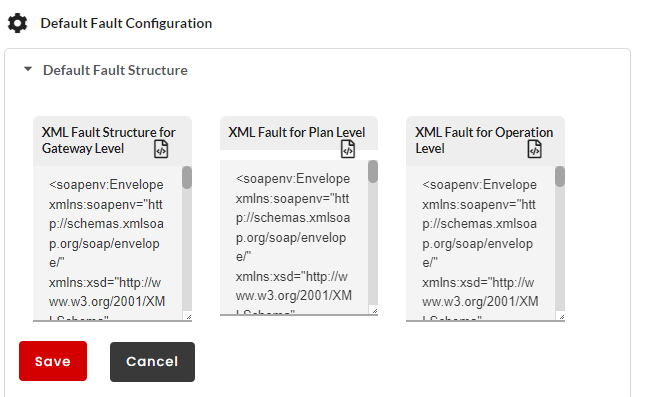
Fig. 3.599 Default Fault Structure
(Optional) Edit the XML Fault box to make any required changes to the Default Fault Structure at Gateway/Plan/Resource Level and then click Save to save the changes.
Next, click to expand the Default Scenario-wise Fault Message accordion tab. At Global Level, you can configure the Default Fault Message for Gateway/Plan/Resource Level in XML.
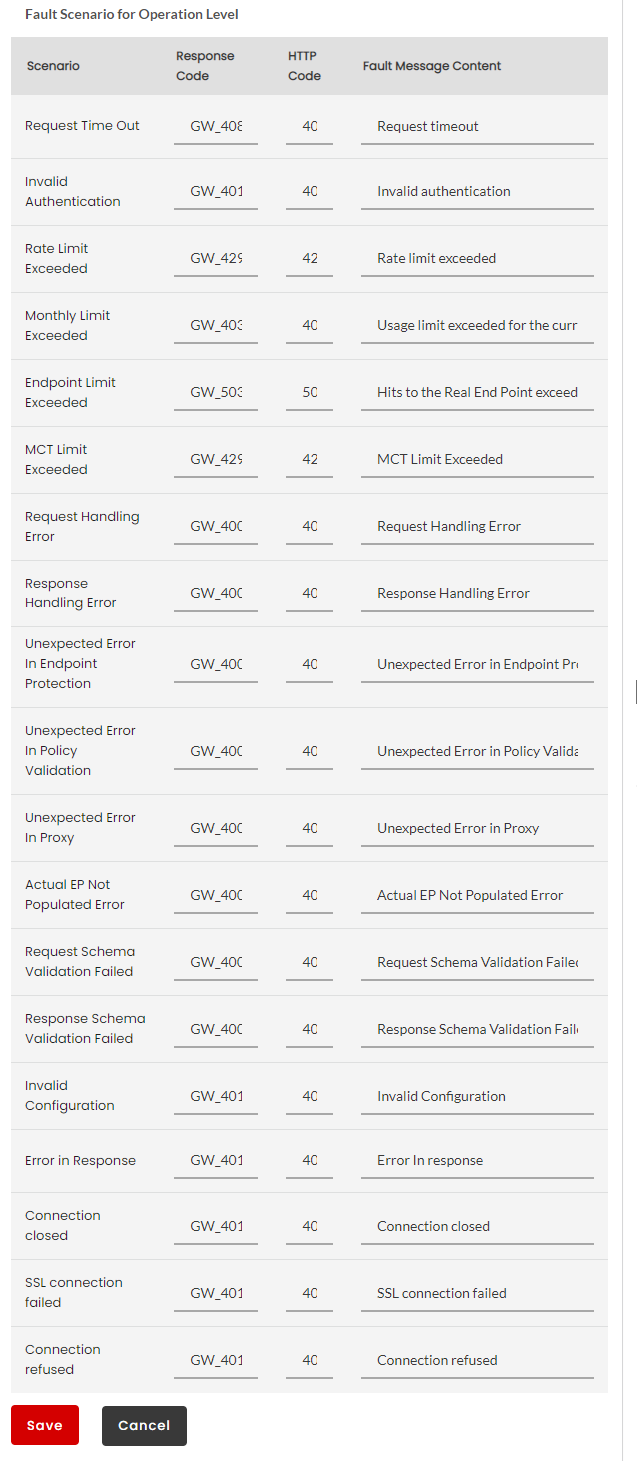
Fig. 3.600 Enable/disable approvals
(Optional) Click the Response Code box corresponding to the Fault scenario to type in a different fault code in the box.
(Optional) Click the HTTP Code box corresponding to the Fault scenario to type in a different HTTP code in the box.
(Optional) Click the Fault Message Content box corresponding to the Fault scenario to type in a different Fault Message in the box.
Click Save to save the changes.
If user updates fault configuration (Content type/Fault structure /fault message) at any level or at for any artifact then the respective artifact needs to be repropagted.
To set the SOAP Fault Configuration at Gateway Level:
Navigate to the Gateways page.
Click the Fault Configuration
icon and then click the SOAP tab to open the Gateway Fault Configuration window.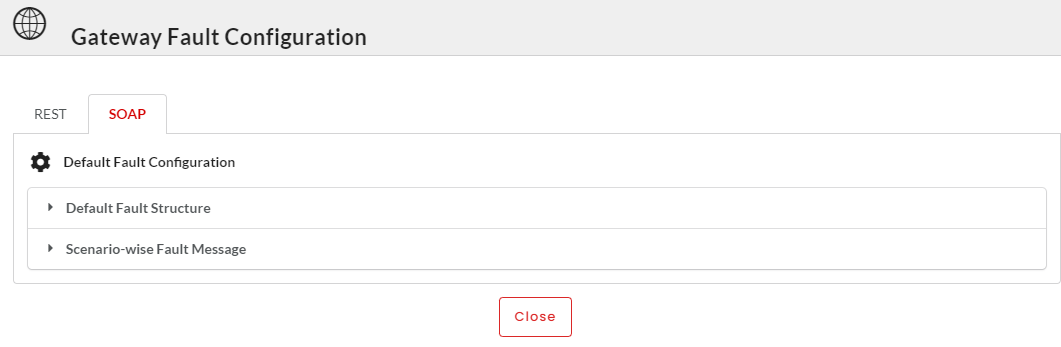
Fig. 3.601 Fault Configuration
Click to expand the Fault Structure accordion tab. At Gateway level, you can overwrite the Gateway/Plan/Operation level Fault Structure that was configured at Global level. Move the Overwrite toggler to the right to activate overwrite and do the inverse to retain the Default Fault Structure settings. Upon enabling Overwrite, the Fault Structure options for Gateway/Plan/Operation level will be enabled.
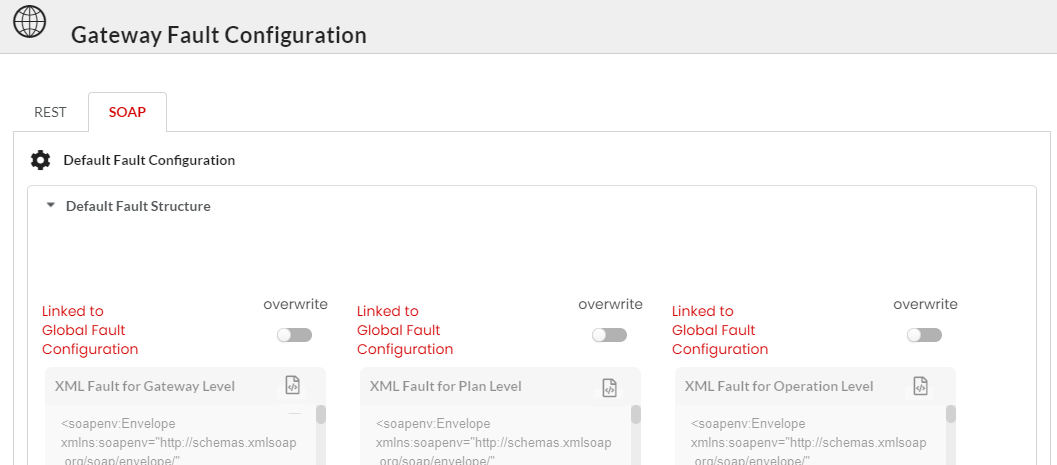
Fig. 3.602 Fault Structure
(Optional) Edit the XML Fault box to make any required changes to the Fault template at Gateway/Plan/Operation Level and then click Save to save the changes.
Next, click to expand the Scenario-wise Fault Message accordion tab. At Gateway level, you can overwrite the Gateway/Plan/Operation level Fault Message that was configured at Global level. Move the toggler to the right to activate Overwrite and do the inverse to retain the Default Fault Message settings. Upon enabling Overwrite, the Fault Message options for Gateway/Plan/Operation level will be enabled.
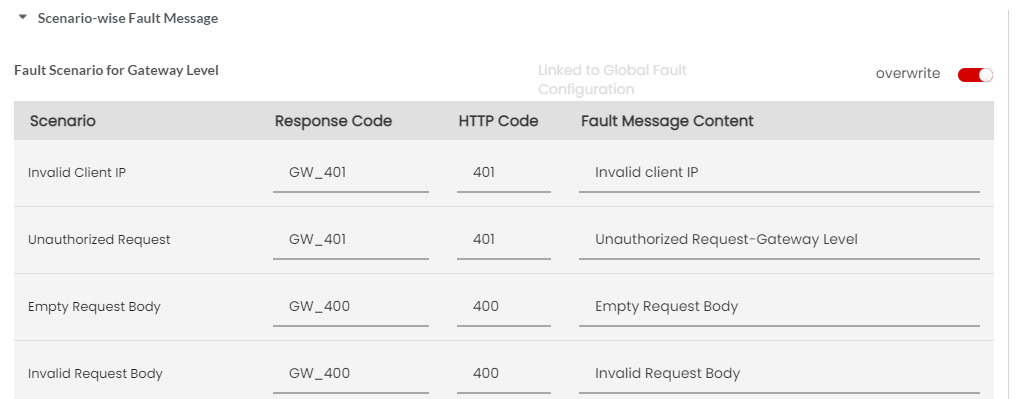
Fig. 3.603 Fault Message
(Optional) Click the Response Code box corresponding to the Fault scenario to type in a different fault code in the box.
(Optional) Click the HTTP Code box corresponding to the Fault scenario to type in a different HTTP code in the box.
(Optional) Click the Fault Message Content box corresponding to the Fault scenario to type in a different Fault Message in the box.
Click Save. This will overwrite the default Fault Message settings.
Click Close to exit the Fault Configuration window.
To set the SOAP Fault Configuration at API Version Level
Navigate to the SOAP API Configuration page.
Click Advanced tab and then click SOAP Fault Configuration tab.
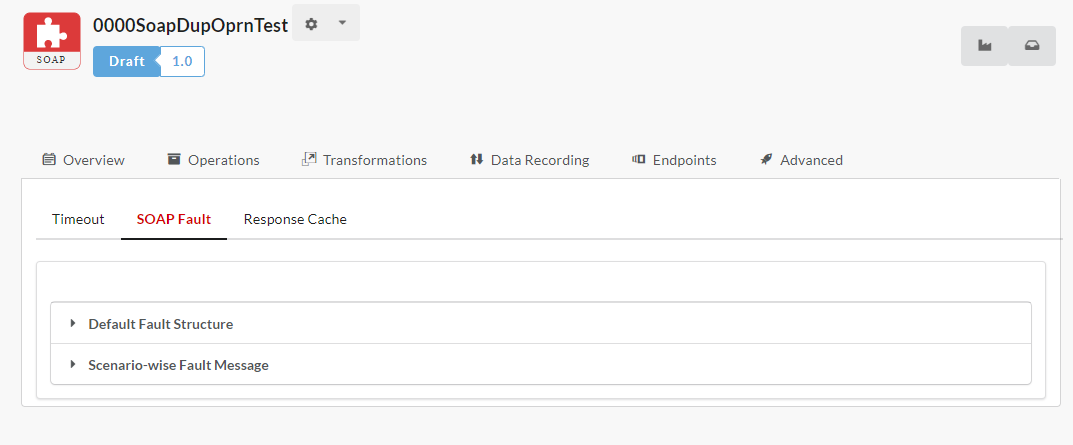
Fig. 3.604 SOAP Fault Configuration
Click to expand the Fault Structure accordion tab. You can overwrite the configured Fault Structure at Version level and for each Operation. Move the Overwrite toggler to the right to activate overwrite and do the inverse to retain the default Fault Structure settings. Upon enabling Overwrite, the Fault Structure options at Version level and for each Operation will be enabled.
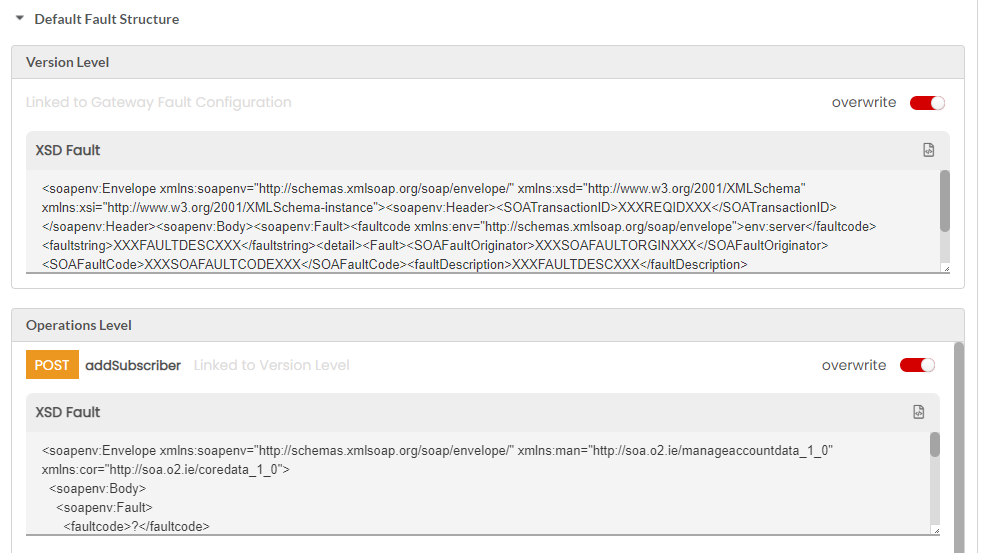
Fig. 3.605 Fault Structure
(Optional) Edit the XML Fault box to make any required changes to the Fault template at API Version Level and for each Operation and then click Save as Draft to save the changes.
Next, click to expand the Scenario-wise Fault Message accordion tab. You can overwrite the configured Fault Message at Version level and for each Operation. Move the Overwrite toggler to the right to activate overwrite and do the inverse to retain the Default Fault Message settings. Upon enabling Overwrite, the Fault Message options at Version Level and for each Operation will be enabled.
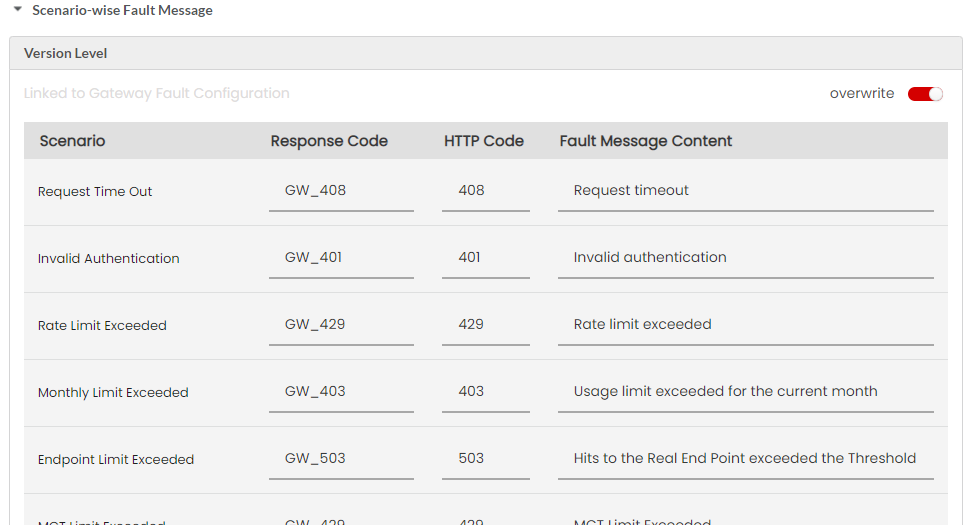
Fig. 3.606 Fault Message
(Optional) Click the Response Code box corresponding to the Fault scenario to type in a different fault code in the box.
(Optional) Click the HTTP Code box corresponding to the Fault scenario to type in a different HTTP code in the box.
(Optional) Click the Fault Message Content box corresponding to the Fault scenario to type in a different Fault Message in the box.
Click Save as Draft. This will overwrite the Default Fault Message settings.
To set the SOAP Fault Configuration at Plan Level:
Navigate to the SOAP API Configuration page.
Click Usage Plans tab and then click the Plan Name.
Fig. 3.607 Usage Plan
Note
Fault configuration can be set only for Plans in Draft state.
Click Fault Config accordion tab and then click Fault Structure. You can overwrite the configured Fault Structure at Plan level and for all/individual Operations. Move the Overwrite toggler to the right to activate overwrite and do the inverse to retain the Default Fault Structure settings. Upon enabling Overwrite, the Fault Structure options for Plan and for all/individual Operations will be enabled.
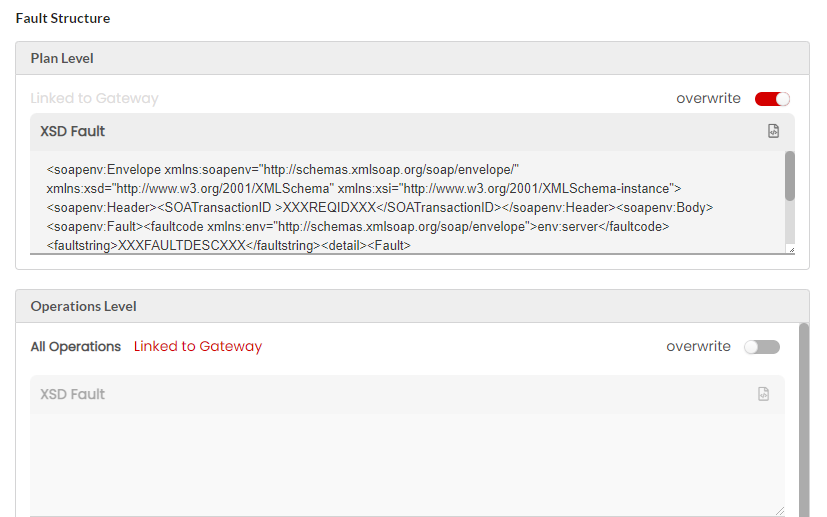
Fig. 3.608 Fault Structure
(Optional) Edit the XML Fault box to make any required changes to the Fault template at Plan level and for all/individual Operations and then click Save as Draft to save the changes.
Next, click Scenario-wise Fault Message. You can overwrite the configured Fault Message at Plan level and for all/individual Operations. Move the Overwrite toggler to the right to activate overwrite and do the inverse to retain the default Fault Message settings. Upon enabling Overwrite, the Fault Message options at Plan level and for all/individual Operations will be enabled.
Note
If Fault Configuration is overwritten for All Operations of a Plan, then the fault configuration of All Operations will be applicable on each Operation.
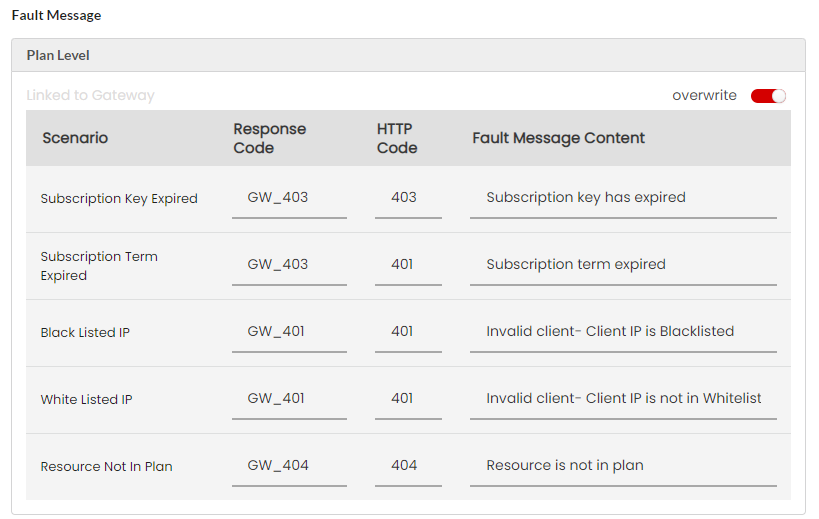
Fig. 3.609 Fault Message
(Optional) Click the Response Code box corresponding to the Fault scenario to type in a different fault code in the box.
(Optional) Click the HTTP Code box corresponding to the Fault scenario to type in a different HTTP code in the box.
(Optional) Click the Fault Message Content box corresponding to the Fault scenario to type in a different Fault Message in the box.
Click Save as Draft. This will overwrite the default Fault Message settings.
To set the SOAP Fault Configuration at Subscription Level:
Navigate to the Subscriptions page.
Click on a SOAP pack to select it and then click Settings sub-tab.
Scroll down to the Fault Configuration section.
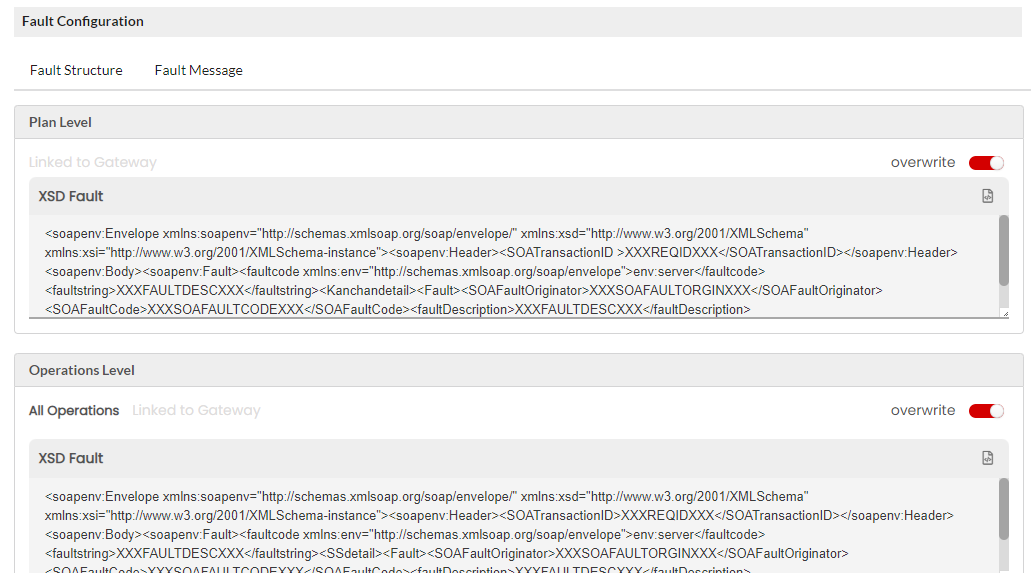
Fig. 3.610 Fault Configuration
Note
Fault configuration can be set only for active subscriptions.
Under Fault Configuration section, click Fault Structure. You can overwrite the configured Fault Structure at Plan level and for all/individual operations. Move the Overwrite toggler to the right to activate overwrite and do the inverse to retain the default Fault Structure settings.
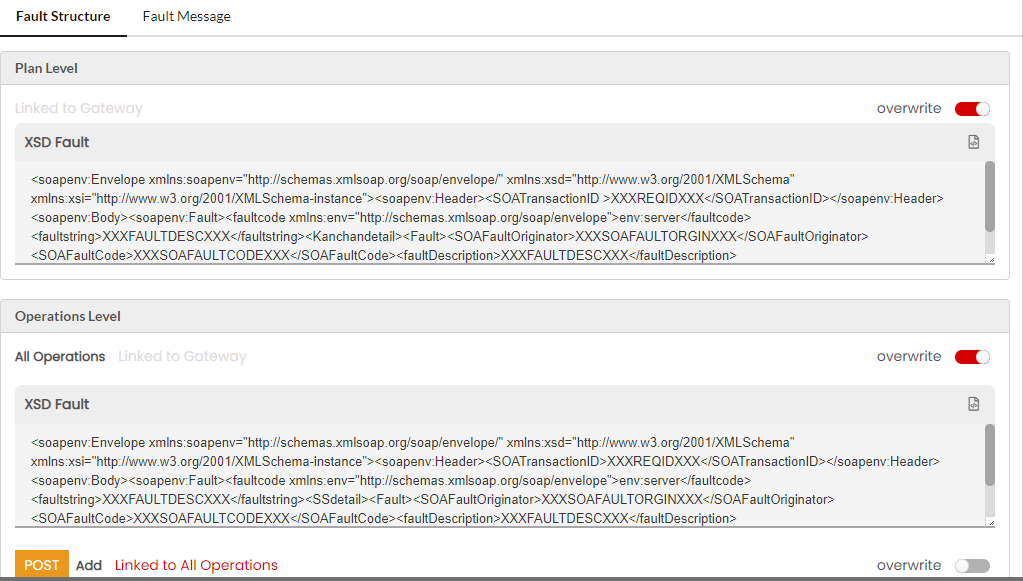
Fig. 3.611 Fault Structure
(Optional) Edit the XML Fault box to make any required changes to the Fault template at Plan level and for all/individual Operations and then click Submit to save the changes.
Next, click Scenario-wise Fault Message tab. You can overwrite the configured Fault Message at Plan level and for all/individual Operations. Move the Overwrite toggler to the right to activate overwrite and do the inverse to retain the default Fault Message settings. Upon enabling Overwrite, the Fault Message options at Plan level and for all/individual Operations will be enabled.
Note
If Fault Configuration is overwritten for All Operations of a Subscription, then the fault configuration of All Operations will be applicable on each Operation.
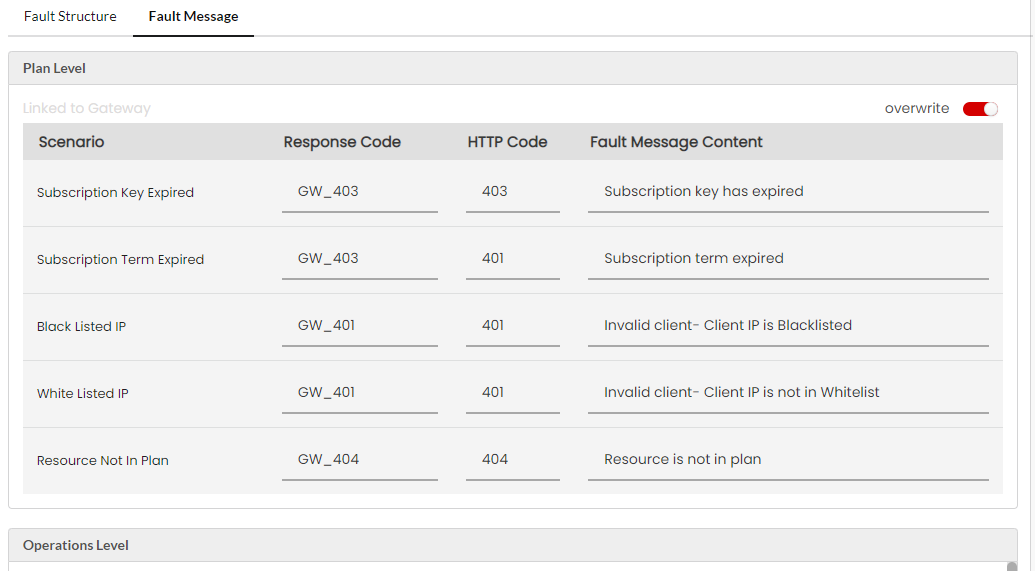
Fig. 3.612 Fault Message
(Optional) Click the Response Code box corresponding to the Fault scenario to type in a different fault code in the box.
(Optional) Click the HTTP Code box corresponding to the Fault scenario to type in a different HTTP code in the box.
(Optional) Click the Fault Message Content box corresponding to the Fault scenario to type in a different Fault Message in the box.
Click Submit. This will overwrite the default Fault Message settings.
3.31.9. Macros for Fault Structure
The tables below provide lists of macros that can be used for the default level and resource level fault structures.
|
|
|---|---|
| XXXREQIDXXX | Prints the Request-ID/SOA-Transaction-ID |
| XXXSOAFAULTORGINXXX | Prints the fault origin |
| XXXSOAFAULTCODEXXX | Prints the fault code |
| XXXFAULTDESCXXX | Prints the fault description |
|
|
|---|---|
| XXXREQIDXXX | Prints the Request-ID/SOA-Transaction-ID |
| XXXSOAFAULTORGINXXX | Prints the fault origin |
| XXXSOAFAULTCODEXXX | Prints the fault code |
| XXXFAULTDESCXXX | Prints the fault description |
| XXXOPNAMEXXX | Prints the operation name |
3.31.10. Configuration Scenarios
Configuration Scenarios detail the scenarios encountered in the gateway during the request and response processing. As seen above, the user can configure the response code, and other details for SOAP and REST faults/errors separately.
The following are the list of Gateway level scenarios specific to REST:
Invalid client IP
The Gateway processes only those requests that come through the reverse proxy server. This IP is passed as an argument during gateway start-up. This scenario occurs when any request is received from a different IP or directly from the client.
Invalid Subscription Key
The Gateway occurs this scenario for the below use cases:
- When APIC-Subs-Key/DMAPIM-Subs-Key header is not present
- Subscription key value is not present
- Subscription key value not existing in the portal
OAuth Plugin Unavailable
This error scenario can occur only for the below mentioned use cases:
- If the path specified for the OAuth Plugin is wrong.
- If there is no read permission for the OAuth Plugin jar.
- If an OAuth related request is received when the OAuth plugin is disabled.
OAuth Server Unavailable
This error scenario occurs when the OAuth server is not reachable.
OAuth Server Request Timeout
This error scenario occurs when the OAuth server is reachable but does not respond within the configured request timeout.
OAuth Plugin Error
This error scenario occurs when an error occurs inside the gateway OAuth plugin during execution.
Invalid OAuth Request URL
This error scenario occurs when the basepath starts with OAuth and the remaining part of the URL doesnot match with any of OAuth URLs.
Empty Request Body
This scenario occurs when the request does not contain the request body (for POST/PUT/DELETE/PATCH requests).
Invalid Request body
This scenario occurs when the request has a request body that is not valid(for POST/PUT/DELETE/PATCH requests).
The following are the list of Gateway level scenarios specific to SOAP:
Invalid client IP
The Gateway processes only those requests that come through the reverse proxy server. This IP is passed as an argument during gateway start-up. This scenario occurs when any request is received from a different IP or directly from the client.
Invalid Subscription Key
The Gateway occurs this scenario for the below use cases:
- When APIC-Subs-Key header is not present
- Subscription key value is not present
- Subscription key value not existing in the portal
WSDL Not found
This error scenario can only occur when the corresponding WSDL is not found for a WSDL download request.
Gateway Configuration Error
This scenario occurs when the request have the below use cases:
- When plan_resources_cache is empty.
- When the plan_resource cache does not have any value for the plan_id mentioned in subscription_details table.
- When Subscriber_level_policies does not have any values for the subscription ID mentioned in subscription table.
Empty Request Body
This scenario occurs when the request does not contain the request body.
Invalid Request body
This scenario occurs when the request has a request body that is not valid.
Operation Name Error
This error occurs when the operation name is not valid.
OAuth Plugin Unavailable
This error scenario can occur only for the below mentioned use cases:
- If the path specified for the OAuth Plugin is wrong.
- If there is no read permission for the OAuth Plugin jar.
- If an OAuth related request is received when the OAuth plugin is disabled.
Note
Along with the above mentioned scenarios, plan level and resource level scenarios are also a part of gateway level fault scenarios. These scenarios are common to both REST and SOAP.
The following are the list of Plan level scenarios for both SOAP and REST faults:
Subscription Term Expired
This scenario occurs when a subscription key’s term date has already expired.
Black listed IP
This scenario occurs when a request is received from a blacklisted IP.
White listed IP
This scenario occurs when a request comes from the non-configured whitelisted IP.
Subscription Key Expired
This scenario occurs when a subscription key that is already cancelled is used in the calls.
Resource Not In Plan
This scenario occurs when a request is received for the below-mentioned use cases:
- When a wrong method is provided.
- When an invalid exposure base path is provided.
- When the operation name in the request body is invalid for the subscribed plan.
- When the service is not subscribed by a user and the user tries to hit the API service using another subscription key.
The following are the list of Resource level scenarios for both SOAP and REST faults:
Request Time Out
This scenario occurs when the backend does not respond within the configured request timeout.
Invalid Authentication
This scenario occurs when the authentication fails at gateway.
For both Basic Authentication and WS Security type, as configured in the portal for security type under API Packs–>Usage Plans–>policies–>Security policy and the security type credentials under Subscription menu.
- Blank in username and valid in password
- Valid in Username and blank in password
- Blank in both Username and password
- Invalid in username and valid in password
- Valid in username and invalid in password
- Invalid in both username and password
- When authorization header is not present
This scenario can also occur for OAuth based Authentication when the OAuth token provided is invalid.
Rate Limit Exceeded
This scenario occurs when a request exceeds the rate limit as provided in the configured service.
Example:
- Configure the rate limit (Example: 4) in rate limit type policy
- Associate the corresponding rate limit policy in plan
- Hit the gateway, once the rate limit exceeded (on 5th hit), the above scenario occurs.
Monthly Limit Exceeded
This scenario occurs when a request exceeds the monthly usage limit as provided in the configured service.
Examples:
a. Configure the consumption limit (Example: number of requests as 5 in limits field) in Usage plan—>limits tab b. Hit the gateway, if the request exceeds the consumption limit (on 6th request hit), the above scenario occurs.
Endpoint Limit Exceeded
This scenario occurs when a request causes the number of requests to exceed the rate limit as provided in the configured service in an endpoint level (Backend).
Examples:
- Configure the endpoint protection limit (Example: 10) in backend endpoint for request count limit type
- Hit the gateway, if it exceeds the protection limit for the backend endpoint (say, on 11th hit), the above scenario occurs.
MCT Limit Exceeded
This scenario occurs when the request load sent is more than the concurrent limit configured.
Sample test scenarios:
- When same subscriber hits single operation
- When same subscriber hits multiple operations
- When different subscriber hits same single operation
- When different subscriber hits multiple operations
Request Handling Error
This scenario occurs when some exception happens while processing the request.
Request Timeout:
When the request is given and the response is not received within the specified time duration, as configured in timeout for that service, then the above scenario occurs, as configured in the portal under API—->Advanced—>Timeout.
Connection Closed :
If the response is not received within the idle timeout mentioned in the gateway.properties file.
Connection Refused:
This occurs for the below use cases:
- When the backend is down.
- When the backend point Protocol/ IP/ Port is invalid.
SSL Handshake Exception
When the SSL connection is not established properly.
Response Handling Error
This scenario occurs when there is any error during receiving and processing the response.
Unexpected Error in Endpoint Protection
This scenario occurs when there is any unexpected error during enforcing Endpoint Protection.
Unexpected Error In Proxy
This scenario occurs if an error occurs during MCT, Rate limit, Throttling, transformation policy enforcement.
Actual End point not Populated Error
This scenario occurs when a request for the service that has dynamic routing configured, and the dynamic routing script in Mongo DB is null.
Request Schema Validation Failed
This scenario occurs when a request fails schema validation for the request body.
Response Schema Validation Failed
This scenario occurs when a response fails schema validation.
Invalid Configuration
When the request is given for the service has dynamic routing configured, and the dynamic routing script contains the invalid configured backend endpoint name, then the above scenario occurs, as configured in the portal under API–>Endpoints–> Dynamic Routing.
Unexpected Error In Policy Validation
This scenario occurs if some error occurs (rare case) during policy enforcement.
Connection Closed
If the response is not received within the idle timeout mentioned in the gateway.properties file.
SSL connection failed
This error scenario occurs when there is problem with SSL connection.
Connection Refused
This occurs for the below use cases:
- When the backend is down.
- When the backend point Protocol/IP/Port is invalid.
Next Steps
In the next section, you will learn about how to export and import data.