3.9. Edit an API Pack
In the last section, you created an API Pack by assigning it a name and pricing type. This section covers the tasks that relate to its composition and behavior. You will learn how to package and bundle APIs in order to make them available to the Consumers.
Editing process for an API Pack involves:
- Adding resources/operations from Approved or Published APIs
- Attaching security and Usage Policies to resources/operations
- Monetizing APIs by adding Usage Plans
- Branding and publishing APIs
An Edited and Approved API Pack becomes available to the developers in the API Store under the selected Category.
In this Section:
- Add Descriptions to an API Pack
- Add Resources to an API Pack
- Delete Resources or Operations from an API Pack
- Add Usage Plans to an API Pack
- Brand an API Pack for Developer portal
- Attach Documentation to an API Pack
- Manage Visibility of an API Pack
- Edit an API Pack Name
- Send an API Pack for Approval
- Deprecate an API Pack
- Retire an API Pack
- Open an Approved API Pack for Editing
- Discard Changes after opening an API Pack for Editing
- Search an API Pack
Before you begin:
- It is assumed that you have completed the tasks enumerated in the earlier sections.
- It is assumed that you have the approval(s) for the API Version(s) that you plan to add to the Pack and the States of these API Versions display as “Approved.”
- The API Packs Configuration screen consists of tabs for editing and adding Pack Contents, Usage Plans, Documentation and Branding. For Admin and Technical user roles, the Usage Plans and Branding tabs are not available.
- The fields marked with asterisks are mandatory.
Common Tasks
Following are the common tasks identified for this section:
Navigating to the API Packs screen
To navigate to the API Packs screen:
- In the main navigation menu, click API Packs.
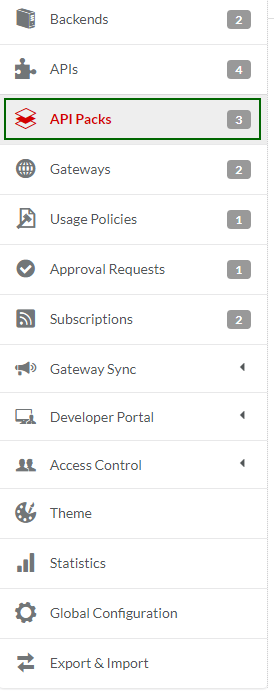
Fig. 3.203 Navigation menu - API Pack
The API Packs screen displays.
Navigating to the REST/SOAP API Packs Configuration screen
To navigate to the API Packs Configuration screen:
- Navigate to the API Packs screen
- In the API Packs screen, click the row that has the REST or SOAP API Pack that you want to configure. The API Packs Configuration screen displays. REST and SOAP API Packs can be differentiated by the ‘R’ and ‘S’ present on their respective icons.
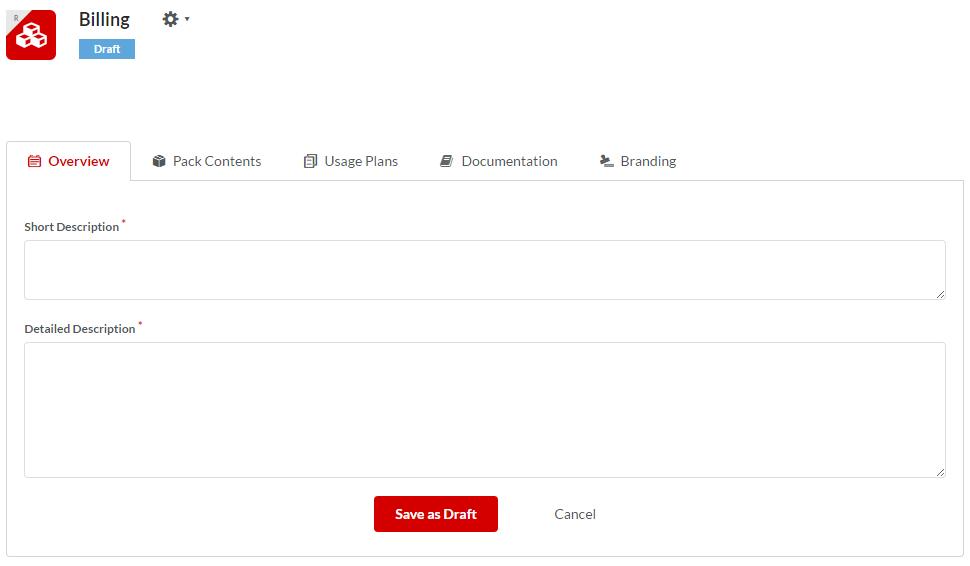
Fig. 3.204 API Pack Configuration screen
3.9.1. Add Descriptions to an API Pack
Descriptions about an API Pack forms part of the information that is made available in the Developer portal. API Consumers start using an API based on the information that you provide in the Descriptions field. The descriptions should therefore be as clear and concise as is possible.
Note
Both the Short Description and Detailed Description fields in the Overview tab of the API Pack Configuration screen are mandatory.
To add Descriptions to an API Pack:
Navigate to the REST API Packs Configuration screen.
In the REST API Packs Configuration screen, click the Overview tab. The Overview tab screen displays.
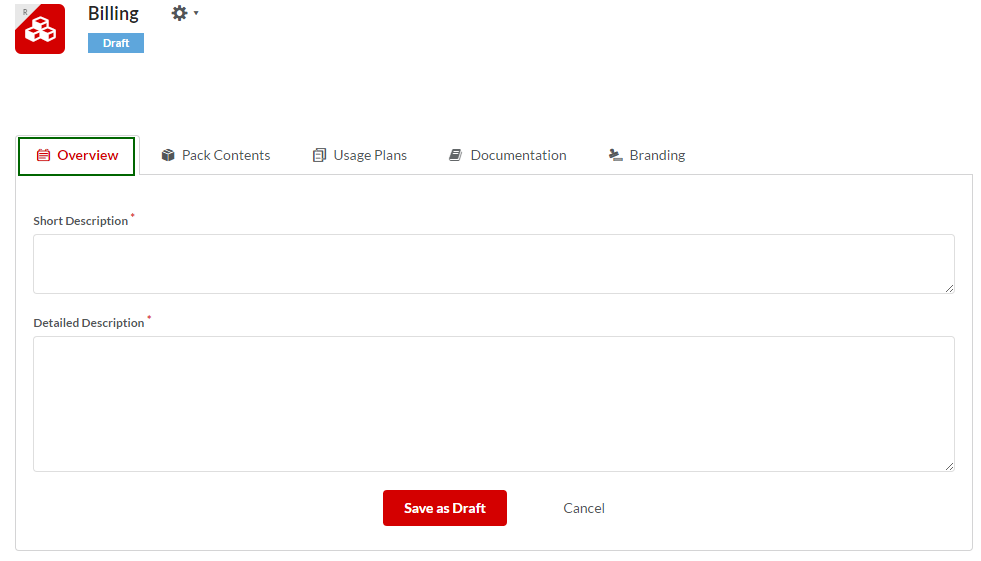
Fig. 3.205 Overview tab screen
Note
You can omit this step if you have navigated here from the APIs Packs screen as the Overview tab displays by default.
In the Short Description box, type or edit a short description. The Short Description box displays the short description that you typed in the Add API Pack dialog box when you created the API Pack earlier.
In the Detailed Description box, type a detailed Description.
Click Save As Draft to save changes and finish adding the Descriptions.
3.9.2. Add Resources to an API Pack
You created/edited resources/operations for APIs when we were in the topics: Add API Resources and Edit API Resources. These resources can now be used to decide the composition of a Pack. All the resources from Approved and Published API Versions are available for forming Pack Contents for an API Pack.
To add Resources from Approved or Published APIs to a REST API Pack:
Navigate to the API Packs Configuration screen.
In the API Packs Configuration Screen, click the Pack Contents tab. The Pack Contents tab displays a list of all resources/operations that have been added to the Pack. In case you are adding Pack contents to the API Pack for the first time, an empty list with the message: “There are no pack contents added yet” displays.
Click Add Resources to Pack to add new resources to the Pack.
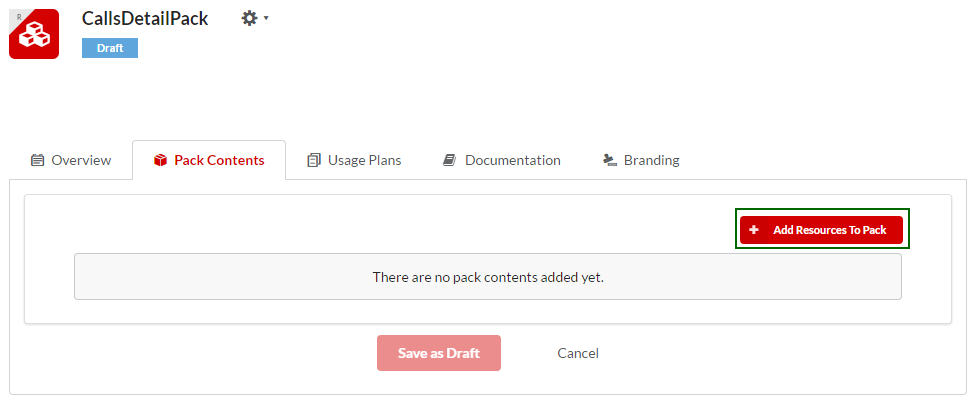
Fig. 3.206 Add Resources to Pack
The Add Resources to Pack dialog box displays.
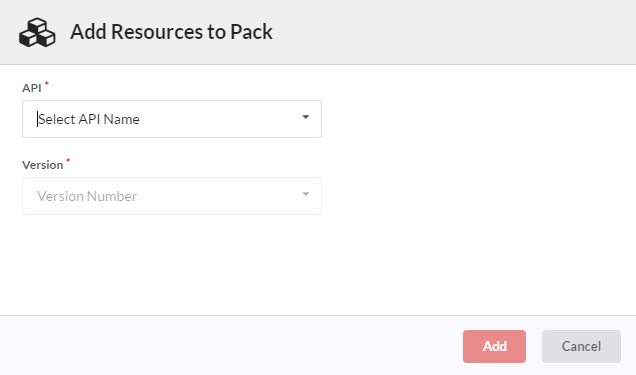
Fig. 3.207 Add Resources to Pack dialog
Click the API drop-down list to select the REST API that has the resource(s) you want to add to the Pack Contents list. The latest version number of the selected API auto-fills in the Version box and the list of resources from that API Version displays under Select Resources For Pack below. Click the API box to display the drop-down list if you need to view the drop-down list again after selection.
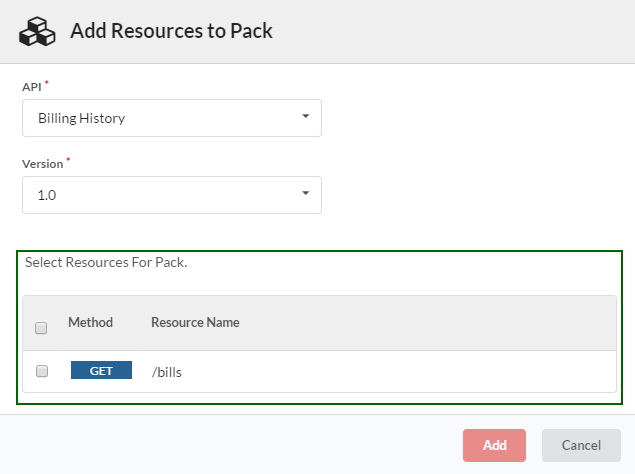
Fig. 3.208 Add Resources to Pack dialog - Select API
Note
If there are no Approved or Published version of the selected API, the Version drop-down displays a “No Matches” message
Click to select the check boxes corresponding to Resource names that you want to add to the API Pack. Alternatively, you can click the header check box to select all resources in one go.
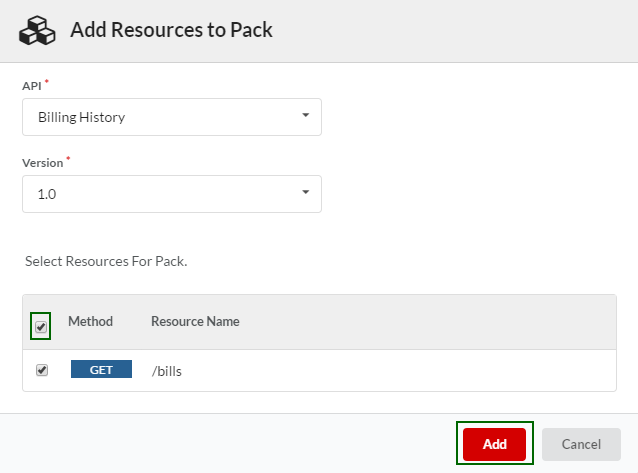
Fig. 3.209 Add Resources to Pack dialog - Select all Resources
Note
By default, the Version drop-down box displays the most recent version of the Approved and Published API. To choose a different Version, click the Version drop-down box.
Click Add to add the selected resources to the API Pack. The Add Resources to Pack dialog box closes. The newly added Resource(s) now displays in the Pack Contents list.
Repeat steps 3 to 6 to add more resources from another REST API.
Click Save as Draft to save the newly added Pack Contents. A notification message “API Pack details were updated successfully” displays indicating that the newly added Pack contents are saved successfully.
Note
The Add Resources to Pack option is enabled and hence available for API Pack versions that are in Draft State.
To add Operations from Approved or Published APIs to a SOAP API Pack:
Navigate to the SOAP API Packs Configuration screen.
In the SOAP API Packs Configuration Screen, click the Pack Contents tab. The Pack Contents tab displays a list of all Operations that have been added to the Pack. In case you are adding Pack contents to the API Pack for the first time, an empty list with the message: “There are no pack contents added yet” displays.
Click Add Operations to Pack to add new Operations to the Pack.

Fig. 3.210 Add Operations to Pack
The Add Operations to Pack dialog box displays.
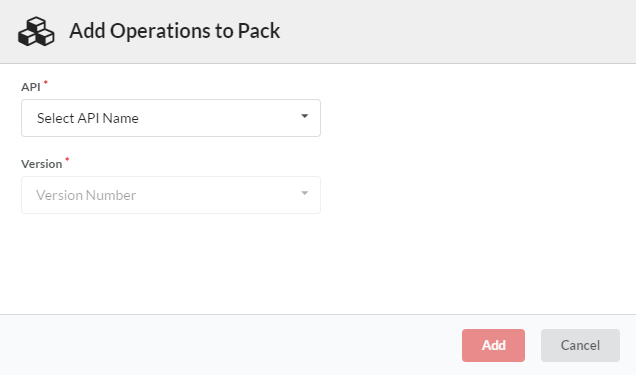
Fig. 3.211 Add Operations to Pack dialog
Click the API drop-down box to select the API that has the Operations that you want to add to the Pack Contents list. The latest version number of the selected API auto-fills in the Version box and the list of Operations from that API Version displays under Select Operations For Pack below.

Fig. 3.212 Add Operations to Pack dialog
Click the API box to display the drop-down list if you need to view the drop-down list again after selection.
Note
If there are no Approved or Published API’s, the drop-down will not display anything.
The check boxes corresponding to Operation names are disabled as all the Operations under an API are selected by default and are added to the API Pack.
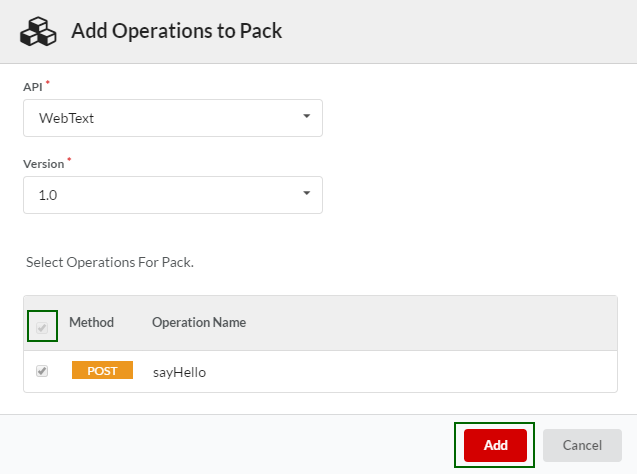
Fig. 3.213 Add Operations to Pack dialog
Note
By default, the Version drop-down box displays the most recent version of the Approved and Published API. To choose a different Version, click the Version drop-down box.
Note
All the Operations that need to go into an API pack can only be added as a whole and cannot be selected individually.
Click Add to add the selected Operations to the API Pack. The Add Operations to Pack dialog box closes. The newly added Operation(s) with its API now displays in the Pack Contents list.
Repeat steps 3 to 6 to add more Operations from another API.
Click Save as Draft to save the newly added Pack Contents. A notification message “The API Pack details were updated successfully” displays indicating that the newly added Pack contents are saved successfully.
Note
The Add Operations to Pack option is enabled and hence available only for API Pack versions that are in Draft State.
3.9.3. Delete Resources or Operations from an API Pack
A Resource or Operation can be deleted directly from an API Pack if:
- The Resource/Operation is not part of a Usage Plan
- The API Pack to which it belongs is in its Draft state
If a Resource/Operation is part of a Usage Plan, you need to unlink/delete the Resource or Operation from the Usage Plan before you can go ahead and delete it from the Pack.
To learn about how to unlink a Resource or Operation from the Usage Plan, visit the topic: ‘Unlink a resource or operation from usage plan’ in Create a Usage Plan.
Note
In the case of a SOAP API Pack, if you have added Operations from more than one version of an API, delete the Operations of a single version and then click Save as Draft. Repeat for other versions.
To delete a Resource from an API Pack:
Navigate to the API Pack Configuration screen.
In the API Configuration screen, click the Pack Contents tab.
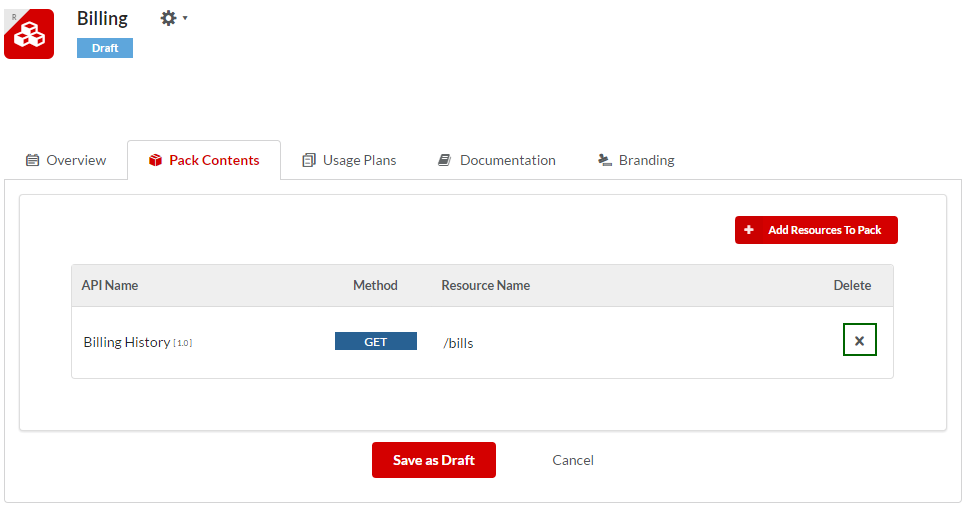
Fig. 3.214 Resource tab
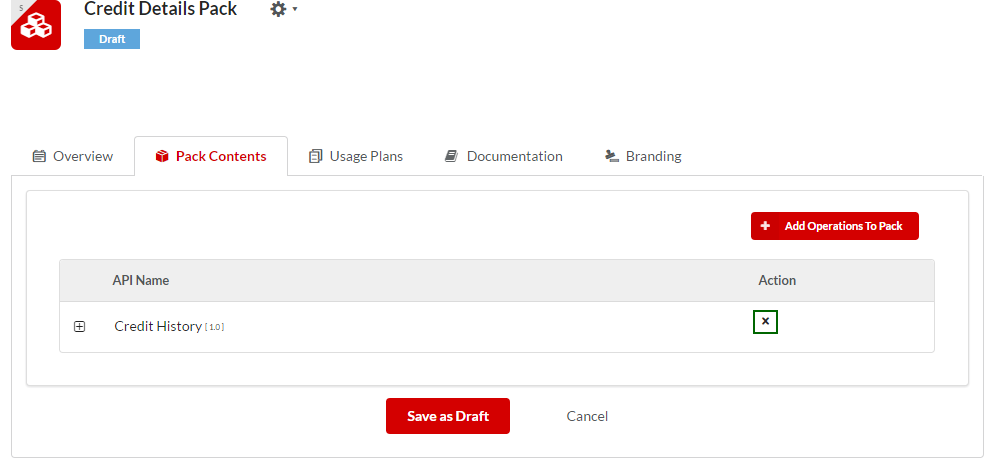
Fig. 3.215 Operation tab
Click the Delete icon
 in the row that has the Resource/Operation that you want to delete. A notification message displays. Click OK to remove the Resource/Operation from the Pack Contents list.
Click Save as Draft to save changes.
Next Steps
In the next section, we will take you through the steps needed to create a Usage Plan so you can bundle and add Usage Plans for an API Pack.
3.9.4. Add Usage Plans to an API Pack
API Resources/Operations are bundled and presented as part of a Subscription plan in a way that allows maximum benefits to its Consumers. A Subscription Plan has all the relevant resources/operations needed by developers for developing an application.
When you think about monetizing an API Pack constituted from a focused set of resources/operations, you also need to have a Plan that bills Consumers based on its usage. Usage Plans enable the developers to choose from among different Plans. Each plan has one or more Usage Policies that define the Usage Limits through Rate Limits and Throttling. The Policies specify the number/volume of API calls that a Consumer is permitted to make during a specified time.
Usage Plans are based on the Monetization Strategies that we selected at the time of creating an API pack in the topic: Assign a Name and Monetization Strategy to an API Pack. To learn more about Monetization Strategies, refer: API Monetization - Usage Plans
In this Section:
- Create a Usage Plan
- Manage Visibility of a Usage Plan
- Edit a Usage Plan Name
- Send a Usage Plan for Approval
- Deprecate a Usage Plan
- Retire a Usage Plan
- Open an Approved or Published Usage Plan for Editing
- Discard Changes after opening a Usage Plan for Editing
- Modify Usage Plan Display Order
- Delete a Usage Plan
Before you begin:
It is assumed that:
- You have completed the tasks enumerated in the earlier sections.
- You have created and edited Named Usage Policies for attaching them to Usage Plans in API Packs. To create a Named Usage Policy, visit pages: Create a Named Usage Policy and Edit a Named Usage Policy.
- The Usage Plans and Branding tabs are available to admin, approver and business-level users.
- The fields marked with asterisks are mandatory.
Following UI screens are referenced in this section:
Usage Plans tab of the API Packs Configuration screen.
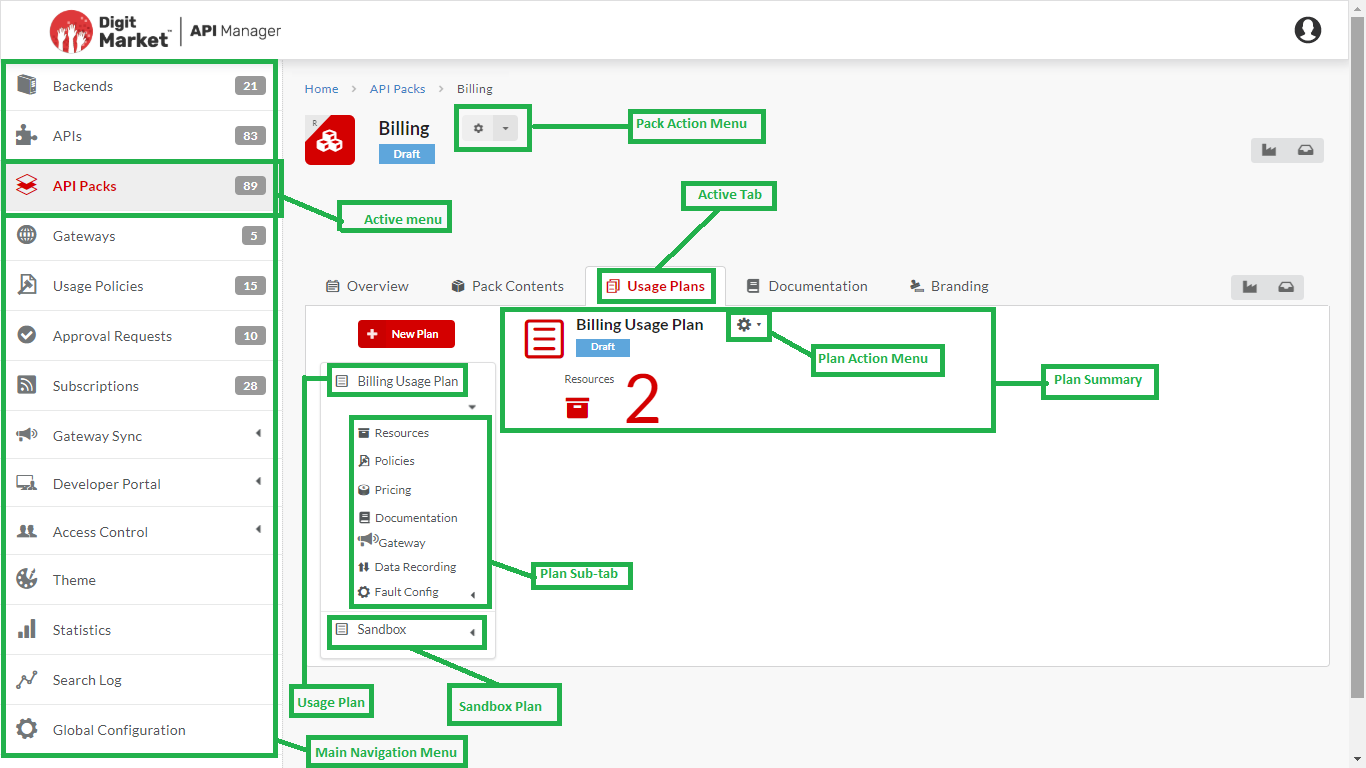
Fig. 3.216 API Packs Configuration screen - Usage Plan tab
Common Tasks
Following are the common tasks identified in this section:
Navigating to the Usage Plans tab of API Packs Configuration screen
To navigate to the Usage Plans tab of API Packs Configuration screen:
- Navigate to the API Packs screen.
- In the API Packs screen, click the row that has the API Pack you want to configure.
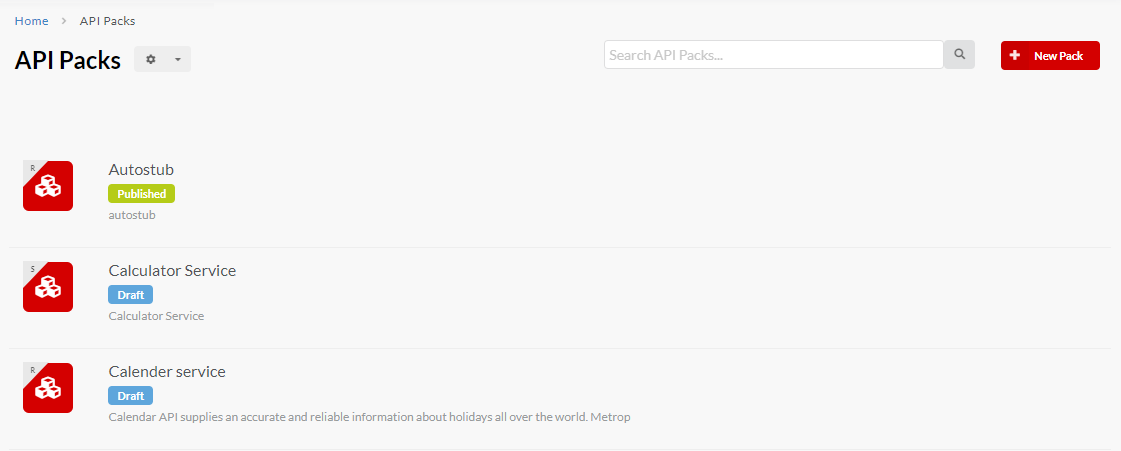
Fig. 3.217 API Packs screen
The API Packs Configuration screen displays.
- In the API Packs Configuration screen, click the Usage Plans tab.
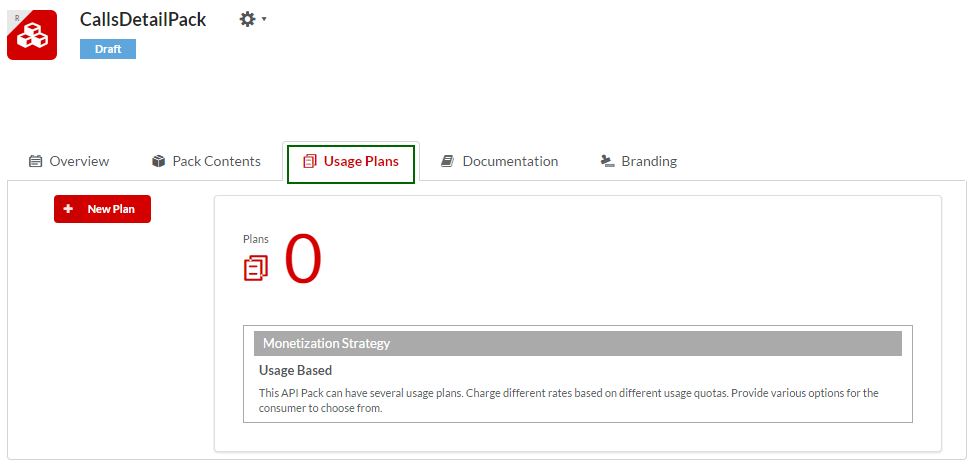
Fig. 3.218 API Packs Configuration screen - Usage Plans tab
3.9.4.1. Create a Usage Plan
A Usage Plan is a set of Policies that defines the level of service that is offered to the subscriber, and through which API owners can bill and generate revenue. You can set your Usage Plans based on the potential traffic an API is able to generate.
Usage Plans can have security policies and usage policies attached to them. Usage Policies specify the limits of use for a plan. Attaching a usage policy to a plan limits the use of APIs falling under the plan. The limit from the policy applies separately to each consumer subscription made under the plan. This is because the usage policies attached to the plan are copied as-is to each subscription made against the plan. It is important to note here that you can override usage policies that are attached to a plan by configuring subscription level settings. To learn more about how you can override usage policies at subscription level, visit: Configure Subscription-level Settings.
The Developer portal in its API store displays the details of the main Usage Plan inside the API Pack box (main Usage Plan is the topmost plan in the Usage Plan Display Order. You can learn more about Display Order in the topic, Modify Usage Plan Display Order and all Plan details in the Pack detail page. As a usage-based monetization strategy can have multiple Usage-based plans, you need to identify and mark the main Usage Plan. By default DigitMarket™ API Manager assumes the first plan that is created under a Pack to be the main usage plan, and displays it inside the API Pack box in the API store. All the plans display in the Plans tab of the API Pack Details page in the Developer portal.
Note
A Usage Plan can be created only if the API Pack to which it belongs is in its Draft State.
To create a Usage Plan:
Navigate to the Usage Plans tab of API Packs Configuration screen.
Click New Plan to add a new Usage Plan. The Add Plan dialog box displays.
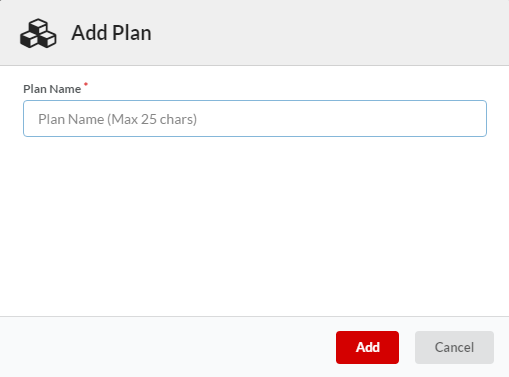
Fig. 3.219 Add Plan dialog
In the Plan Name box, type a name for your Usage Plan.
Click Add to include the Plan to the Usage Plans tab. The Plan name displays in the Plan list below the New Plan button.
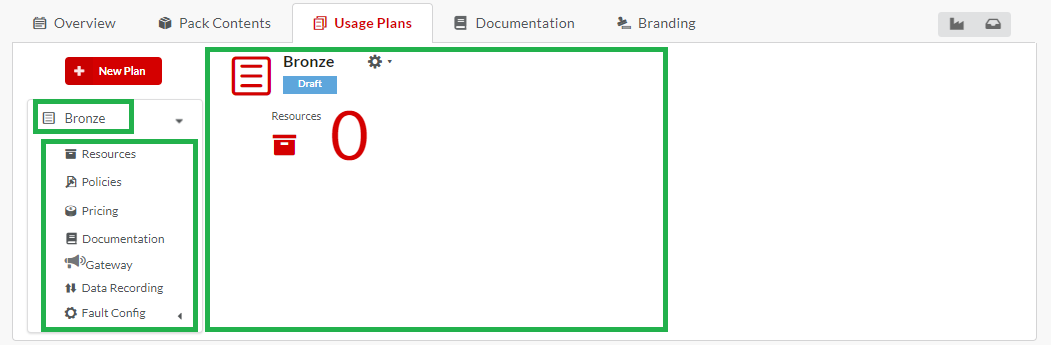
Fig. 3.220 New Plan
Plan name menu has collapsible sub-menus. Clicking the Plan name toggles between displaying and hiding the following sub-tabs in the case of monetized strategies such as Usage-based, Revenue-sharing and Transactional:
- Resources(REST)/Operations(SOAP)
- Policies
- Pricing
- Documentation
- Gateway
- Data Recording
- Fault Config
In the case of Non-monetized strategy, clicking the Plan name toggles between displaying and hiding the following sub-tabs
- Resources(REST)/Operations(SOAP)
- Policies
- Limits
- Documentation
- Gateway
- Data Recording
- Fault Config
It also displays a summarized view of the Plan in the Usage Plan Summary screen and a Sandbox Plan.
Add Resources or Operations to a Usage Plan
By default, the Resource sub-tab/Operations sub-tab displays all the resources/operations that are added to the Pack through Add Resources to Pack/Add Operations to Pack in the Pack Contents tab. Using the task stepped out here, you can select the resources/operations from the Pack that you want added to the Usage Plan.
To add Resources/Operations to a Plan:
Navigate to the Usage Plans tab of API Packs Configuration screen.
In the Usage Plans tab, click the Plan name to display collapsible tabs and the Plan Summary panel.
Click the Resources/Operations tab to display the resources/operations that have been added to the currently open API pack.
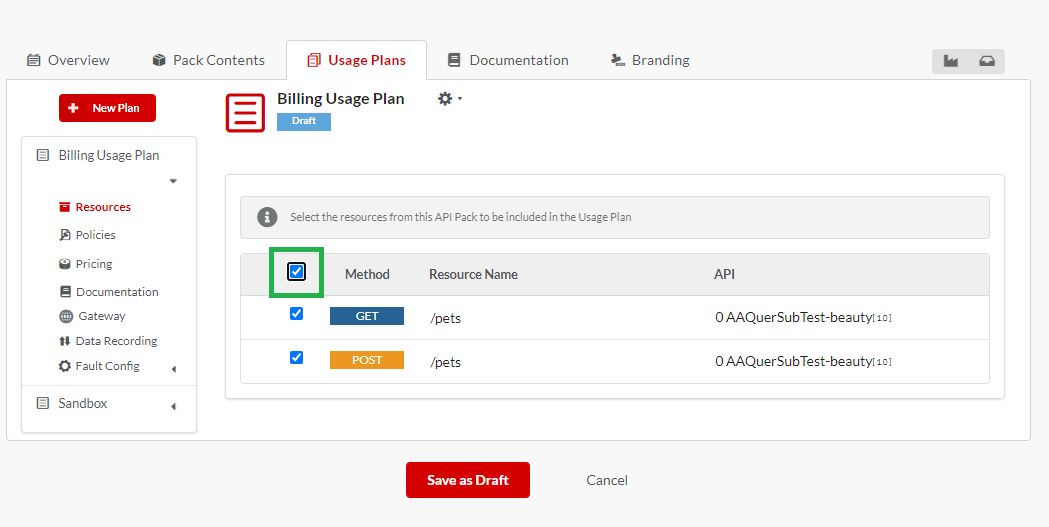
Fig. 3.221 API Pack Plan - Resources
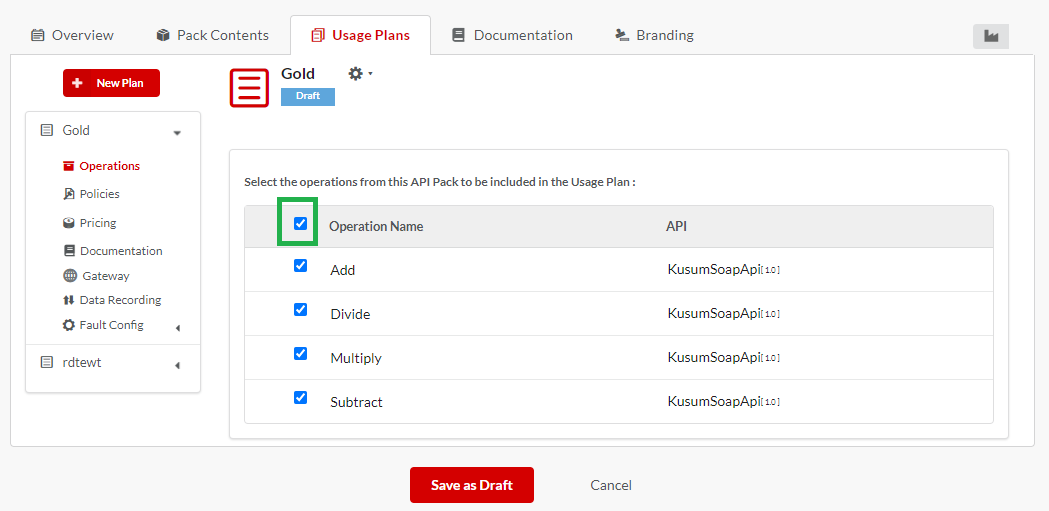
Fig. 3.222 API Pack Plan - Operations
Click to select the check box(es) corresponding to the resources/operations that you want included in the Usage Plan. The Select All checkbox next to the Method header allows you to select all the resources/operations.
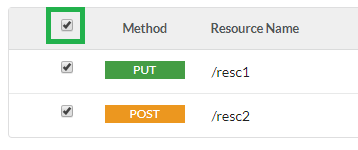
Fig. 3.223 API Pack Plan - Resources/Operations select
Click Save as Draft to save changes. A notification message: “Resource details for the Usage plan were updated successfully”(REST)/”Operation details for the Usage plan were updated successfully”(SOAP) displays indicating that the resources/operations have been successfully added to the Usage Plan.
Note
The Save as Draft option is available only when the Usage Plan is in its draft state.
Unlink a Resource or Operation from Usage Plan
To unlink a Resource or Operation from a Usage Plan:
- Repeat steps 1 to 3 from the earlier task: ‘Add Resources or Operations to a Usage Plan’.
- Click the selected check boxes to deselect the resources/operations that you want to unlink from the Plan.
- Click Save as Draft to save changes.
Attach a Plan Level Usage Policy to a Usage Plan
Plan-level Usage Policies are Usage Policies that are applied commonly to all the resources/operations present in a Plan. The policies that are attached to a Usage Plan shall be copied and applied as is to all the subscriptions that fall under the Plan. The usage limits from the attached policies are enforced separately to each consumer subscription made against the plan.
To add a Plan level Usage Policy:
Navigate to the Usage Plans tab of API Packs Configuration screen.
In the Usage Plans tab, click the Plan name to display collapsible sub-tabs and the Plan Summary panel.
From the collapsible sub-tabs, click Policies to display the Policies configuration options.
Under Plan level policies, click Usage Policy accordion tab to open the Usage Policy section. A list of usage Policies attached to the Plan displays. In case you are attaching policies newly to a Plan, the message, “There are no policies added yet’ displays.
Click the Assign Policy button
 to assign a new policy to the Plan. The Plan Level - Select Existing Usage Policies dialog box displays.
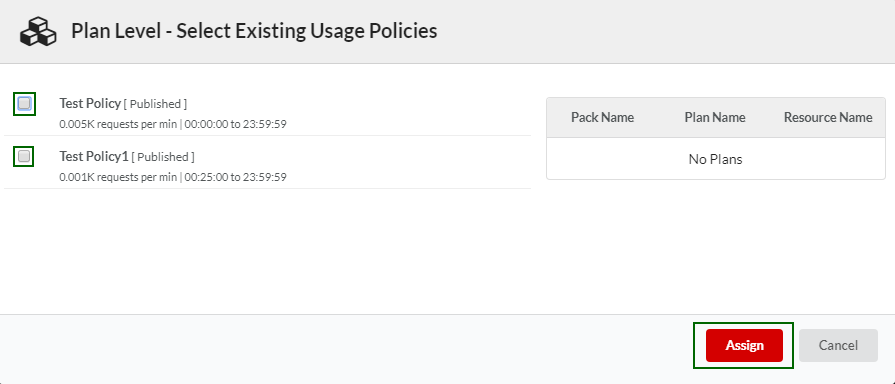
Fig. 3.224 Select Existing Usage Policies dialog
Click to select the check box corresponding to the Usage Policy you want to apply to the Plan as a whole.
Note
Usage Policies that are in Approved and Published states appear in the Plan Level - Select Existing Usage Policies dialog box for selection but you can only send a plan for approval that has an Approved or Published Usage Policy attached to it and does not have any Usage Policy in Draft State.
Click Assign to add the Plan-level Usage Policy to the Plan and close the Plan Level - Select Existing Usage Policies dialog box. The Plan name displays in the Usage Policy section indicating that the Policy has been attached to the Plan.
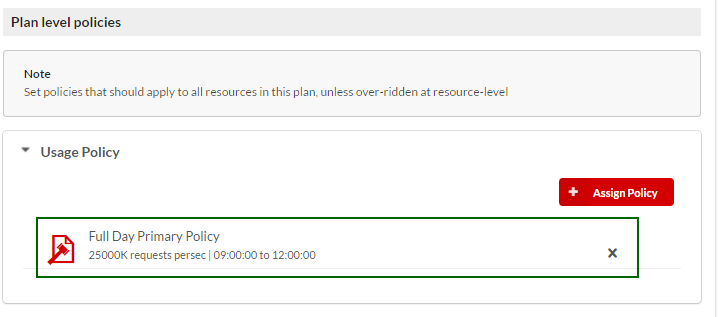
Fig. 3.225 Usage Policy section
Click Save as Draft to finish adding the Plan level Usage Policy to the Plan.
You can add any number of Plan-level Usage Policies, provided you keep a manual check over the period to which each one of them apply - keeping a check to see that none of the Plans, so added, overlap each other in the time duration for which they apply.
In case you have added both Rate Limiting and Throttling Usage Policies to a Plan, and they apply to the same time period, the Rate Limiting Policy will take precedence over the Throttling one, which means that at run time Rate Limiting policy will be enforced.
In case you have configured policies for a plan (at both Plan level and Resource level), and also for its Subscription (at both Plan level and Resource level) then Subscription (Resource level) policy will override all the other policies.
Policy configuration precedence hierarchy is: Subscription level (Resource level policy) > Plan level (Resource level policy)> Subscription level (Plan level policy) > Plan level (Plan level policy)
To add a Resource-level/Operation-level Usage Policy, visit ‘Attach a resource or operation level policy to a usage plan’ below.
Note
When you have the same policy as the Plan-level and Resource/Operation level Policy, the Resource/Operation level Policy is applied at runtime.
Adding Plan Level Authentication
Authentication mechanism for a plan is used for granting access to the API resources of the plan that the user has subscribed. Once the user configures the authentication type and assigns the values (wherever applicable), the user will be able to access the plan and consume the resources. As a user, under the Plan Authentication you can configure the following authentication types to consume the API resources:
- Subscription key
- IP Whitelisting
- Header key
- Query parameter
Subscription key:
Subscription key is a key that is required for processing authentication requests. This is the default authentication mechanism that is available for getting access to the resources. User can change the default by choosing a different authentication mechanism from the available options.
IP Whitelisting:
IP Whitelisting is a way to limit access control only to a list of trusted IPs addresses. Publisher users or Developer users can add the list of IP addresses, or define the IP address range that can be allowed to access the resources at the time of subscription.
Header key:
Header key is the key that needs to be passed in the request header to consume an API. Header key consists of a key-value pair. The Header key (or header name) can be defined when selecting the authentication type. The value can be defined by Publisher users or Developer users at the time of subscription.
Query Parameter:
Query parameter is the parameter that needs to be passed in the request URL. Query parameter consists of a key-value pair. The Query parameter key (or Query parameter name) can be defined when selecting the authentication type. The value can be defined by Publisher users or Developer users at the time of subscription.
Note
- Only users with Publisher rights (Publisher User) can define the plan with one of the above authentication types. Plan Authentication type (and key wherever applicable) can only be set by a Publisher in the Publisher Portal. The values can be configured at the time of Subscription either in the Publisher Portal or Developer Portal.
- Plan level subscription authentication model is applicable only for Production plan. Sandbox plan has subscription key authentication model by default.
- Gateway will process the request to authenticate the service request with the below hierarchy: Subscription key > IP Whitelisting > Header key > Query parameter
To set the plan level authentication:
Navigate to the Usage Plans tab of API Packs Configuration screen.
In the Usage Plans tab, click the Plan name to display collapsible tabs below.
Click the Policies tab to display the Plan-level Policies.
Click Plan Authentication tab.
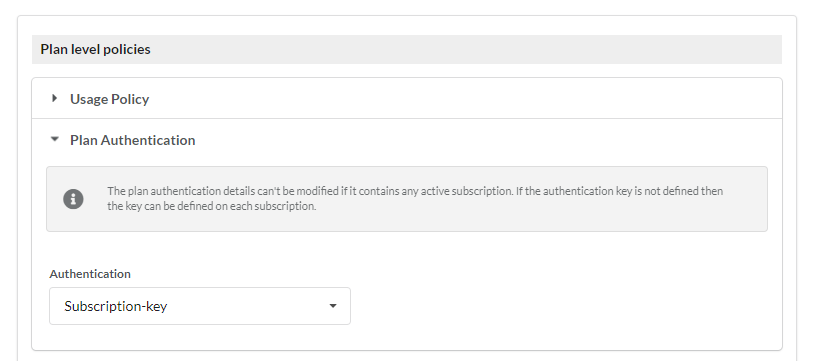
Fig. 3.226 Plan Authentication
From the drop-down list, select the Authentication Type. The available option are: Subscription-key, Ip-white listing, Header key, Query parameter. If you have selected Header key or Query parameter authentication method, additionally you need to specify the Header key value and the Query key value respectively.
Fig. 3.227 Plan Authentication - Subscription-key
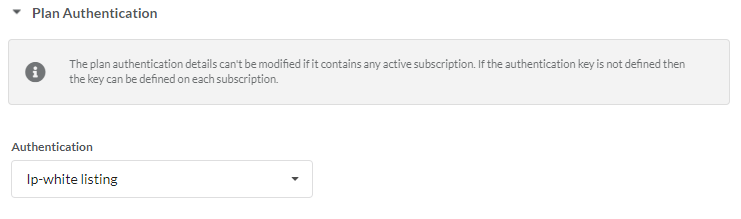
Fig. 3.228 Plan Authentication - Ip-white listing
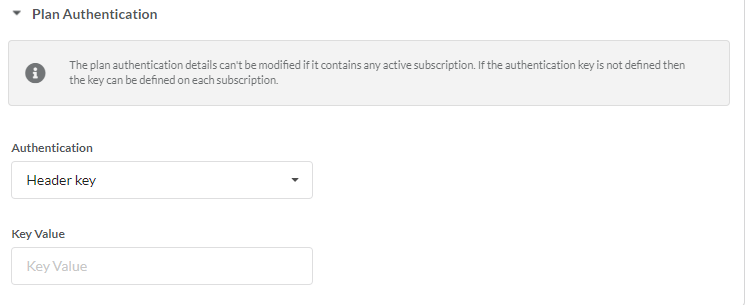
Fig. 3.229 Plan Authentication - Header key
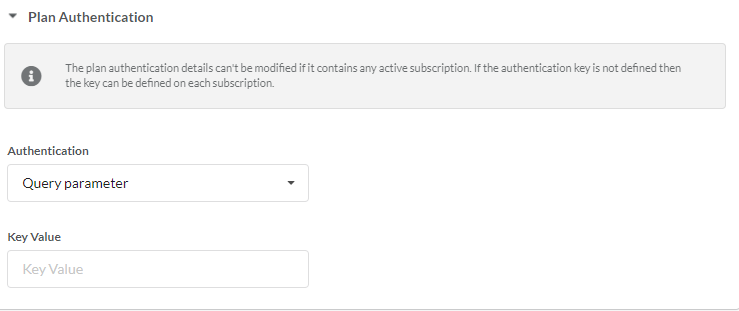
Fig. 3.230 Plan Authentication - Header key
Click Save as Draft.
Note
If a plan has an active subscription, it will not allow editing of plan level authentication method. If the authentication key is not defined then the key can be defined on each subscription
Note
After a subscriber subscribes to a plan, a subscription key will be generated only if the plan authentication type is selected as Subscription-key.
Attach a Resource or Operation Level Policy to a Usage Plan
The policies that are attached to a Usage Plan shall be copied and applied as is to all the subscriptions that fall under the Plan. The Usage limits from the attached policies is enforced separately to each consumer subscription made against the plan.
If you have already added Named Usage Policies as needed, you can go ahead with attaching them to Plans. If you do not have a Named Usage Policy that you want to add to the Plan, you need to create and edit a Named Usage Policy from the Create a Named Usage Policy and Edit a Named Usage Policy in the Main Navigation menu.
The Policies tab has accordion tabs for each Policy, wherein clicking a Policy tab toggles between expanding and collapsing relevant tab details.
Add Security Policy for a REST Pack
A Security Policy applies to only those resources that are added to the Plan.
To display the resources that are covered by a Security Policy, click the Security Policy tab.
To attach a security policy to a Resource:
Navigate to the Usage Plans tab of API Packs Configuration screen.
In the Usage Plans tab, click the Plan name to display collapsible tabs below.
Click the Policies tab to display the Plan-level and Resource-level Policies in accordion tabs.
Under Resource-level Policies, click Security Policy accordion tab to open the Security Policy section. The list of resources that have been added to the Plan displays. Each row represents a Resource.
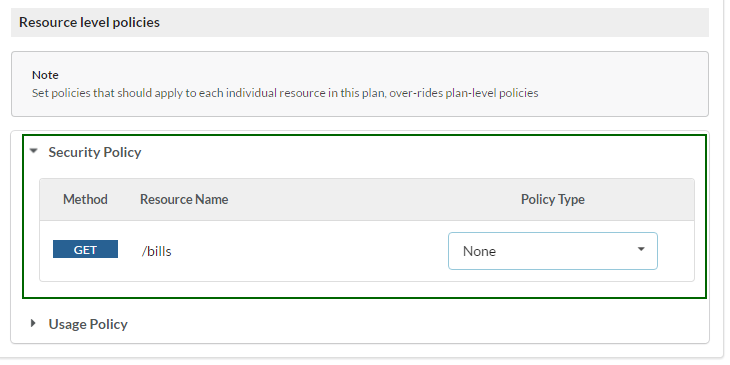
Fig. 3.231 Security Policy
Click the drop-down menu under the column header Policy Type to select from Basic Authentication or oAuth security policy for REST resources.
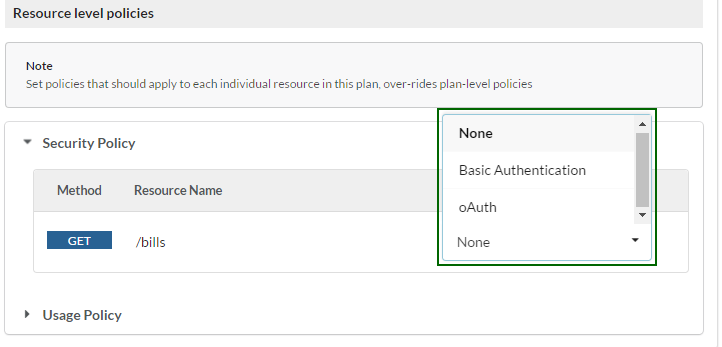
Fig. 3.232 Security Policy drop down list
If you select Policy Type as oAuth, enter the Username header key.
(Optional) Click the Access Token check box to select it.
(Optional) Click the Client ID check box to select it.
The Username header key header key value is the username that is required to be validated in the active directory against the oAuth token. This validation is only applicable if the Password Grant Type oAuth Authorization is selected while generating the token. For more information, refer the topic ‘Using OAuth in API Connect’ in the section Authentication. Upon successful authentication, the Gateway will attach the Client ID and the Access Token (invoked from the Gateway property file) in the request header before sending it to the backend.
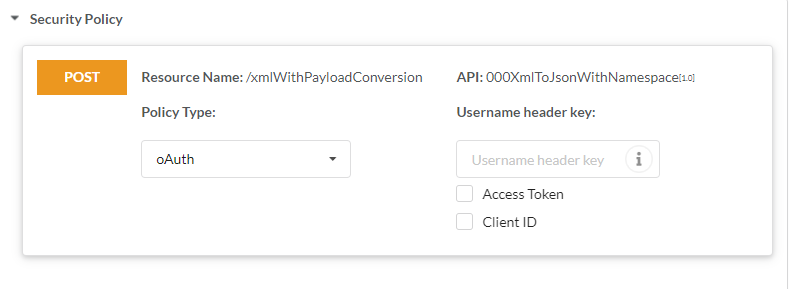
Fig. 3.233 oAuth Policy Type
Note
If the Username header key box is left blank, the oAuth token will not be validated against the username.
Click Save as Draft to save changes.
Note
You can add the credentials for Basic Authentication using the main menu option: Subscriptions. Learn more on this in the topic: Configure Subscription-level Settings.
Assign a Resource level or Operation level policy to a Usage Plan
A Usage Policy is applied to only those Resources/Operations that are added to the Plan.
To display the resources/operations that are covered by the Usage Policy, click Resource level Policies/Operation level Policies tab.
To attach an existing Usage Policy to a Resource/Operation:
Navigate to the Usage Plans tab of API Packs Configuration screen.
In the Usage Plans tab, click the Plan name to display collapsible tabs below.
Click the Policies tab to display the Policies in an accordion menu.
Click Usage Policy accordion tab to open the Usage Policy section. The list of resources/operations added to the Plan displays. Each row represents a Resource/Operation.
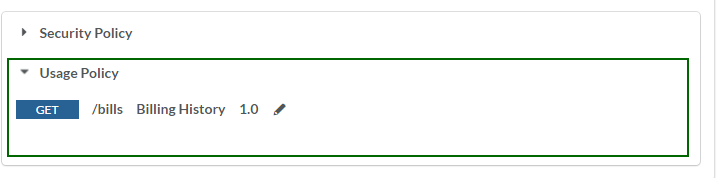
Fig. 3.234 Usage Policy tab
Click the edit icon
 next to the Resource/Operation name to attach an existing policy to the Resource/Operation. The Resource Level – Select Existing Usage policies (REST)/ Operation Level – Select Existing Usage policies (SOAP) dialog box displays.
Click the check box(es) corresponding to the Usage policy(ies) that you want to attach to the Resource/Operation. You can attach multiple policies to a Resource/Operation provided there are no runtime overlaps with respect to the time duration for which they are enforced.
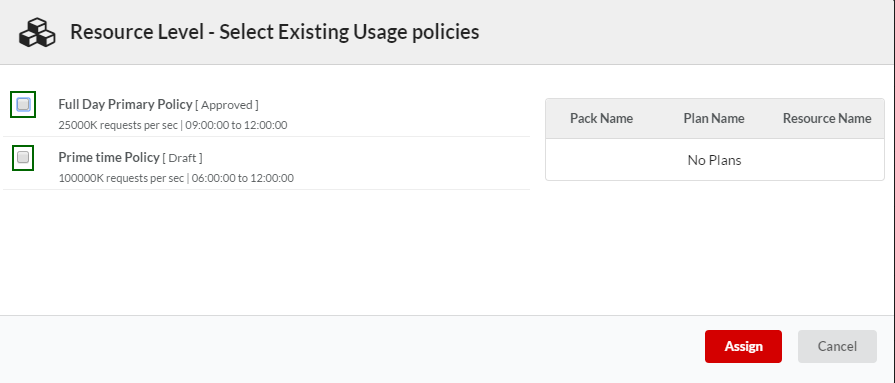
Fig. 3.235 Select Resource-level policy
In the adjoining panel on the right, the Plans that are impacted by the selected policy display.
Click Assign to finish assigning the Usage Policy to the Plan. The assigned Policy displays underneath the Resource/Operation name.
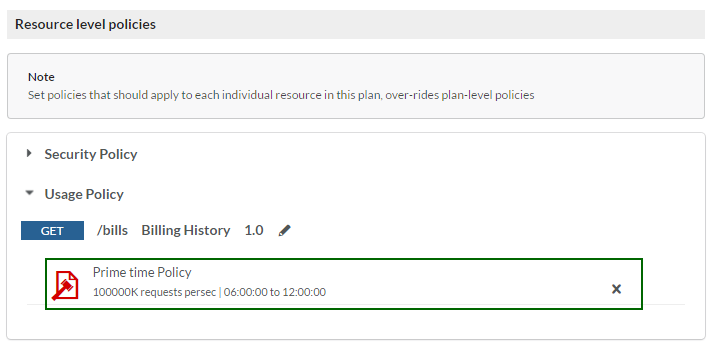
Fig. 3.236 Assign Usage Policy
Note
When you have the same policy as the Plan-level and Resource/Operation level Policy, the Resource/Operation level Policy is enforced.
Unlink a Usage Policy
To unlink a Usage Policy from a Plan:
Repeat steps 1 to 4 from the earlier task: Assign a Resource level or Operation level policy to a Usage Plan
If Usage Policies are attached to a Resource/Operation, you will find a delete icon
against each Usage Policy.Click the Delete icon
to remove the Usage Policy from the Resource/Operation. This unlinks the Usage Policy from the Resource/Operation.Click Save as Draft to save changes.
Add Pricing to a Usage Plan
The steps below apply to the monetized strategies: Usage-based, Revenue-sharing and Transactional strategies.
To add Pricing to a Usage Plan:
Navigate to the Usage Plans tab of API Packs Configuration screen.
In the Usage Plans tab, in the left panel, click the Plan name to display collapsible Plan tabs.
Click the Pricing sub-tab to display the Pricing form (Usage-based monetization strategy used for the screenshot below).
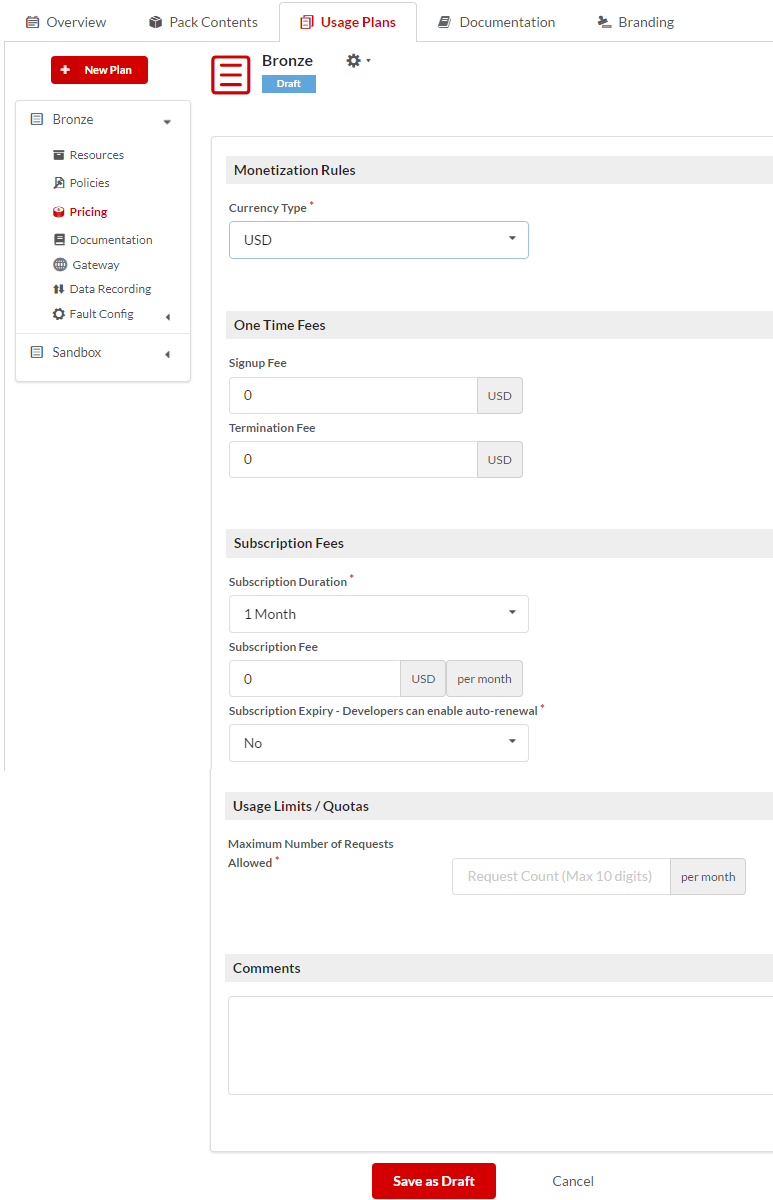
Fig. 3.237 Pricing sub-tab
The Pricing sub-tab displays fields that are relevant to the Monetization Strategy selected while creating a new API Pack.
Following steps are common to all Monetization Strategies:
Under Monetization Rules, click the Currency Type drop-down box to select the currency type for the Pricing information. The currencies available are USD, EURO and INR.
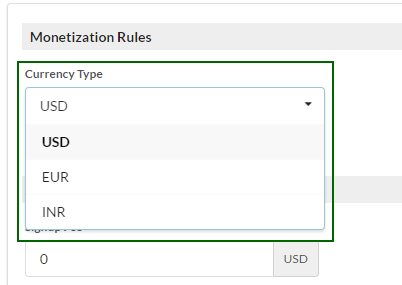
Fig. 3.238 Currency types
The Currency type for the form changes to the selected Currency type.
Under One Time Fees, in the Signup Fee box, type the sign-up fee. Sign-up fee is the fee that the developer user needs to pay for registering to a pack plan.
Under One Time Fees, in the Termination Fee box, type the Termination fee. Termination fee is the amount that will be applicable once the subscriber/consumer chooses to unsubscribe from a plan midway through the plan validity period.
Under Subscription Fees section, click the Subscription Duration drop-down list to select the number of months for which the subscription will be applicable.
Under Subscription Fees, in the Subscription Fee box, type the subscription fee that will be applicable for the number of months as selected from the Subscription Duration drop-down box from the previous step.
Under Subscription Fees, click the Subscription Expiry - Developers can enable auto-renewal drop-down list. Select Yes to allow the Developer users the option to enable auto renewal at the time of subscribing for a Pack plan from the Developer portal. Select No to deny them this option.
The fields in the Revenue Limits/Quotas section are contextual to the Monetization Strategy selected:
Monetization Strategy: Usage-based
Under Usage Limits/Quotas, type the maximum number of requests allowed per month in the Maximum Number of Requests Allowed box.
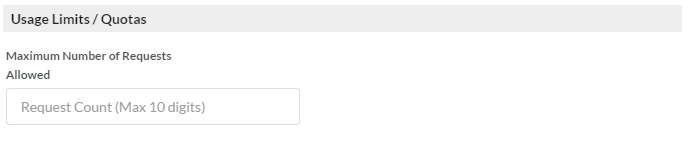
Fig. 3.239 Usage Limits
Monetization Strategy: Revenue-sharing
Under Revenue Limits/Quotas, in Percentage box, type the percentage of revenue that you wish to share with consumers.

Fig. 3.240 Revenue percentage
Monetization Strategy: Transactional
Under Transaction Limits/Quotas, in Percentage box, type the percentage of the transaction value that you want to bill Consumers.
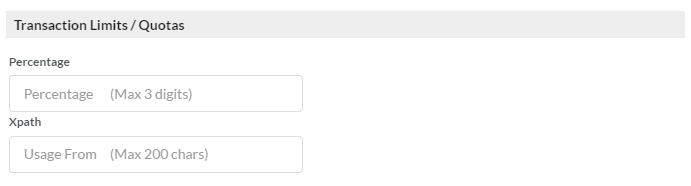
Fig. 3.241 Transaction percentage
Under Transaction Limits/Quotas, type the path to the field in the message payload that contains the transaction value in Xpath box. The path helps the Publishers keep a track of the transaction value involved in any transaction. This information is used for billing and data recording purposes.
Following steps are common to all Monetization Strategies:
In the Comment box, type any comment that you want to add to the Usage Plan.
Click Save as Draft to save changes.
Note
For the Usage-based monetization strategy, when there are multiple plans, the first plan that you create will be the main usage plan that displays inside the API Pack box in the API store.
The steps below apply to the Non-monetized strategy.
To add Limits to a Usage Plan:
Navigate to the Usage Plans tab of API Packs Configuration screen.
In the Usage Plans tab, in the left panel, click the Plan name to display collapsible Plan tabs.
Click the Limits sub-tab to display the Monetization Rules form.

Fig. 3.242 Limits sub-tab
Click to select the Limit Requests check box to enable the No of Requests box.
In the No of Requests box, type the number of request calls that you want to permit.
Click to select the Limit Validity check box to enable the Term Validity box.
Click the Term Validity drop down box to select the number of months that you want to allow the Limit Requests to be operational.
Click Save as Draft to save changes.
Attach Documentation to a Usage Plan
Documentation that you attach to a Plan is made available in the Developer portal at the Plan-level.
Note
The documentation file can be an HTML or Zip file. If you are using a Zip file, make sure you include an index.html file in the root folder.
To attach documentation to a Usage Plan:
- Navigate to the Usage Plans tab of API Packs Configuration screen.
- In the Usage Plans tab, click the Plan name to display collapsible tabs and the Plan Summary panel.
- In the collapsed tabs, click Documentation to display the Plan Documentation screen.
- In Plan Documentation, click Choose File to attach a file from your computer that has the documentation related to APIs covered under the Plan.
- In Sample Data, click Choose File to attach a file from your computer that has the examples and samples for trying out APIs covered under the Plan.
- Click Save as Draft to save changes.
Map Usage Plan to Gateways
In the Map to Gateway section, you can map the Usage Plans to all, single or multiple Gateways.
The Select the Gateway you want to map drop-down displays the list of Gateways that are configured for the publisher organization. From the Select the Gateway you want to map drop-down, choose the Gateway to which you want to map the Usage Plan. The Gateways you select will appear at the top of the drop-down. You can remove the selected Gateways by clicking the  .
.
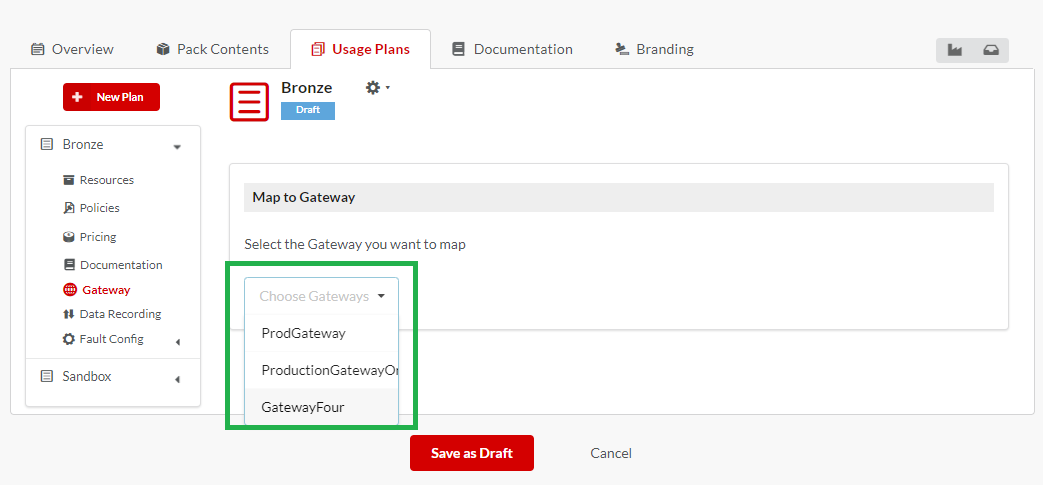
Fig. 3.243 Gateway to Map
Note
- For a Production Usage Plan, Production Gateways will be available in the drop-down list to map and for the Sandbox Usage Plan Sandbox Gateway will be available in the drop-down.
- The Usage Plan will be mapped only to the selected Gateways. If the Plan has a dependency on API then those APIs will also be mapped along with the Plan.
You can also map the Usage Plan from the Plan tab of the selected Gateway. Refer Plan.
Enable Data Recording
The Data Recording sub-tab allows the user to manage data recording activities for each resource/operation that is added to the Usage Plan. By default, the script is copied from the default script entered in the resource/operation when creating the API. The script that is included in a Usage Plan for each Resource/Operation is editable independent of the script at the API-level. If enabled, the script used in data recording of Resource/Operation at the Usage plan level is processed for that Resource/Operation and the resultant output data is logged for that Resource/Operation only. In case a particular Resource/Operation is found in more than one usage plan, scripts in each of such cases are processed and data logged in each case separately.
To enable Data Recording:
Navigate to the Usage Plans tab of API Packs Configuration screen.
In the Usage Plans tab, in the left panel, click the Plan name to display collapsible Plan tabs.
Click the Data Recording tab to display the Data Recording screen.
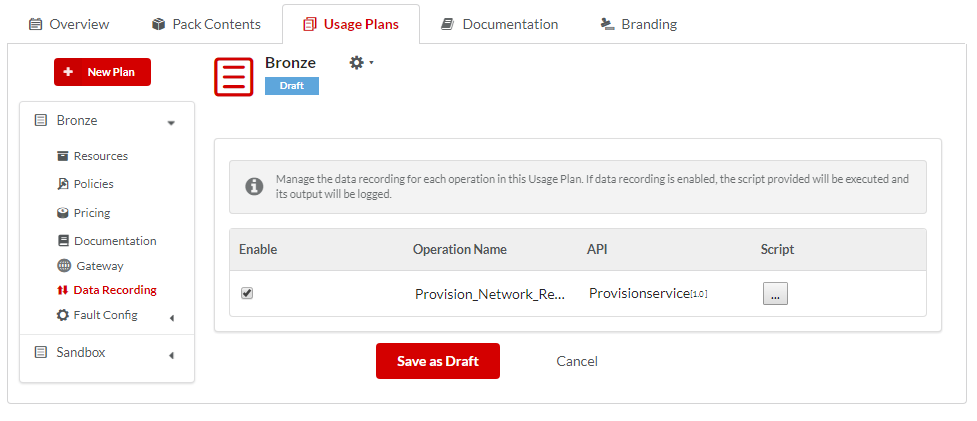
Fig. 3.244 Data Recording tab
Click to select the check box(es) under column head Enable corresponding to a Resource name(s) to allow transaction recording for the Resource(s).
Under Script, click the three-dotted button
 to display the Resource level - Data Recording script /Operation level - Data Recording script dialog box.
Edit the script to make changes, if required, and then click Submit.
Click Save as Draft to save changes.
3.9.4.2. Manage Visibility of a Usage Plan
You need to set the visibility of a Usage Plan to manage a Developer group’s accessibility to the Plan. For you to be able to set visibility to a Usage Plan for a Group, you must first set API Pack-level visibility for that Group. This is because a Group that has permission to view an API Pack shall only be allowed to view the plans contained in it.
To learn more about the Visibility feature, refer: User Roles and Portal Visibility
To manage the Visibility of a Usage Plan:
Navigate to the Usage Plans tab of API Packs Configuration screen.
In the Usage Plans tab, click the Plan name to display the collapsible Plan tabs and the Usage Plan Summary screen.
In the Usage Plan Summary screen, click the Usage Plan Action icon  to display the Usage Plan Action menu.
Click Manage Visibility to display the Usage Plan Visibility dialog box.
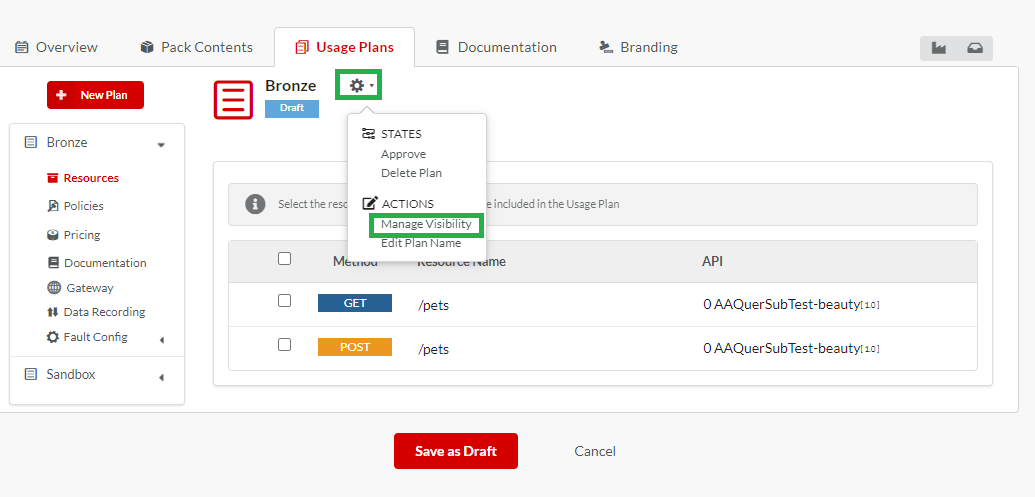
Fig. 3.245 Usage Plan Visibility dialog
The list of current Developer Groups displays.
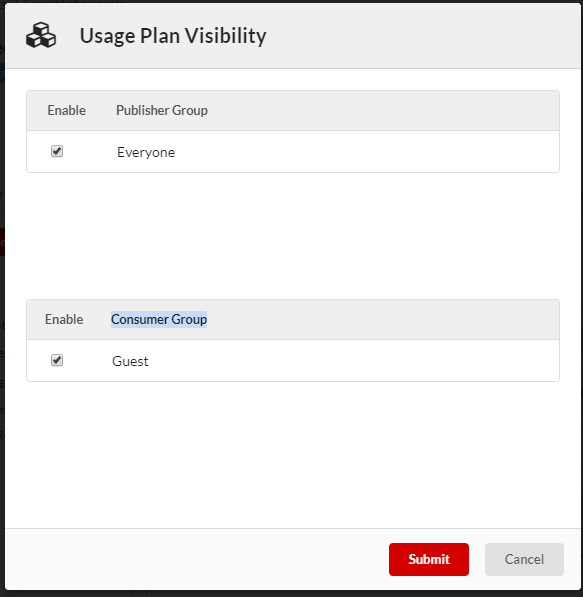
Fig. 3.246 Developer Groups
Click to select the check boxes corresponding to the Developer Groups for which you want to allow access.
Click Submit to save changes and close the dialog box.
3.9.4.3. Edit a Usage Plan Name
DigitMarket™ API Manager allows you to edit a Usage Plan name so you can have a different Plan name from the existing one:
To edit a Usage Plan name:
Navigate to the Usage Plans tab of API Packs Configuration screen.
In the Usage Plans tab, click the Plan name to display Usage Plan Summary screen.
In the Usage Plan Summary screen, click the Usage Plan Action icon  to display the Usage Plan Action menu.
Click Edit Plan Name to display the Edit Plan Name dialog box.
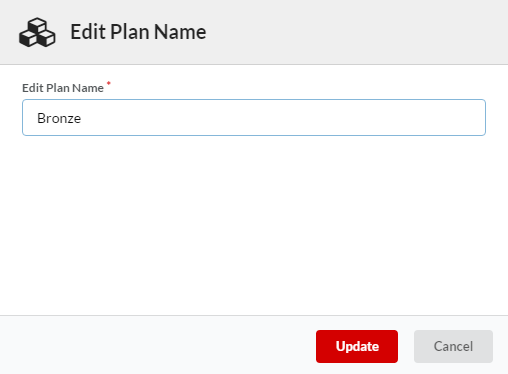
Fig. 3.247 Edit Plan Name dialog
In the Edit Plan Name box, type the new name and click Update to save changes and close the Edit Plan Name dialog box.
3.9.4.4. Send a Usage Plan for Approval
Once you are through with adding resources/operations, attaching Usage Policies, adding Pricing, attaching documentation for the Plan and Pack, and branding and selecting the Usage Plan display order (in the case of Usage-based monetization strategy), the Plan is ready to be send for approval. At the minimum, before sending a plan for approval, you must check if the following details are present for the Usage Plan:
- Resource details
- Term validity
- Usage Limits for Usage-based strategy or Transaction/Revenue limit for Transactional/Revenue-sharing strategy
- All attached policies have Approved or Published states
For Packs that have Usage-based Monetization Strategy and multiple Usage Plans, you need to send all Usage Plans for approval for you to be able to send the API Pack for approval. If there is even one Usage Plan that is still in the Draft State, the API Pack is not allowed to be send for Approval.
To send a Usage Plan for Approval:
Navigate to the Usage Plans tab of API Packs Configuration screen.
In the Usage Plans tab, click the Plan name to display the collapsible sub-menu and Usage Plan Summary screen.
In the Usage Plan Summary screen, click the Usage Plan Action icon
 to display the Usage Plan Action menu.
Click Submit for Approval to send the Usage Plan for approval.
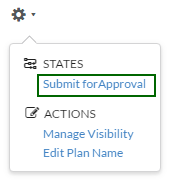
Fig. 3.248 Usage Plan for approval
The State of the Usage Plan changes from Draft to Submitted for Approval if Automatic Approval Workflow is disabled. The state of the Usage Plan changes automatically to Approved if Automatic Approval Workflow is enabled.
Note
All the Plans under a Pack have to be in the Approved or Published State for you to be able to send the Pack for approval.
Once the Usage Plan is approved, the Usage Plan’s State changes from Submitted for Approval to Approved. An Approved Usage Plan displays in the Gateway Sync screen, from where it needs to be propagated and made operational in the Gateway. Once the Plan is propagated to the Gateway, the State of the Plan changes to the Published state. The Published state of the Plan (and other plans in the case of Usage-based strategy) allows you to send the Pack for approval.
Note
All the Policies that you have attached to the Plan either at the Plan-level or Resource or Operation-level have to be in the Approved or Published State for you to be able to send the Plan for approval.
3.9.4.5. Deprecate a Usage Plan
User can deprecate a Usage Plan if it is in its Approved /Published State.
To deprecate a Usage Plan in Approved State:
Navigate to the Usage Plans tab of API Packs Configuration screen.
In the Usage Plans tab, click the Plan name to display the collapsible sub-tabs and Usage Plan Summary screen.
In the Usage Plan Summary screen, click the Usage Plan Action icon
to display the Usage Plan Action menu.Click Submit for Deprecation (for manual workflows) or click Deprecate (for automatic workflows) to send the Usage Plan for deprecation.
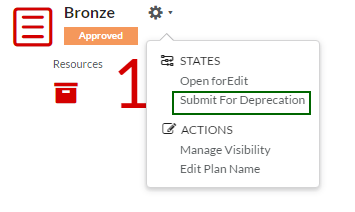
Fig. 3.249 Usage Plan for deprecate
A warning message appears asking you to confirm your action.
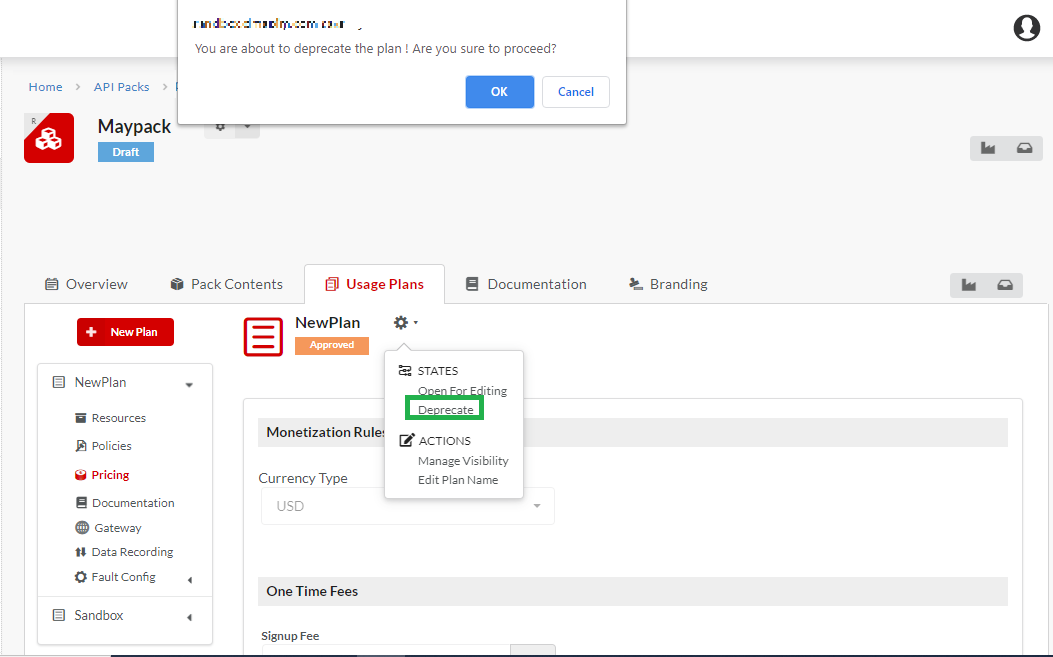
Fig. 3.250 Warning for Deprecating a Usage Plan
Click OK to proceed or click Cancel to exit.
For automatic workflows, the state of Usage Plan changes to Deprecated.
For manual workflows, the state of the Usage Plan changes from Approved to Approved.Submitted for Deprecation.
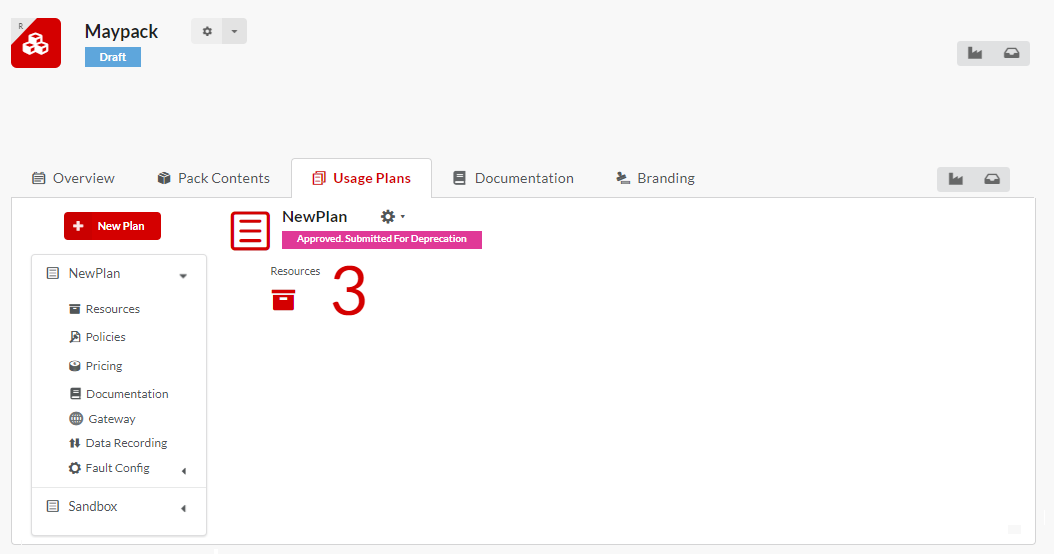
Fig. 3.251 Approved Submitted for Deprecation
Once the Approval request for deprecation is approved, the Usage Plan’s state changes from Approved.Submitted for Deprecation to Deprecated.
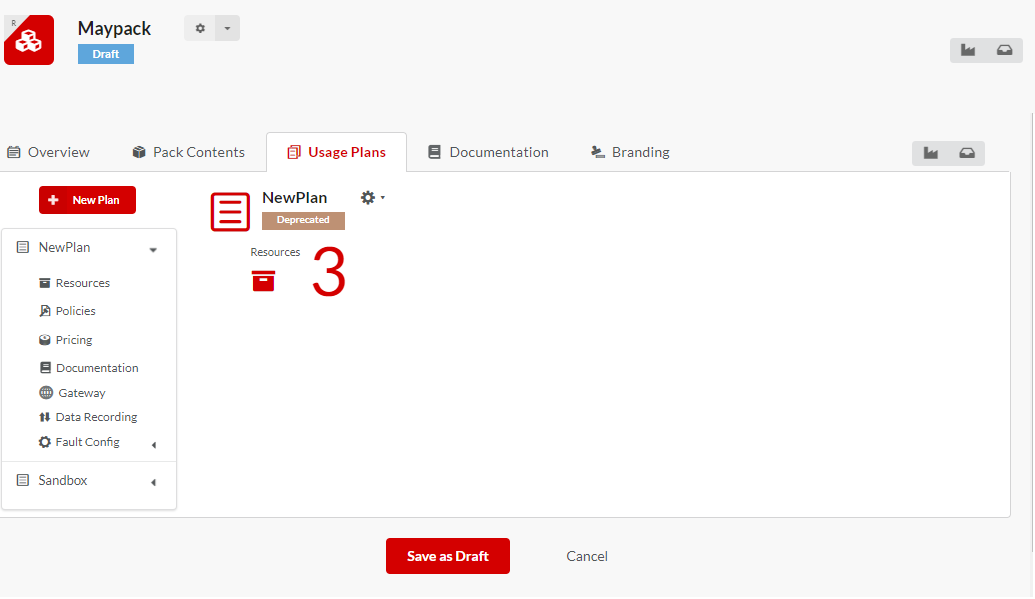
Fig. 3.252 Deprecated
If the approval request for Deprecation is rejected, the Usage Plan’s state changes from Approved.Submitted for Deprecation to Approved.
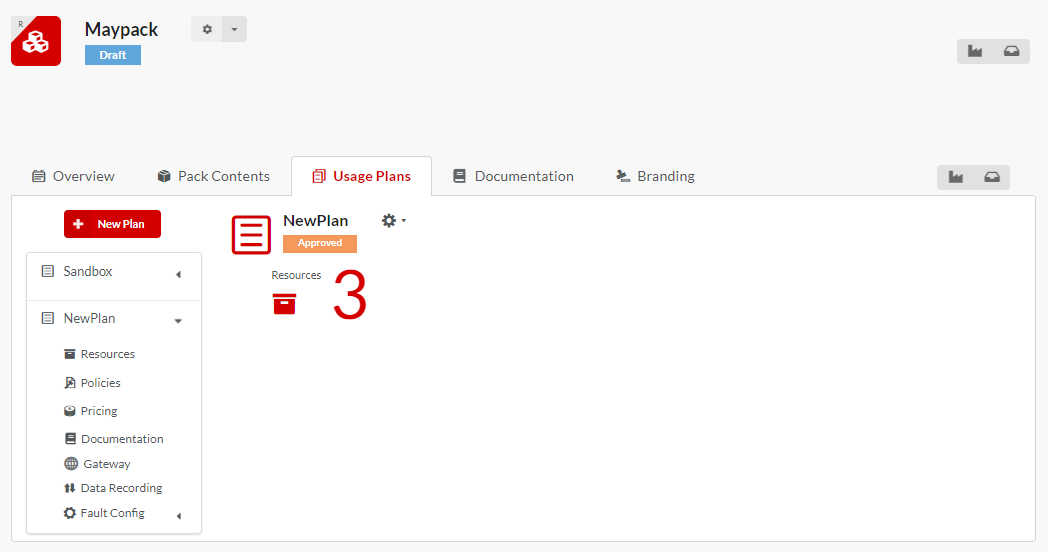
Fig. 3.253 Approved
To deprecate a Usage Plan in Published State:
Navigate to the Usage Plans tab of API Packs Configuration screen whose API Packs is in Published state. Click the drop down and select Open for Edit.
In the Usage Plans tab, click the Plan name to display the collapsible sub-tabs and Usage Plan Summary screen.
In the Usage Plan Summary screen, select a usage plan in Published state click the Usage Plan Action icon
to display the Usage Plan Action menu.Click Submit for Deprecation (for manual workflows) or click Deprecate (for automatic workflows) to send the Usage Plan for deprecation.
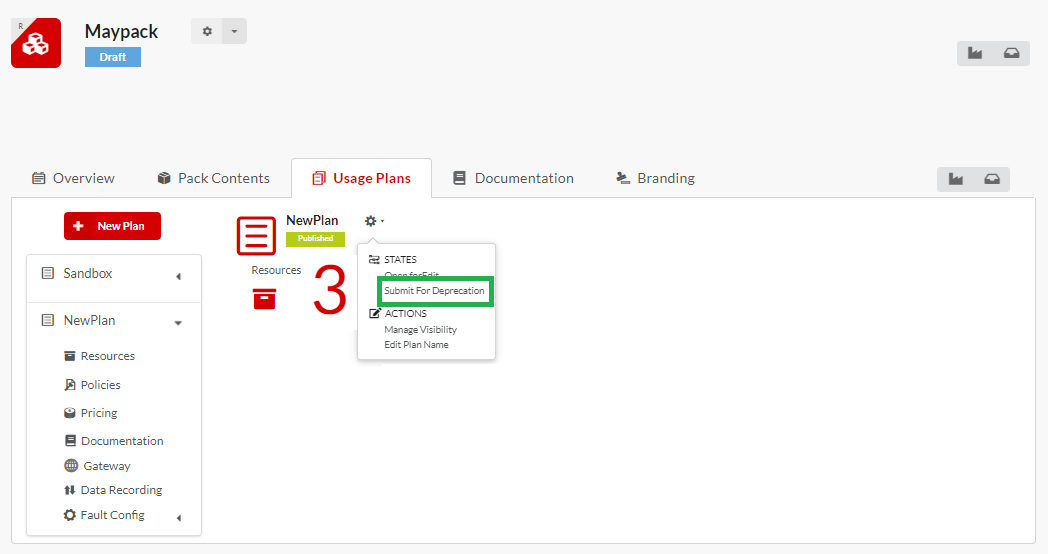
Fig. 3.254 Usage Plan for deprecate
A warning message appears asking you to confirm your action.
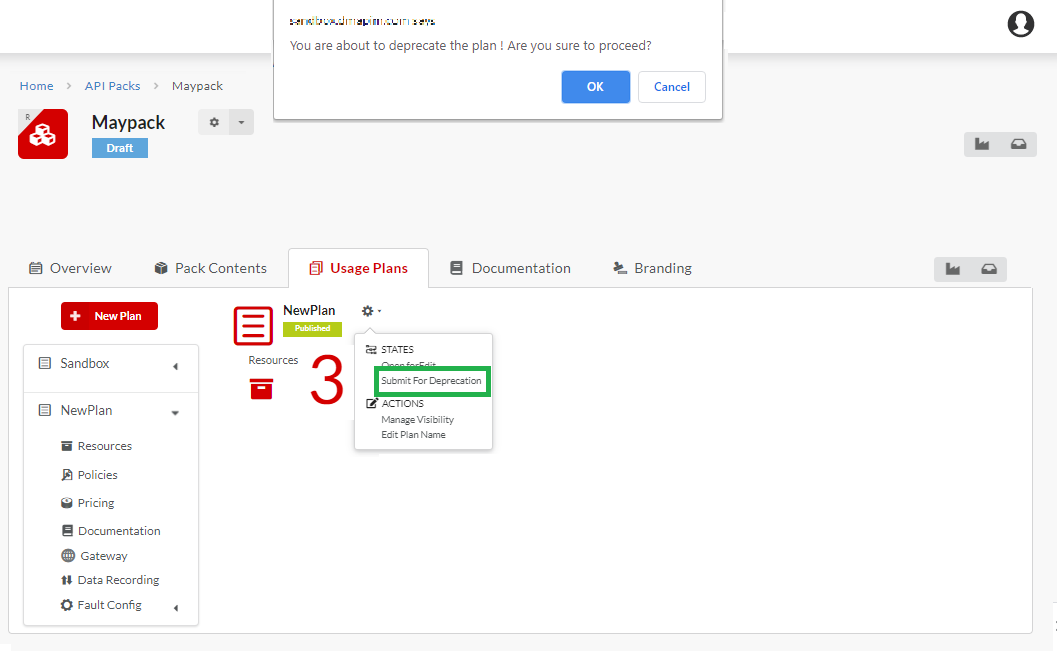
Fig. 3.255 Warning for Deprecating a Usage Plan
Click OK to proceed or click Cancel to exit.
For automatic workflows, the state of Usage Plan changes to Deprecated.
For manual workflows, the state of the Usage Plan changes from Published to Published.Submitted for Deprecation.
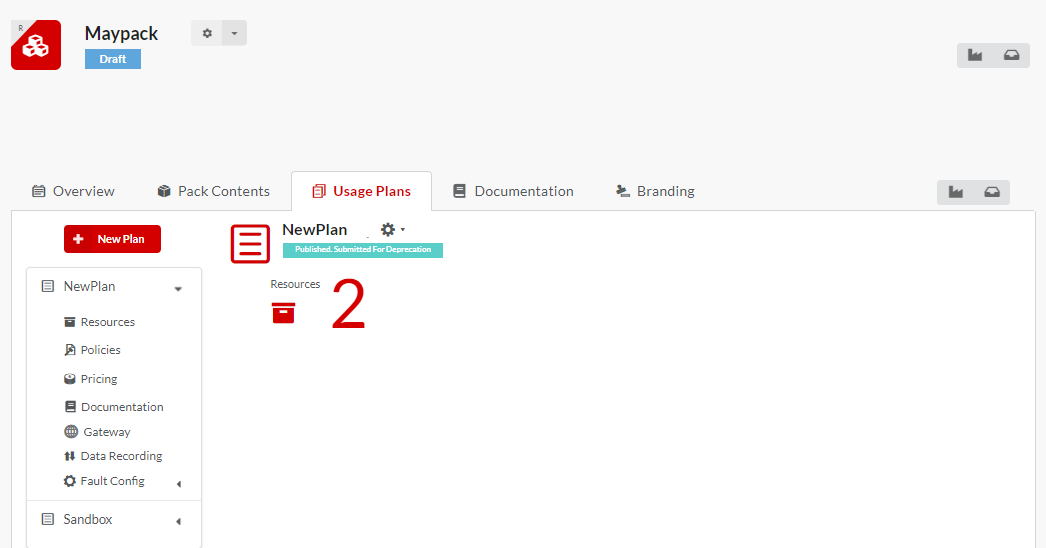
Fig. 3.256 Published Submitted for Deprecation
Once the Approval request for deprecation is approved, the Usage Plan’s state changes from Published.Submitted for Deprecation to Deprecated.
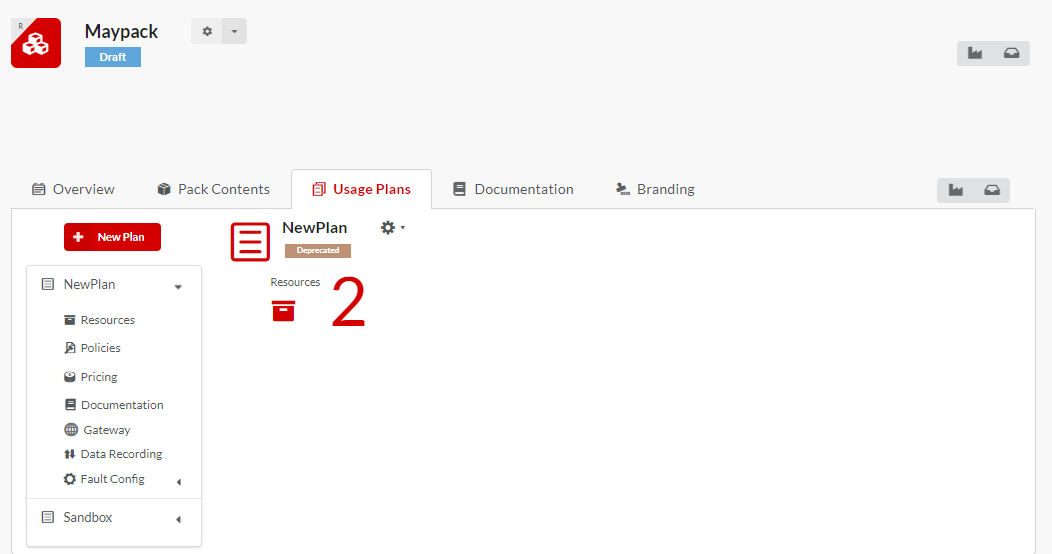
Fig. 3.257 Deprecated
If the approval request for Deprecation is rejected, the Usage Plan’s state changes from Published.Submitted for Deprecation to Published.
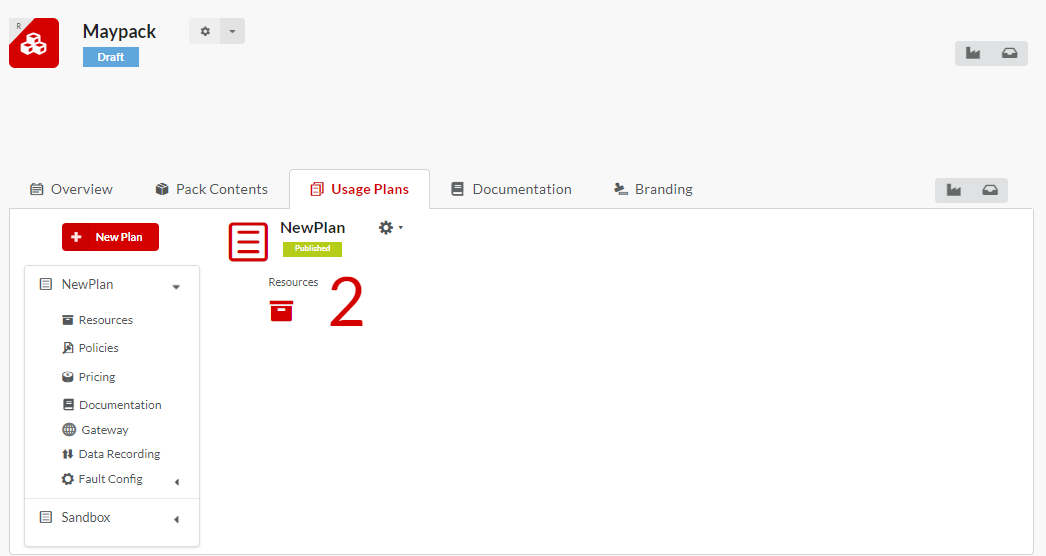
Fig. 3.258 Published
3.9.4.6. Retire a Usage Plan
You can retire a Usage Plan if:
- It is in its Deprecated State
- There are no active subscriptions present for the plan (all subscriptions must be expired).
To retire a Usage Plan:
Navigate to the Usage Plans tab of API Packs Configuration screen.
In the Usage Plans tab, click the Plan name to display the collapsible submenu and Usage Plan Summary screen.
In the Usage Plan Summary screen, click the Usage Plan Action icon
to display the Usage Plan Action menu.Click Submit for Retirement (for manual workflows) or click Retire (for automatic workflows) to send the Usage Plan for retirement.

Fig. 3.259 Usage Plan for Retire
A warning message appears asking you to confirm your action.
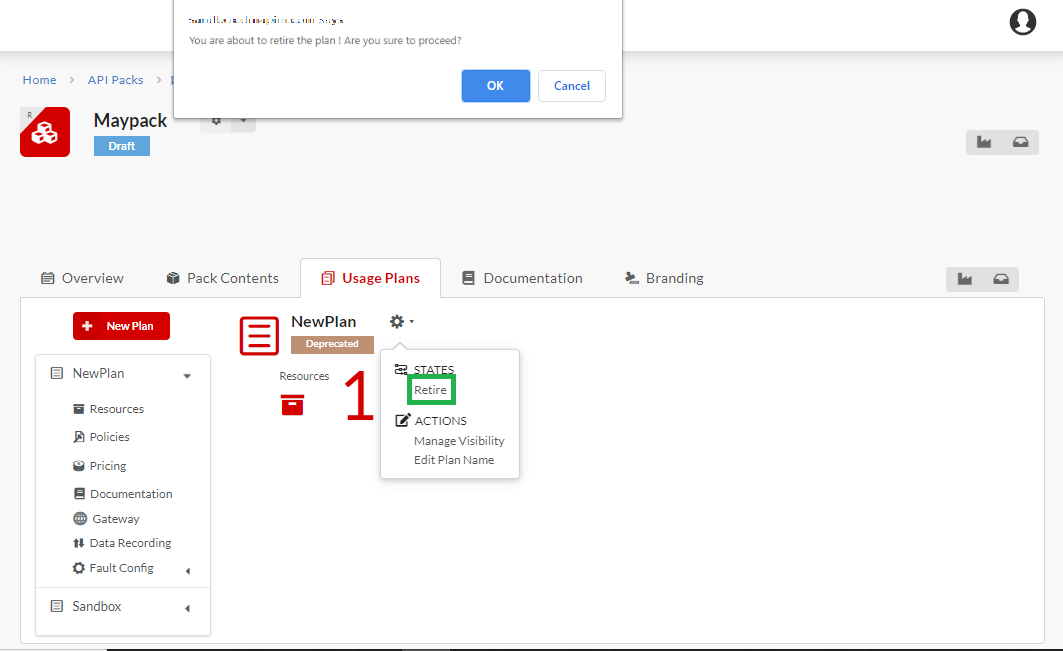
Fig. 3.260 Warning for Retiring a Usage Plan
Click OK to proceed or click Cancel to exit.
For automatic workflows, the state of Usage Plan changes to Retired.
For manual workflows, the state of the Usage Plan changes from Deprecated to Submitted for Retirement. Once the approval request for Usage Plan retirement is approved, the Usage Plan’s state changes from Submit for Retirement to Retired.
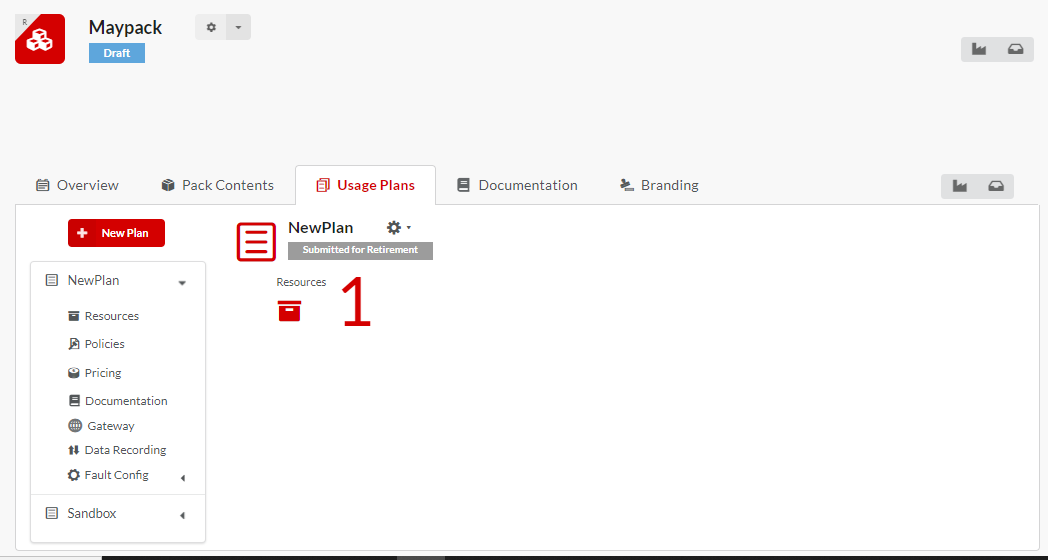
Fig. 3.261 Submitted for Retirement
If the approval request for Usage Plan retirement is rejected, the Usage Plan’s state changes from Submitted for Retirement to Deprecated else the state will change to Retired.
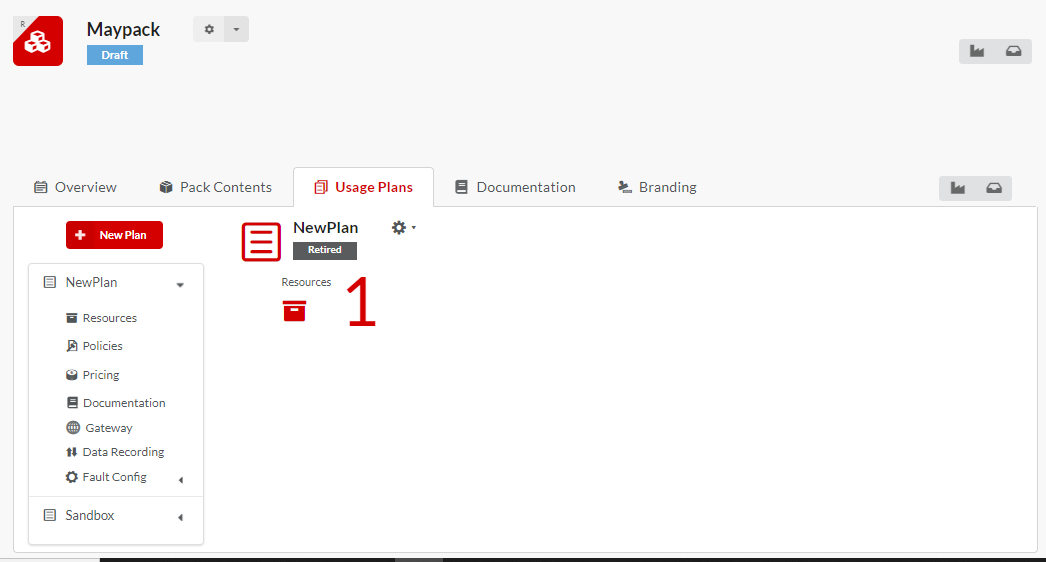
Fig. 3.262 Retired
3.9.4.7. Open an Approved or Published Usage Plan for Editing
The “Open For Editing” feature that is available from the Usage Plan Action menu enables you to make an Approved Usage Plan available for editing.
To enable editing of an Approved Usage Plan:
Navigate to the Usage Plans tab of API Packs Configuration screen.
In the Usage Plans tab, click the Plan name to display Usage Plan Summary screen.
In the Usage Plan Summary screen, click the Usage Plan Action icon
to display the Usage Plan Action menu.In the Usage Plan Action menu, click Open for Edit.
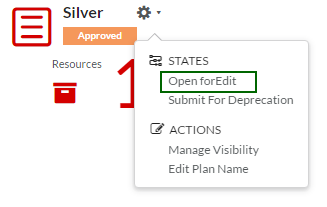
Fig. 3.263 Usage Plan - Open for Edit
The Usage Plan State changes from Approved to Approved Waiting Approval for Editing.
The Usage Plan is sent for approval and once a Publisher user approves it, the state of the Usage Plan changes to draft. You can now edit the Usage Plan.
Once you are done with making changes to the Usage Plan, send the Usage Plan for Approval. When approved, the State of the Usage Plan changes back to the Approved state.
To propagate the Usage Plan and make it operational, complete the tasks in the section: Synchronize Changes.
3.9.4.8. Discard Changes after opening a Usage Plan for Editing
You can discard the draft and revert to earlier Approved Usage Plan if you change your mind about revising the Usage Plan after opening it for editing.
To Discard the Draft after opening a Usage Plan for editing:
Navigate to the Usage Plans tab of API Packs Configuration screen.
In the Usage Plans tab, click the Plan name to display Usage Plan Summary screen.
In the Usage Plan Summary screen, click the Usage Plan Action icon
to display the Usage Plan Action menu.In the Usage Plan Action menu, click Discard Draft to submit the request for discarding the API Pack draft.
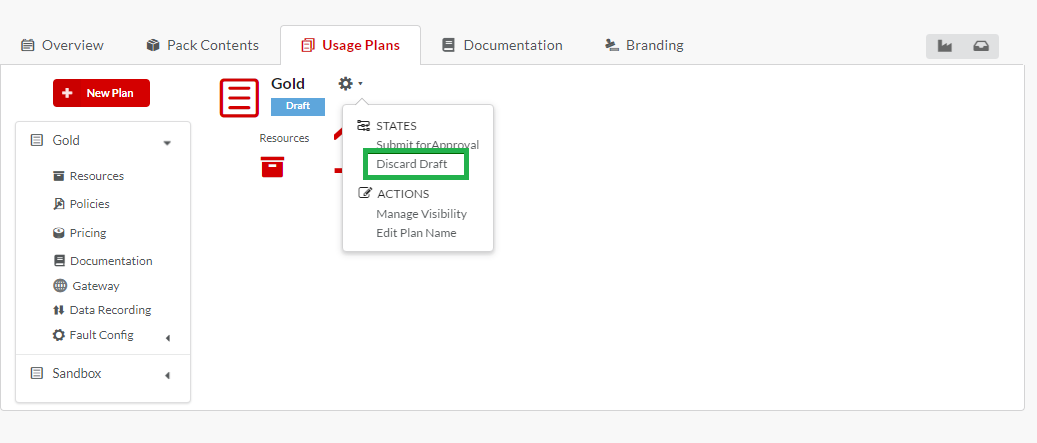
Fig. 3.264 Usage Plan - Action menu
The Usage Plan State reverts to the Approved state and the approved Usage Plan before the last Open for Editing is restored.
3.9.4.9. Modify Usage Plan Display Order
There can be more than one Usage Plan in the case of Plans based on Usage-based monetization Strategy. You can set the order in which they display in the Developer portal. By default, the plans display in the order of their creation.
To modify the Usage Plan Display Order, complete the task below:
To modify Usage Plan Display Order:
Navigate to the Usage Plans tab of API Packs Configuration screen.
When there are more than one Usage Plan, Usage Plans tab Summary screen displays Modify Usage Plans Display Order panel. Alternatively, in the Usage Plans tab, click a Plan name to bring it to the collapsed state.
In the Usage Plans tab Summary screen, under Modify Usage Plans Display Order, drag and drop the Usage Plan buttons to re-arrange the order of their display in the Developer portal.
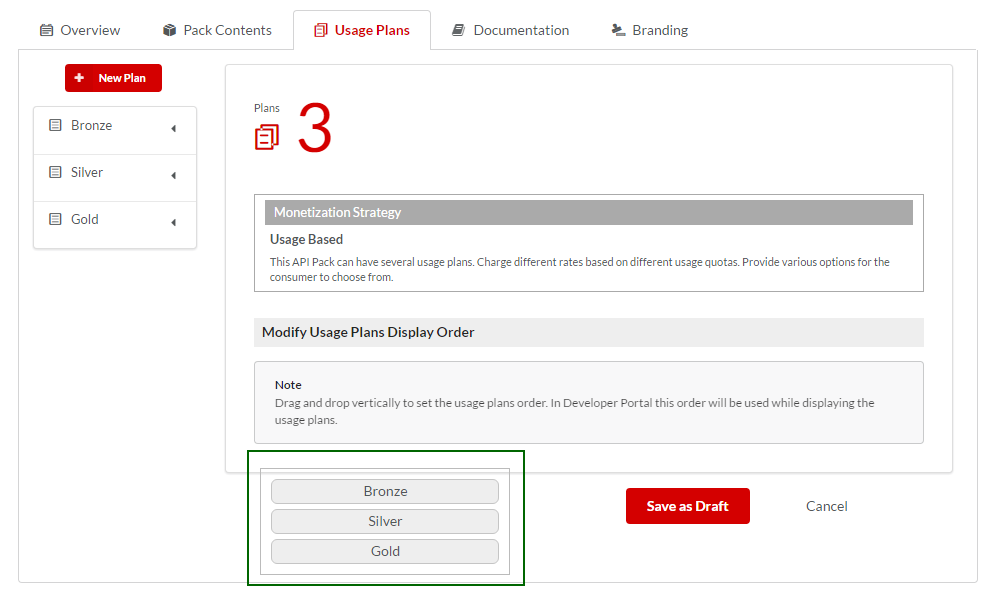
Fig. 3.265 Usage Plans Display Order
Note
The Modify Usage Plans Display Order panel displays only if there are multiple Usage Plans available in the Usage Plans tab.
Click Save as Draft to save changes.
3.9.4.10. Delete a Usage Plan
You can delete a Usage Plan provided the API Pack to which it belongs is in any of the following States:
- Draft (Conditional)
- Retired
A Usage Plan in the Draft state can be deleted provided no Resource/Operation has yet been added to the Pack.
Note
The Usage Plan Summary screen displays a zero against Resources/Operations Summary if a resource/operation is yet to be added to the Plan.
To delete a Usage Plan:
Navigate to the Usage Plans tab of API Packs Configuration screen.
In the Usage Plans tab, click the Plan name to display Usage Plan Summary screen.
In the Usage Plan Summary screen, click the Usage Plan Action icon
to display the Usage Plan Action menu.Click Delete Plan to delete the currently open Usage Plan.
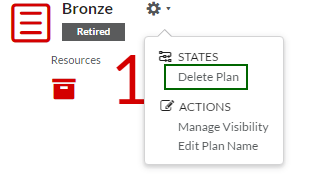
Fig. 3.266 Delete Plans
A warning message appears asking you to confirm your action.
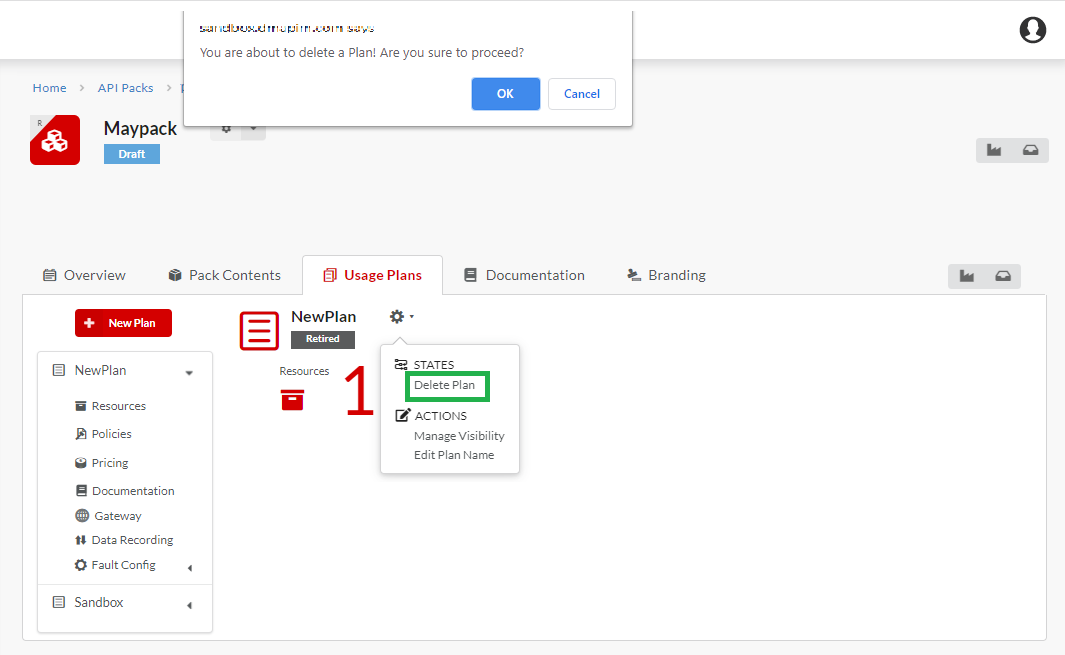
Fig. 3.267 Warning for Deleting a Usage Plan
Click OK to proceed or click Cancel to exit.
3.9.5. Attach Documentation to an API Pack
Documentation that you attach to an API Pack is made available in the Developer portal at the Pack-level. The documentation file can be an HTML or Zip file. If you are using a Zip file, make sure you include an index.html file in the root folder.
To attach documents to an API Pack:
Navigate to the Documentation tab of API Packs Configuration screen.
The Documentation screen displays.
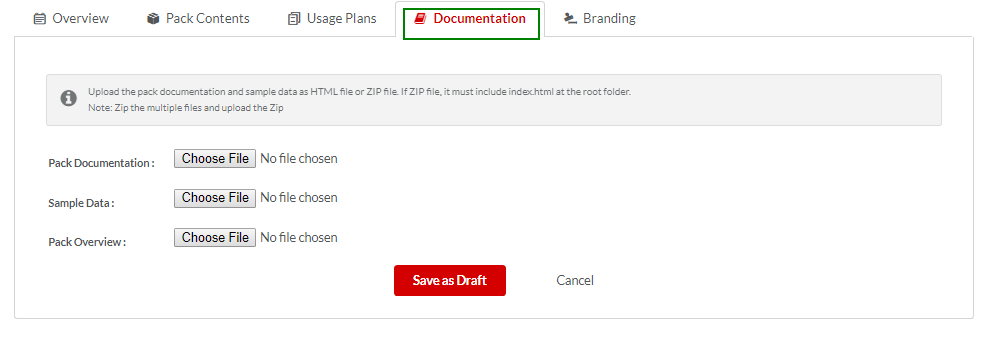
Fig. 3.268 Documentation tab
Click the Choose File button alongside Pack Documentation to attach a file from your computer that has the documentation related to APIs covered under the Pack.
Click the Choose File button alongside Sample Data to attach a file from your computer that has the examples and samples for trying out APIs covered under the Pack.
Click the Choose File button alongside Pack Overview to attach a file from your computer that has the overview description for the Pack.
Click Save as Draft to save changes.
3.9.6. Brand an API Pack for Developer portal
You can customise the look and feel of API Packs in the Developer portal. Customizing the background images and pack icons enables you to add branding to your API Packs in the Developer portal. You can add a background image, a banner image and an icon to go with an API Pack. You can also select a Category from the Category Tree to which you want to assign an API Pack. The Category tree (as explained later) is used to display categories in the API Store.
Before you begin:
- The Branding tab is available only to the business-level users.
- The fields marked with asterisks are mandatory.
To apply Branding to your API Pack in the Developer portal:
Navigate to the API Packs Configuration screen.
In the API Packs Configuration screen, click the Branding tab.
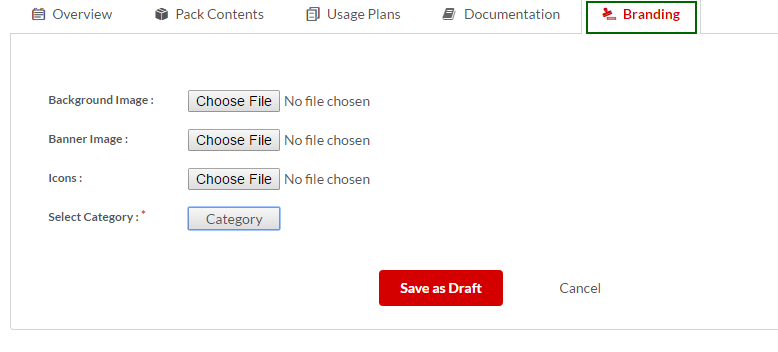
Fig. 3.269 Branding tab
In the Background Image: field, click Choose File to choose an image file (JPEG, PNG) from your local machine.

Fig. 3.270 Background Image
Open a high-resolution PNG or JPG image for your background image. The dimension for the image should ideally be 265 x 125 pixels. The background image you choose here will be used as the background for the API Pack Display box in the API Stores and the API Pack Details page in the Developer portal.
The chosen image file name displays alongside the Choose File button indicating that the background image is uploaded successfully.
In the Banner Image: field, click Choose File to choose an image file (JPG, PNG) from your local machine. The banner image you choose here will be used as the banner for the API Pack Details page in the Developer portal.
Open a high resolution image for your banner image. The dimension for the image should ideally be 1142 x 179 pixels.
The image file name displays alongside the Choose File button indicating that the banner image is uploaded successfully.
In the Icons: field, click Choose File to choose an image file (JPG, PNG) from your local machine to represent an icon for the API Pack. The icon image that you choose here will be used as the icon image for the API Pack Display box in the API Stores page in the Developer portal.
Open an image for your icon image. The dimension for the image should ideally be 41 x 41 pixels.
The image file name displays alongside the Choose File button indicating that the icon image is uploaded successfully.
In the Select Category field, Click Category to display the Branding - Select Category dialog box.
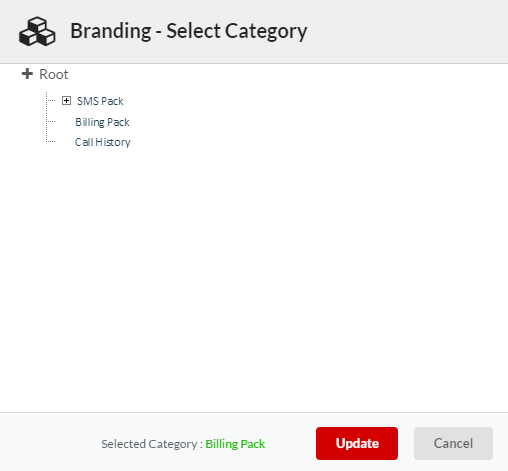
Fig. 3.271 Branding - Select Category dialog
Click to select the Category you want to assign to the API Pack. The Category to display the currently open API pack in the Developer portal is based on the category you select here.
You can also add/delete/edit a category from the Category Tree dialog box.
To learn more on how to add/delete/edit categories to the Category Tree, visit: Manage API Pack Categories.
Click Update once you are done with selecting the category. The selected category displays alongside the Category Tree indicating that the category has been assigned to the currently open API Pack.
Note
In the absence of user-uploaded images, the default images apply.
Click Save as Draft to save changes to the Branding tab.
Next Steps
The next section takes you through the steps necessary to manage Visibility of an API Pack.
3.9.7. Manage Visibility of an API Pack
The API Pack Configuration screen allows you to select the Publisher and Developer Group(s) that have access permissions to view an API Pack. The Visibility option available from the API Pack Action menu helps associate Publisher and Developer groups with a Pack. Once a Developer Group is associated with a Pack, all the members of that Group can view and subscribe to Plans under that Pack.
To learn more about the Visibility feature, refer: User Roles and Portal Visibility.
To select which Publisher Groups should be permitted access to the currently open API pack:
Navigate to the API Packs Configuration screen.
In the API Packs Configuration screen, click the Action icon
to display the API Pack Action Menu.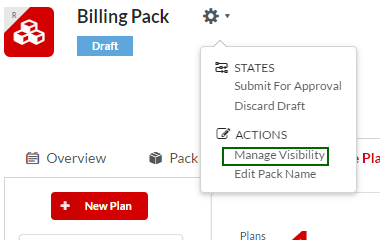
Fig. 3.272 API Pack Action Menu - Manage Visibility
In the API Pack Action Menu, click Manage Visibility to display the Manage Visibility dialog box with two panels named For Publishers and For Developers.
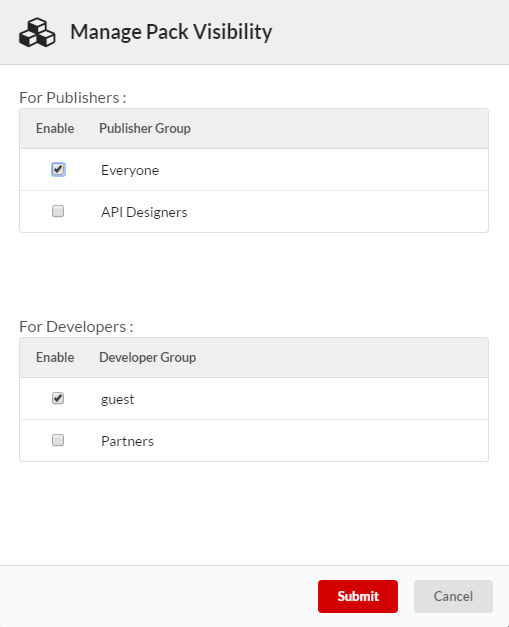
Fig. 3.273 Manage Visibility dialog
In the For Publishers panel, click to select the check box(es) corresponding to the Publisher Group(s) for which you want to allow access to the currently open API Pack.
Click Submit to save changes. A notification message “API Pack visibility details were updated” displays.
To select which Developer groups are permitted access to the currently open API pack:
Navigate to the API Packs Configuration screen.
In the API Packs Configuration screen, click the Action icon to display the API Pack Action Menu.
Fig. 3.274 API Pack Action Menu - Manage Visibility
In the API Pack Action menu, click Visibility to display the Manage Pack Visibility dialog box with two panels named For Publishers: and For Developers:.
Fig. 3.275 Manage Pack Visibility dialog
In the For Developers: panel, click to select the check box(es) corresponding to the Developer Group(s) for whom you want to allow access.
Click Submit to save changes.
Note
Visibility set for Developer Groups is limited to only viewing API Packs.
3.9.8. Edit an API Pack Name
You can change the name of an API Pack notwithstanding its State in its life cycle.
To edit an API Pack name:
Navigate to the API Packs Configuration screen.
In the API Packs Configuration screen, click the Action icon
. The API Pack Action menu displays.Click Edit Pack Name to display the Edit Pack Name dialog box.
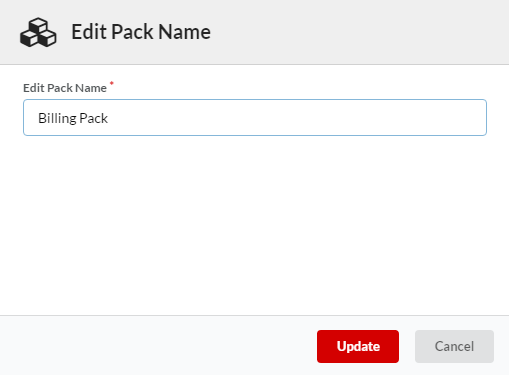
Fig. 3.276 Edit Pack Name dialog
Make the necessary changes and click Update to save changes and close the dialog box.
3.9.9. Send an API Pack for Approval
You need to publish all the Usage Plans that have been created within a API Pack for you to be able to publish the API Pack. An API Pack is restricted from being send for approval if any Usage Plan remains in the Draft or Approved State, which means that all the Plans under the Pack must be in the Published State.
To publish an API Pack:
Navigate to the API Packs Configuration screen.
Click the Action icon
 . The API Pack Action menu displays.
In the API Pack Action menu, click Submit For Approval to send the Draft API Pack for approval if the Automatic Workflow for the Pack for the user is enabled, or click Publish to publish the API Pack if the Automatic Workflow for the Pack for the user is enabled.
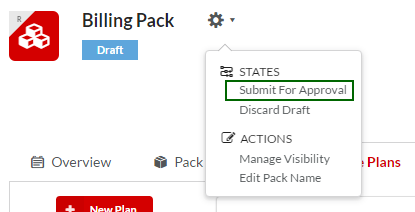
Fig. 3.277 Submit API for approval
If Automatic Workflow for the Pack for the user is not enabled, the State of the API Pack changes from Submit for Approval to Submitted for Approval. If Automatic Workflow for the Pack for the user is enabled, the State of the API Pack changes from Draft to Published.
Note
In case any of the mandatory fields in the Overview, Pack Contents, Documentation and Branding tabs is not filled or any of the Usage Plan is not Approved, a notification message displays, and you are not allowed to send the Pack for approval.
The API Pack is sent for approval if Automatic Workflow for the API Pack is not enabled. After the Pack is approved, the state of the API Pack changes to Approved.
If Automatic Workflow for the Pack for the user is enabled - and since there is no sync for API Packs - its State changes to Published and all the Plans under the Pack is now available on the Developer portal.
3.9.10. Deprecate an API Pack
You can deprecate an API Pack that you want to retire in the future. The Plans under a Deprecated API Pack remain operational for the existing subscribers until the Pack is retired. The option to deprecate an API Pack is available only if the API Pack is in its Approved State.
To Deprecate an API Pack:
- Navigate to the API Packs Configuration screen.
- Click the API Pack Action icon . The API Pack Action menu displays.
- In the API Pack Action menu, click Submit for Deprecation (for manual workflows) or click Deprecate (for automatic workflows) to send the Approved API Pack for Deprecation.
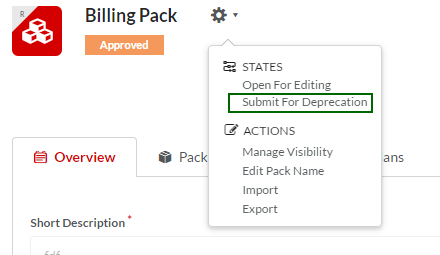
Fig. 3.278 Submit for Deprecation
A warning message appears asking you to confirm your action.
Fig. 3.279 Warning for Deprecating an API Pack
- Click OK to proceed or click Cancel to exit.
For automatic workflows, the state of API Pack changes to Deprecated.
For manual workflows, the API Pack is sent for approval and once approved the state of the API Pack changes to Deprecated.
3.9.11. Retire an API Pack
An API Pack that is deprecated can be retired, provided all of the Usage Plans under the Pack are also in their Retired States. A Retired API Pack ceases to display in the API Store, which means that Consumers can no longer subscribe to the Plans under the API Pack.
To retire an API Pack:
Navigate to the API Packs Configuration screen.
Click the API Pack Action icon
. The API Pack Action menu displays.In the API Pack Action menu, click Submit For Retirement (for manual workflows) or click Retire (for automatic workflows) to send the Deprecated API Pack for Retirement.
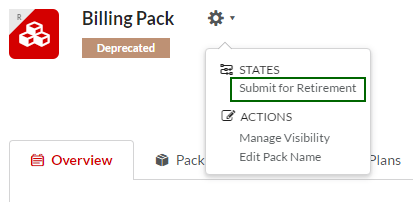
Fig. 3.280 Submit for Retirement
A warning message appears asking you to confirm your action.
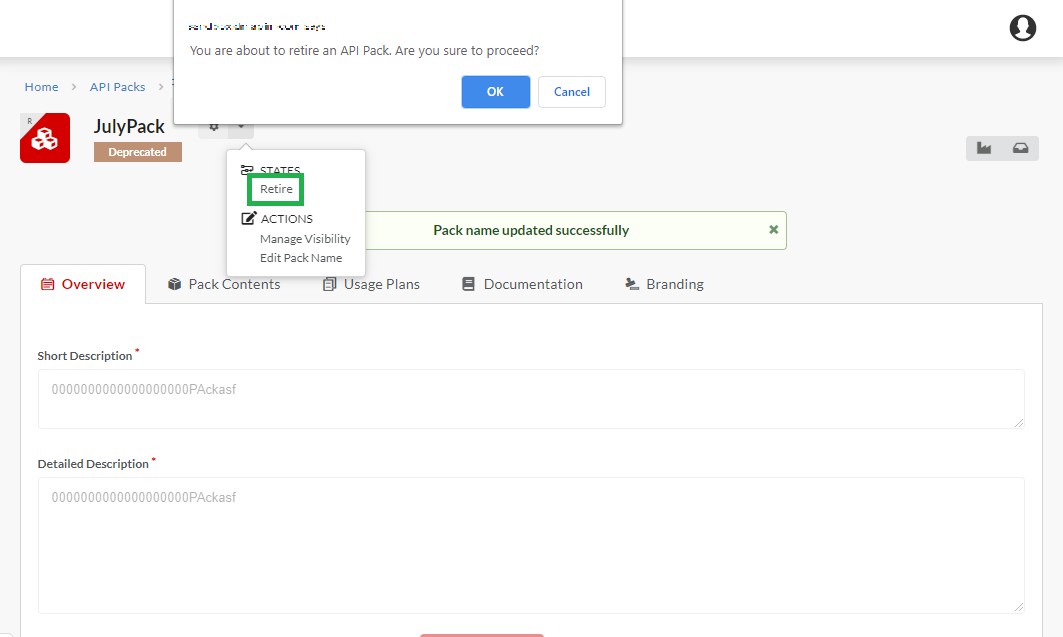
Fig. 3.281 Warning for Retiring an API Pack
Click OK to proceed or click Cancel to exit.
For automatic workflows, the state of API Pack changes to Retired.
For manual workflows, the API Pack is sent for approval and once it is approved the state of the API Pack changes to Retired, indicating that the API Pack will no longer be available in the Developer portal.
3.9.12. Open an Approved API Pack for Editing
Approved API Packs are API Packs that are ready to be subscribed and consumed by the Developer community. You cannot directly edit an Approved API Pack to, for instance, add another Resource/Operation from an API. To enable editing, you have to send the Pack for edit approval using the “Open For Editing” option that is available from the API Pack Action menu.
To enable editing of an Approved API pack:
Navigate to the API Packs Configuration screen.
Click the API Pack Action icon
. The API Pack Action menu displays.In the API Pack Action menu, click Open for Editing.
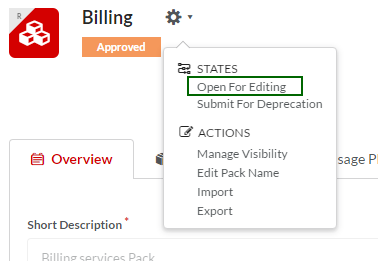
Fig. 3.282 Open for Editing
The API Pack state changes from Approved to Approved, Awaiting Approval for Editing.
The API Pack is sent for approval and once the Publisher user approves it, the state of the API Pack changes to Draft. You can now edit the Pack as it has the Draft State.
Once you are done with making changes to the API Pack, submit the API Pack for approval. After the approval, the API Pack’s State changes to Approved.
To make the changes operational complete the tasks enumerated in the section: Gateway Sync.
3.9.13. Discard Changes after opening an API Pack for Editing
You can discard the draft and revert to earlier Approved API Pack if you change your mind about making any revision to the API Pack after opening it for Editing.
To Discard the Draft after opening an API Pack for editing:
Navigate to the API Packs Configuration screen.
Click the API Pack Action icon
. The API Pack Action menu displays.In the API Pack Action menu, click Discard Draft to submit the request for discarding the API Pack draft.
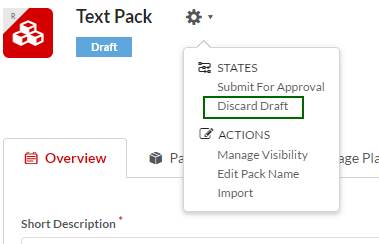
Fig. 3.283 Discard Draft
The API Pack State reverts to the Approved state and the approved API Pack before the last Open for Editing is restored.
3.9.14. Search an API Pack
The user can search for an API Pack using the Search feature present in the API Packs list pages. To learn more about the Search feature, refer the topic: Search.
The search results page displays matches for the search from the following API Pack components:
- API Pack name
- Overview (all components)
- Resource names in the pack
- Resource description for each resource in the pack
- Usage Plan names
- Usage Plan - Associated Policy names
- API Name
- API Version number
- Monetization strategy used
- Plan documentation file name
- Pack documentation file name
- Pack branding details
To search components of an API Pack:
Navigate to the API Packs screen.
In the search box, type in the keyword(s) for starting a search on an API Pack or one of its components.

Fig. 3.284 Search API Pack Components
Click the Search icon
 to display the search results.
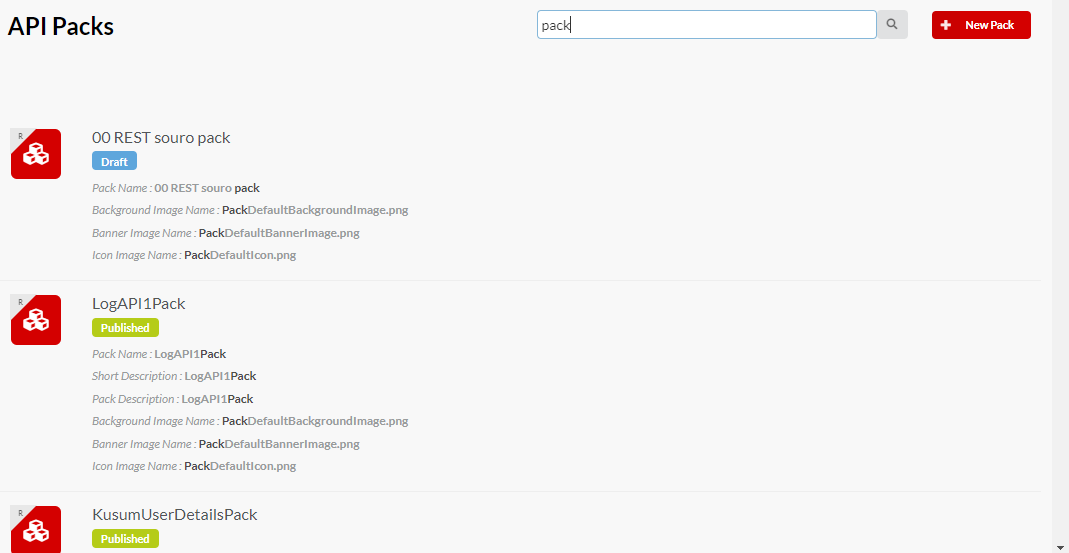
Fig. 3.285 Search results
Each entry in the Search result page takes the following format for displaying matches:
<API Pack Name>
<State>
<matches>...

<API Pack name>
<State>
<matches>...
For example, a search for the word ‘call duration’ in the API packs screen returns:
Call Details Pack
Draft
Pack Name : Call Details Pack
Short Description : details of calls
Pack Description : details of calls
Resource name matched In api :Credit Balance~1.0~/CallDuration
Resource Desc matched In api :Credit Balance~1.0~get the call duration for calls made for a period
Resource Name Matched In Plan :Gold:/CallDuration
Next Steps
In the next section, you will learn to export and import API Packs.