3.2. Getting Started
The Getting Started section will attempt to familiarize you with the login processes and the initial UIs.
In this Section:
- Log in to the Publisher Portal
- Login Case-sensitivity
- User Roles and Access
- Change your User Profile
- User Login Issues
- Password Expiry Notification
- Changing Password after Expiry
- Password Policy on Change/Reset Password
- Customized Login Failure Messages
For a 30-day free evaluation of DigitMarket™ API Manager:
For accessing DigitMarket™ API Manager, you can sign up from the Login page of the Publisher portal.
Use the URL provided to access the Publisher portal’s login page.
Fill the Sign up form, and then click Sign Up to submit it for our approval. A default admin user will be created after signup.
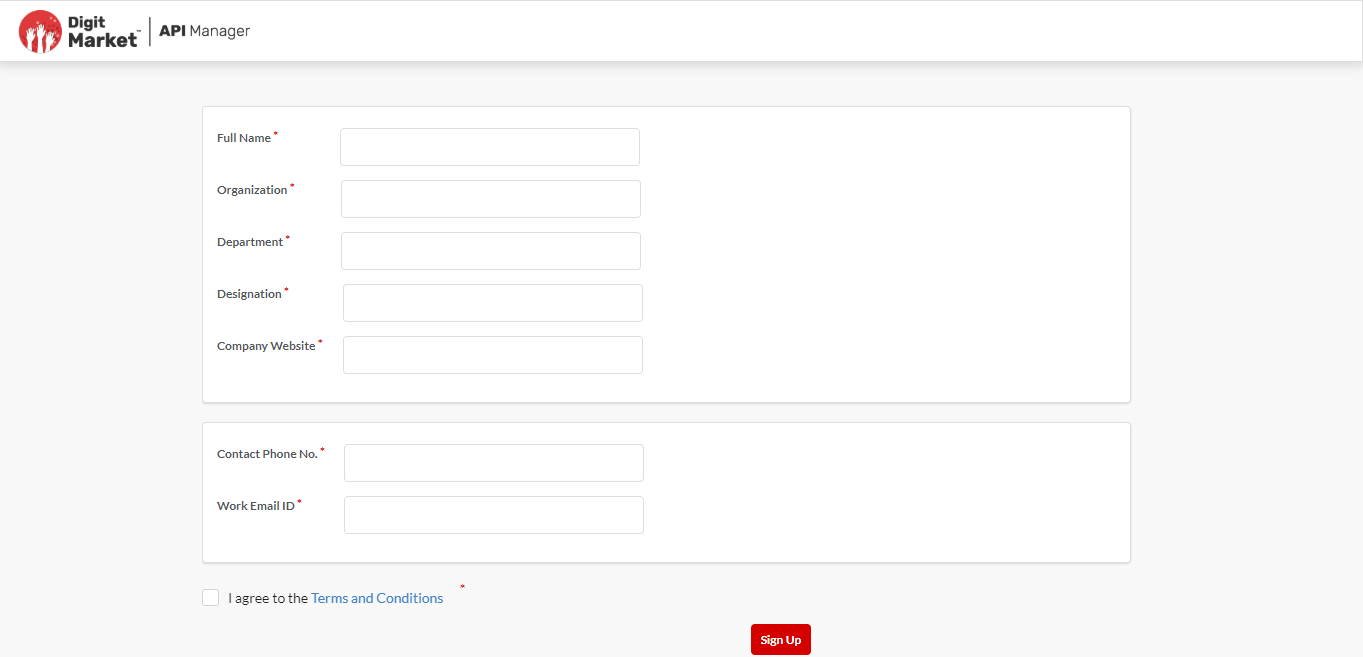
Fig. 3.1 Publisher Signup
You will receive the portal URL and Login information on the email ID registered with us in our records.
You can also click the Sign Up For DigitMarket™ API Manager link on the Login page to sign up for a 30-day free evaluation of DigitMarket™ API Manager.
Below are some of the points that need caution when filling up the Sign Up form:
- You should provide personal Full Name, Organization, Department, Designation, Company Website, Contact Number and Work Email ID in the respective field.
- The contact number should be a valid number with a minimum of five digits.
- You should agree the terms and condition before clicking SignUp tab by checking the checkbox corresponds to it.
- Click on Signup to create account.
3.2.1. Log in to the Publisher Portal
To log in as a first-time user:
First-time users of DigitMarket™ API Manager Publisher portal, will receive an email invite on their registered email ID. The invite will contain the user’s username, a randomly-generated password and a link to update the password. User must click the link to set a new password for the Publisher portal. A snapshot of the invite is displayed below.
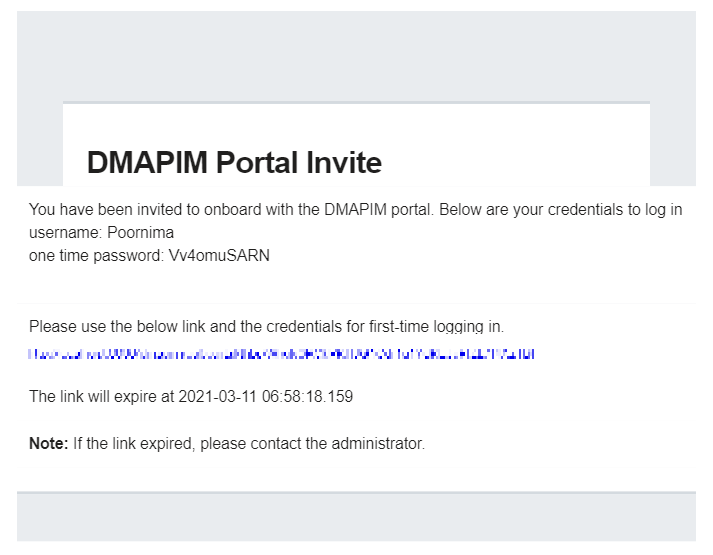
Fig. 3.2 Publisher onboard mail
The link is programmed to expire at the time mentioned in the invite. Hence the user must update their password before the link expires. In case the link expires before the user can update their password, they must contact DigitMarket™ API Manager Admin.
Note
- The randomly-generated password is a one-time password that can only be used in the link and cannot be used to login to the application.
- Users will not be able to login to the Publisher portal without updating their password.
As a first-time user, when you click the link, the below screen will be displayed.
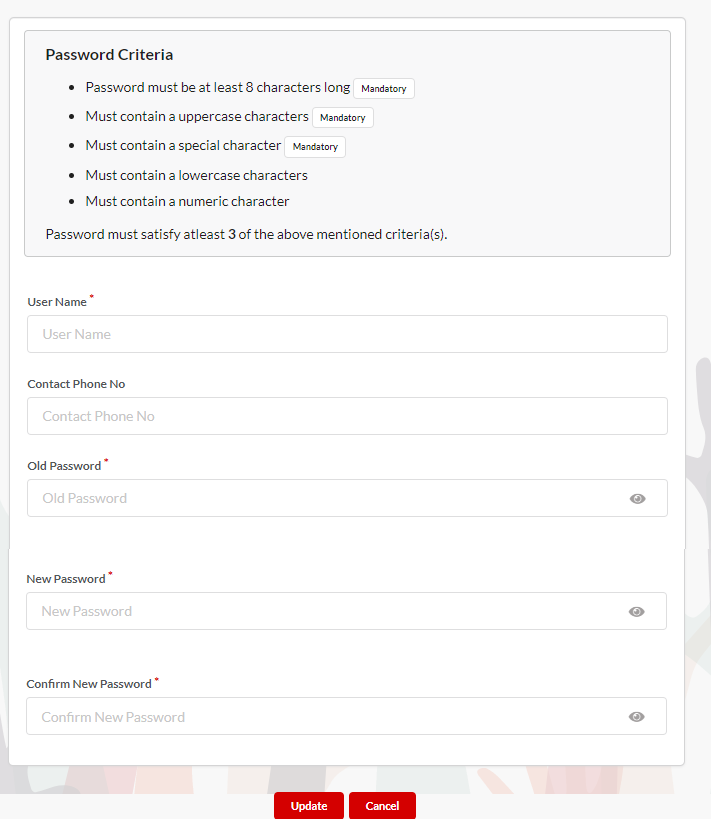
Fig. 3.3 Update Password
- In the Username box, enter the username that was sent in the invite.
- In the Contact Phone No box, enter your contact number.
- In the Old Password box, enter the one-time password sent in the invite mail.
- In the New Password box, enter a new password. Re-enter the new password in the Confirm New Password box.
- Click Update. You will be redirected to the DigitMarket™ API Manager Publisher Login page. You must use your new password to login to your account. You will also receive a password updated mail on your registered email id.
To log in to the Publisher portal:
Access the Publisher Portal using the URL provided to you. The DigitMarket™ API Manager Publisher Login page appears as below:
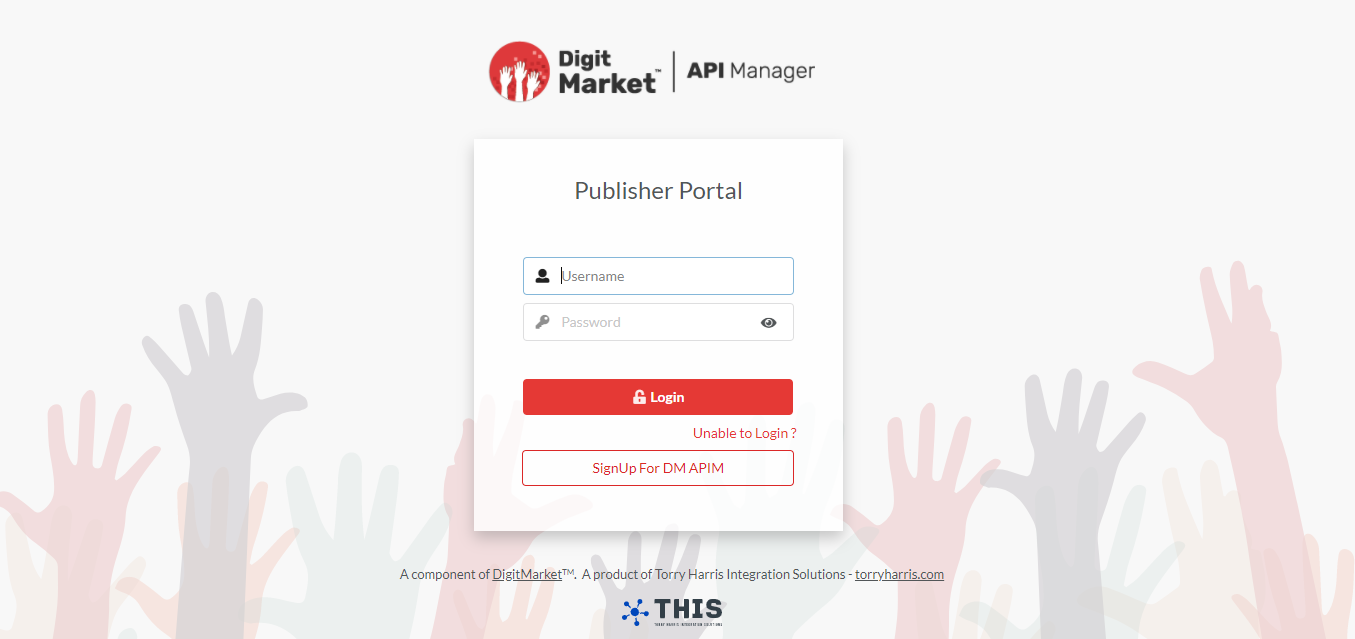
Fig. 3.4 Publisher Login
In the Username and Password boxes, type the Login Credentials and then click Login. The DigitMarket™ API Manager homepage will be displayed.
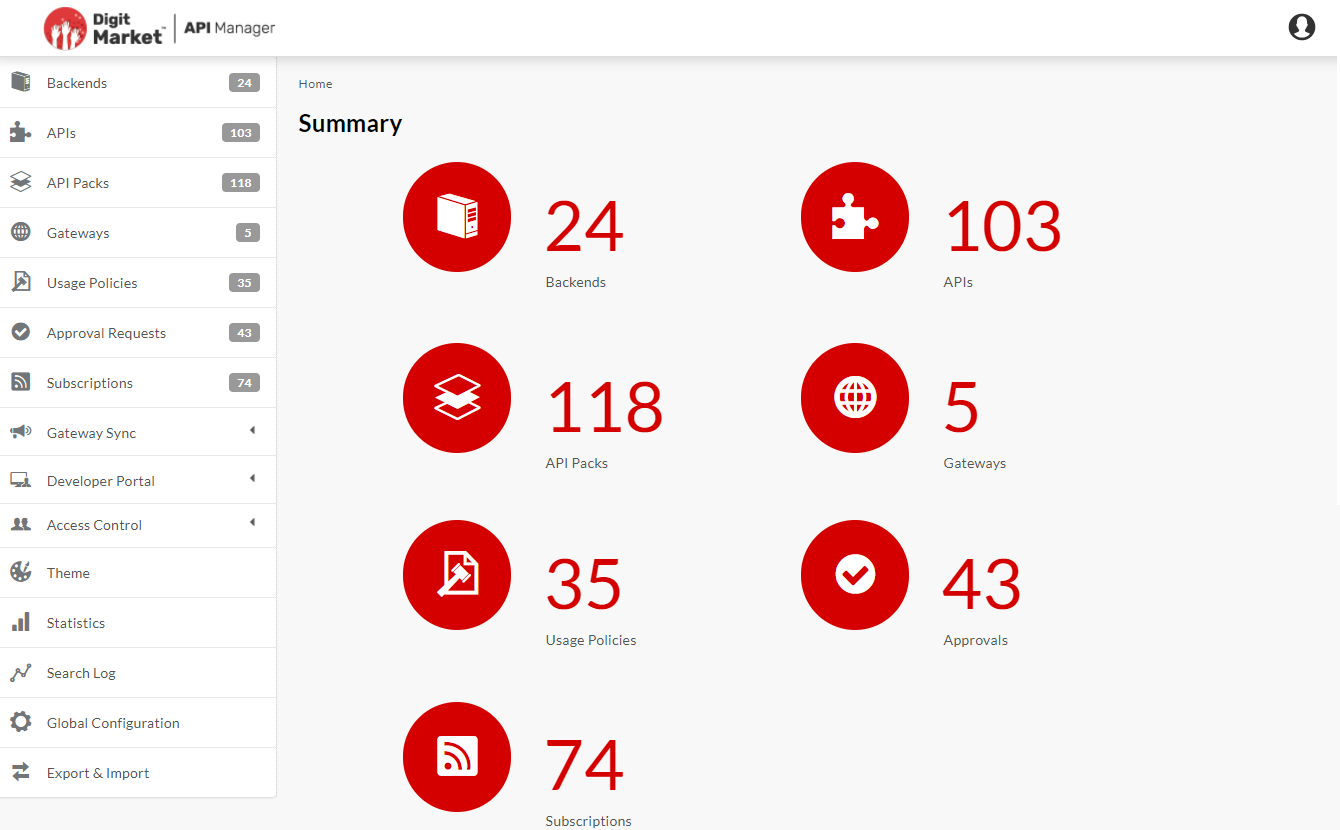
Fig. 3.5 DMAPIM homepage
Note
Users attempting to login with incorrect login credentials get locked out from the portal after three unsuccessful attempts. This applies in both LDAP and native modes.
To log out from the Publisher portal:
On the DigitMarket™ API Manager homepage, click the User menu icon
 to display the user menu.
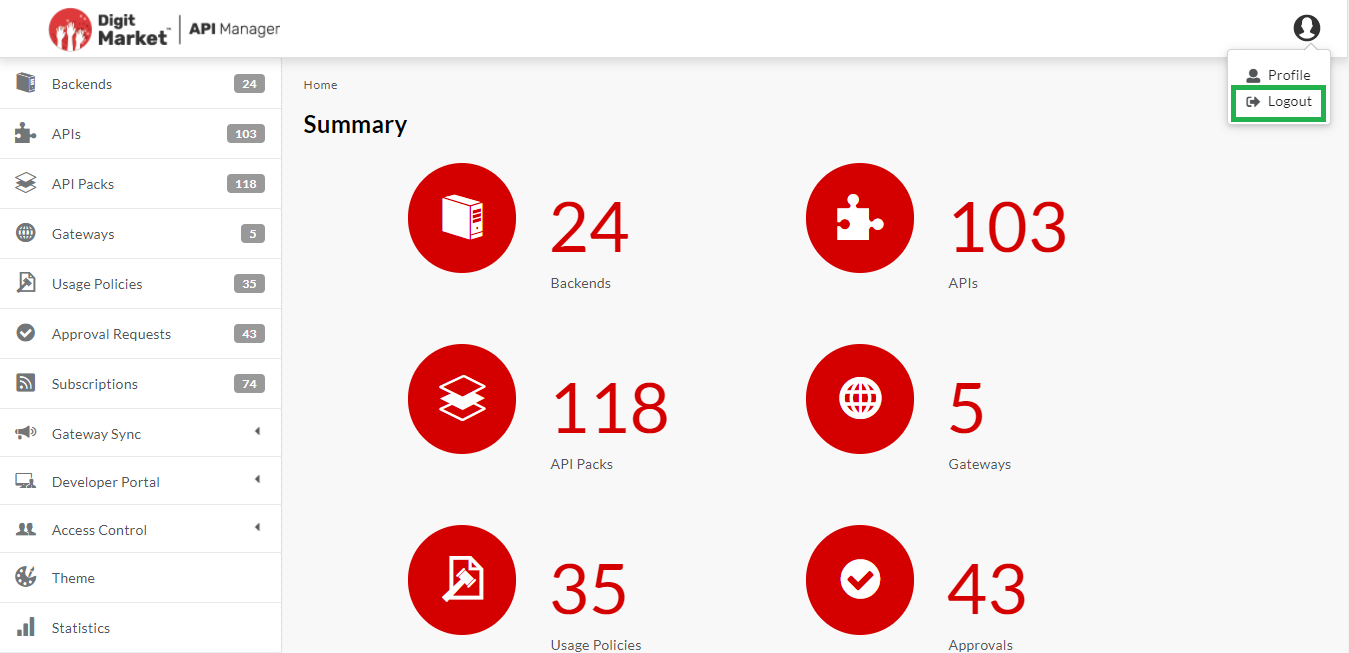
Fig. 3.6 Logout
Click Logout to log out from the application.
Note
The Publisher portal automatically ends a browser session and logs you out after a period of inactivity.
3.2.1.1. Login Case-sensitivity
If a website’s user login is case-sensitive, then users will not be allowed to login to the website if there is a case mismatch. In such cases, for successful authentication, users will have to ensure that the uppercase/lowercase characters of the username entered during login is correct. DigitMarket™ API Manager offers users the freedom to enable/disable case-sensitivity based on their request.
Note
Passwords are case-sensitive by default.
3.2.1.1.1. How case-sensitivity works
If case-sensitivity is enabled:
If case-sensitivity is enabled, a user with the username check (lowercase) will be able to login to DigitMarket™ API Manager only as check (lowercase) and not as CHECK (uppercase case) or chECK (mixed case).
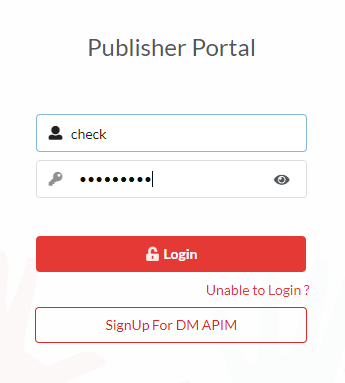
Fig. 3.7 User sensitivity enabled
If case-sensitivity is disabled:
If case-sensitivity is disabled, a user with the username check (lowercase) will also be able to login to DigitMarket™ API Manager as CHECK (uppercase) and chECK (mixed case)
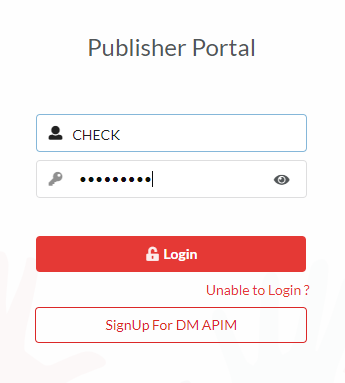
Fig. 3.8 User sensitivity disabled
3.2.1.1.2. Adding users with case sensitivity enabled/disabled
If case sensitivity is enabled:
If the case-sensitivity is enabled, the system will consider check, CHECK and chECK as three different users and allow the Admin to create three different user accounts with the usernames check, CHECK and chECK. Provided atleast one among Role or Email-Id must different ,since Role and Email-Id are not case sensitive.
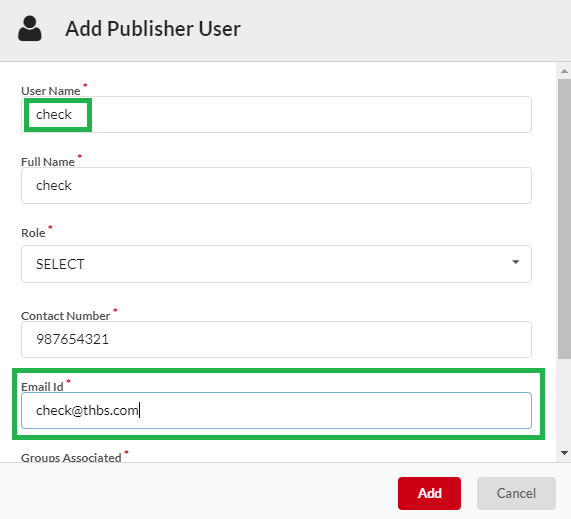
Fig. 3.9 User check
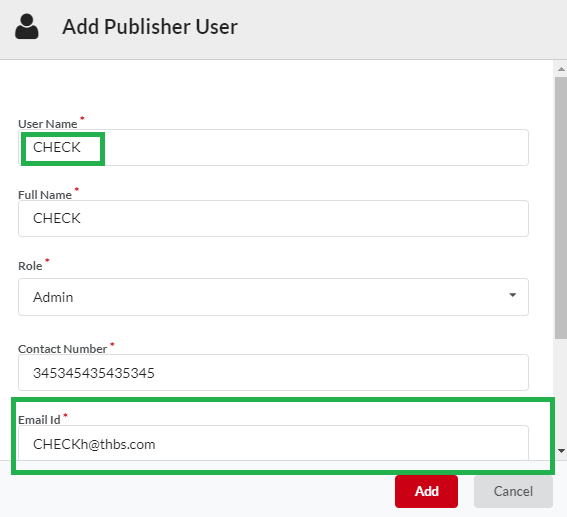
Fig. 3.10 User CHECK
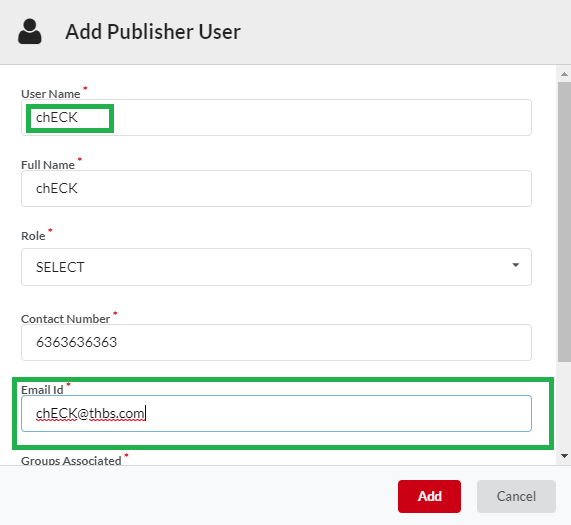
Fig. 3.11 User chECK
If case-sensitivity is disabled:
If the case-sensitivity is disabled, the system will consider check, CHECK and chECK as the same user and will not allow the Admin to create different user accounts with the usernames check, CHECK and chECK. After creating user account with the username check, if the Admin tries to create another account with username CHECK, an error message will be displayed.
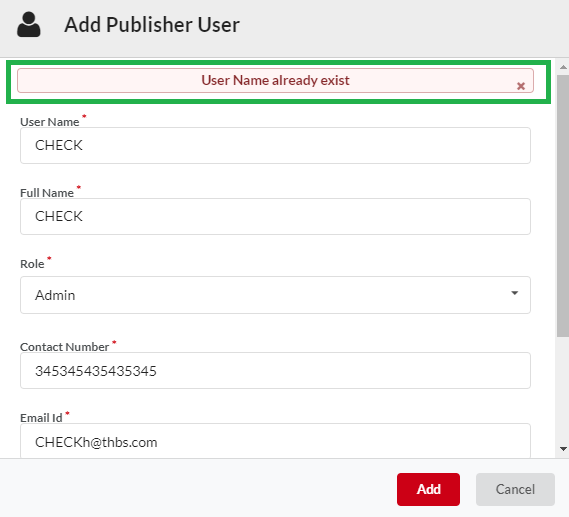
Fig. 3.12 Username exists error
3.2.1.1.3. Changing case-sensitivity
Scenario 1:
When username case-sensitivity is enabled, the Admin will be able to add three user accounts with the names check, CHECK and chECK respectively and users should login with same sensitivity.
Scenario 2:
When username case-sensitivity is enabled, the Admin will be able to add three user accounts with the names check, CHECK and chECK respectively. Let us suppose that the username CHECK is deleted and erased from the database. The user with the username CHECK will no longer be allowed to login. If the user tries to login as CHECK, the system will throw an error.
Scenario 3:
When username case-sensitivity is disabled, the Admin will be able to add only one user account with the name check. Let us suppose that after adding check user,the Admin will be not be able to create two other accounts with the name CHECK and chECK respectively.
3.2.2. User Roles and Access
Publisher users are divided into following types for access-based control to the Publisher portal:
- Admin User
- Business User
- Approver
- Technical User
User types are used to set portal Visibility. Admin, Business, Approver and Technical users have different Visibility options and part of the portal is either visible or not visible depending on the type of Publisher user that is logged in. The topic ‘Role-based UI Access’ below describes the homepage and menu options available to each user type. Refer User Roles and Portal Visibility for more information.
Role-based UI Access
On logging in, you are presented with the homepage, which has the main Navigation menu. Options in the main navigation menu vary based on the user role of the user that is logged in to the portal.
To an Admin user, the homepage appears as below:
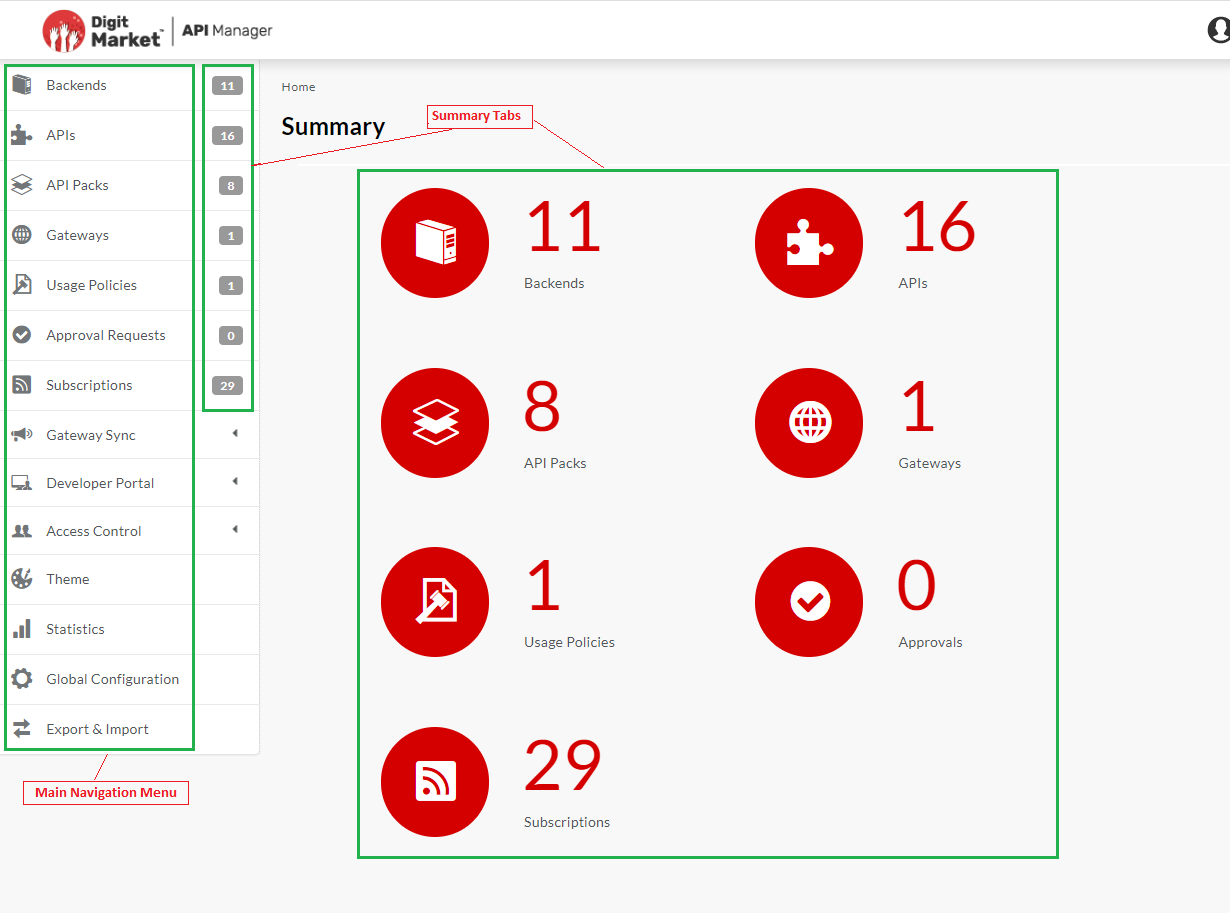
Fig. 3.13 Homepage-Admin user
To a Business user, the homepage appears as below:
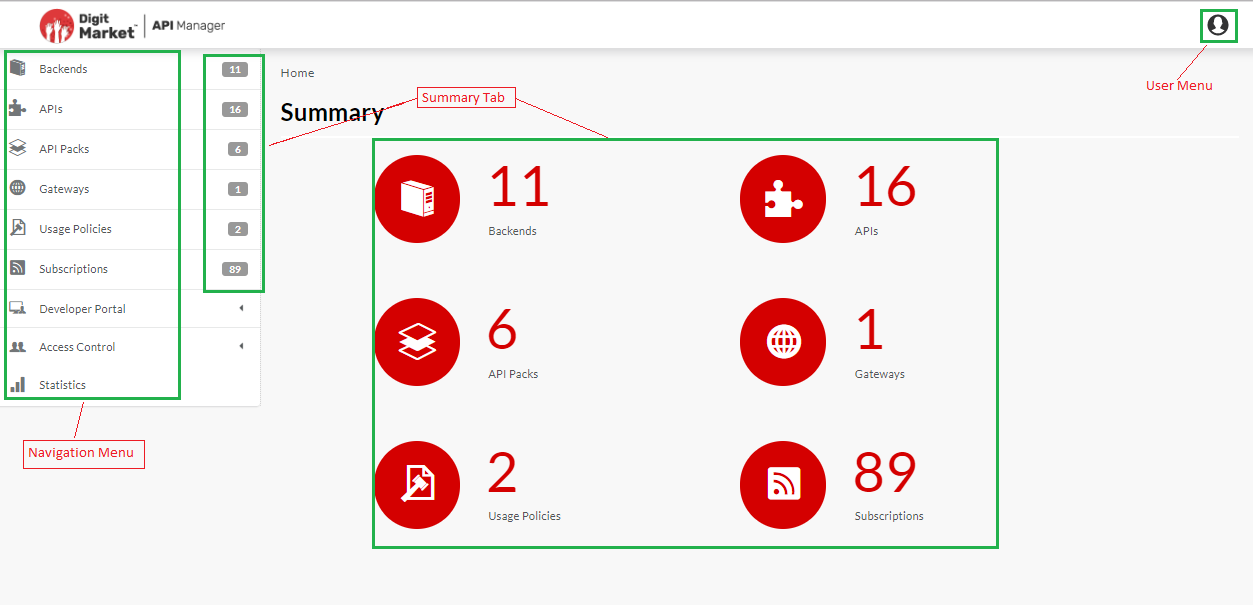
Fig. 3.14 Homepage-Business user
To an Approver user, the homepage appears as below:
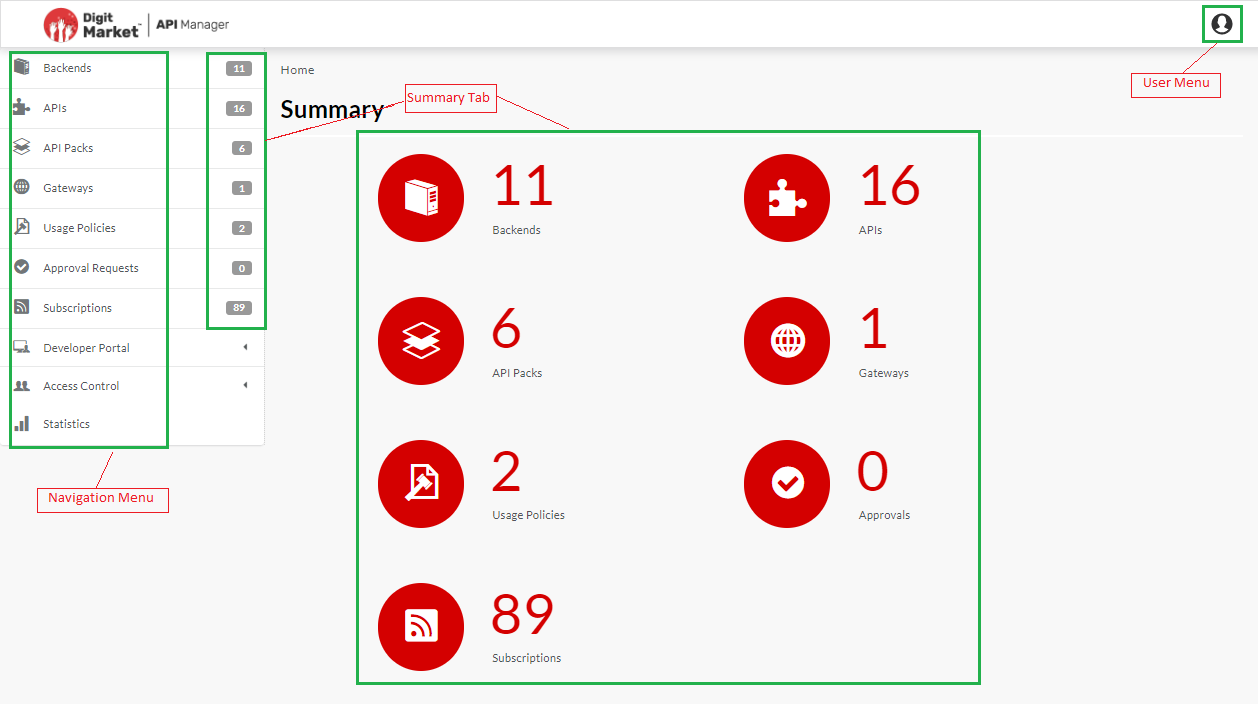
Fig. 3.15 Homepage-Approver
To a Technical User, the homepage appears as below:
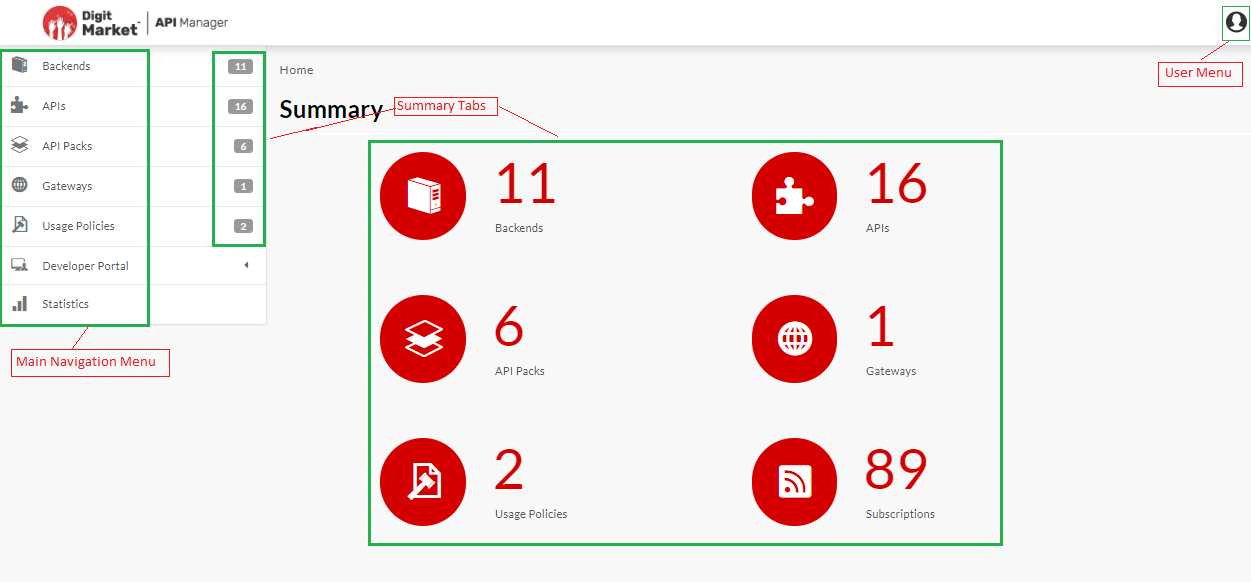
Fig. 3.16 Homepage- Technical user
The table below illustrates the menu options available to a Business user, Approver, Admin user and Technical user:
| UI Element Caption | UI Element Type | Business User | Approver | Admin User | Technical User |
|---|---|---|---|---|---|
| Backends | Main Navigation menu | ||||
| APIs | Main Navigation menu | ||||
| API Packs | Main Navigation menu | ||||
| Gateways | Main Navigation menu | ||||
| Usage Policies | Main Navigation menu | ||||
| Approval Requests | Main Navigation menu | ||||
| Subscriptions | Main Navigation menu | ||||
| Gateway Sync | Main Navigation menu | ||||
| Theme | Main Navigation menu | ||||
| Developer Portal | Main Navigation menu | ||||
| Access Control | Main Navigation menu | ||||
| Statistics | Main Navigation menu | ||||
| Global Configuration | Main Navigation menu | ||||
| Export and Import | Main Navigation menu | ||||
| Usage Plans | API Packs Configuration Tab | ||||
| Branding | API Packs Configuration Tab |


3.2.3. Change your User Profile
The User Profile page allows you to edit your user profile data after logging in to the Publisher portal.
To edit your profile:
Click the User Menu icon
to display the User Menu.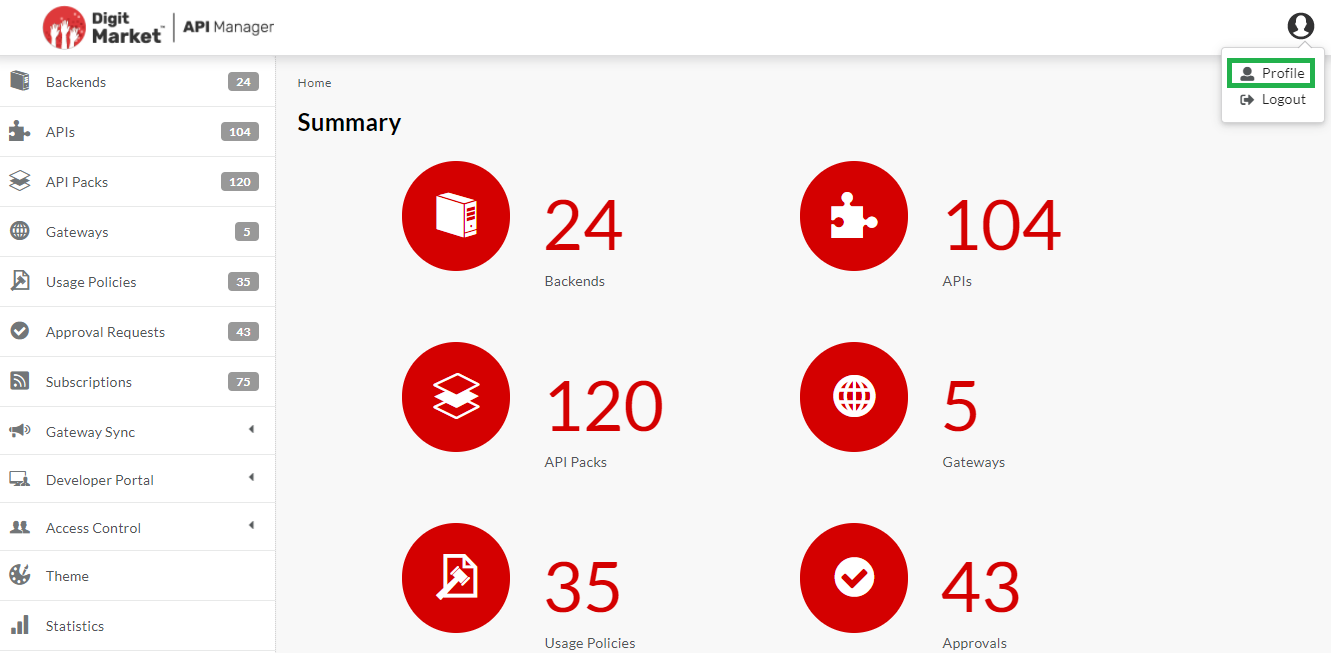
Fig. 3.17 Profile
Click Profile to display the My Profile page. The My Profile page displays.
Fill all fields except User Name and Role fields. User Name and Role fields are pre-filled and hence are not editable.
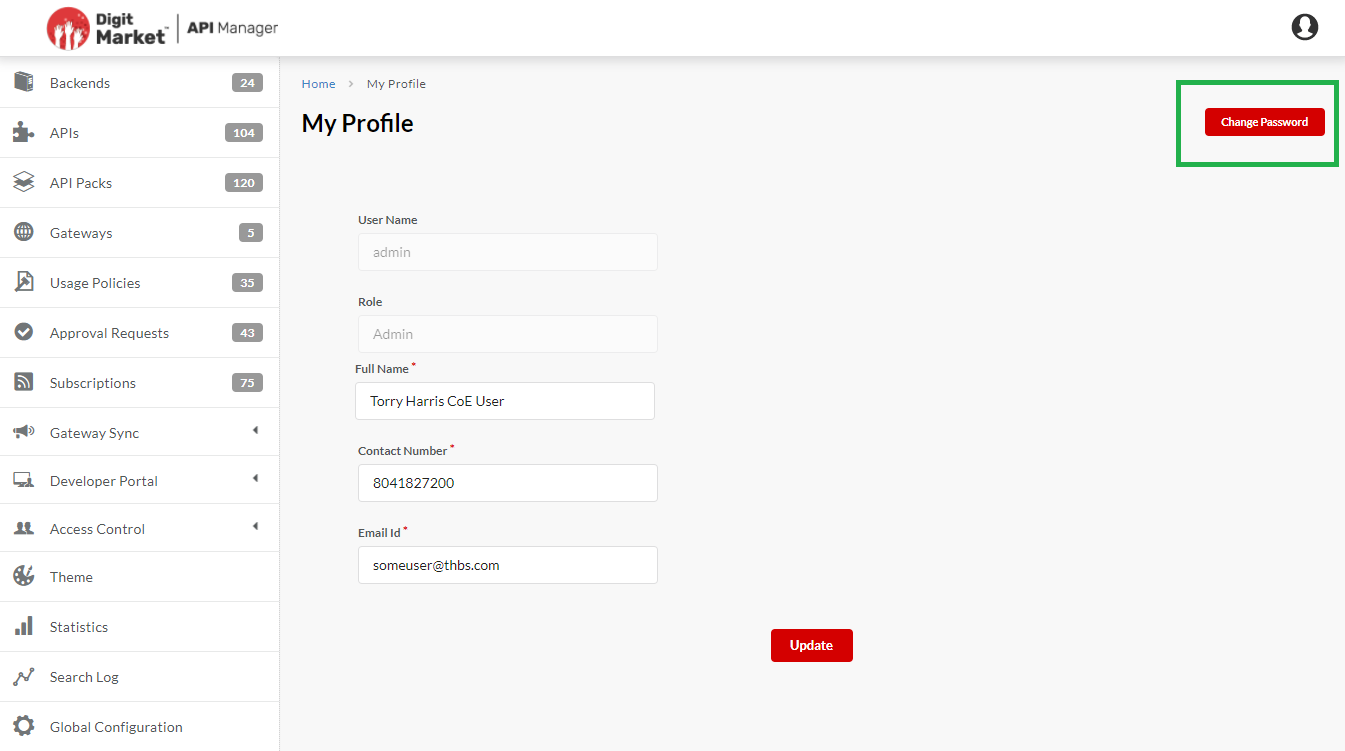
Fig. 3.18 Edit Profile
Click Change Password to change password. The Password Details dialog box displays.
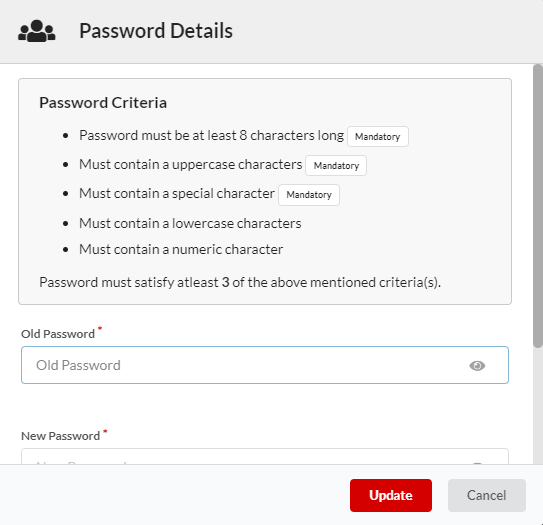
Fig. 3.19 Password Change Criteria
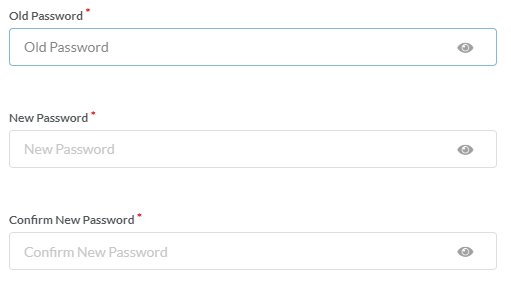
Fig. 3.20 Update Password
In the Old Password box type your existing password that you want to change.
In the New Password box, type your new password that you want to use from here on. Based on the guidelines provided.
In the Confirm New Password box, type the new password again to confirm the new password.
Click Update to save changes to the password.
On changing the password from the Profile page , users are redirected to Login Page.
In the My Profile screen, Click Update to save changes to the My Profile screen.
Note
The Change Password button is enabled only when the user logged in as a native user.
3.2.4. User Login Issues
If you have forgotten your DigitMarket™ API Manager account password or you have been locked out of your account, please refer the sections below.
3.2.4.1. Forgot Password
The Forgot Password feature of DigitMarket™ API Manager allows you to reset your account password and regain access to your account.
On the Login page, click Unable to Login.
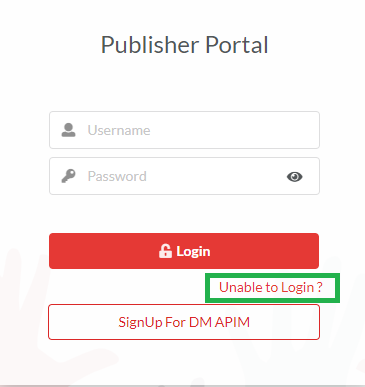
Fig. 3.21 Unable to Login
Upon clicking, the Unable to Login button displays two options: * Forgot Password * Unlock Account
Follow the steps below to reset your password.
- Click Forgot Password.
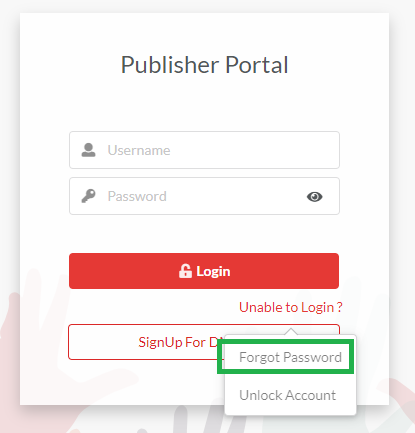
Fig. 3.22 Forgot Password
- Enter your account Username and click Get Password Reset Link.
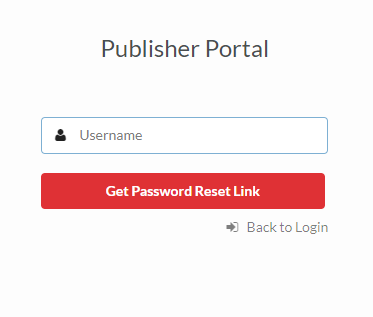
Fig. 3.23 Forgot Password
A link to reset your password is sent to your registered email ID. A snapshot of the mail is displayed below.
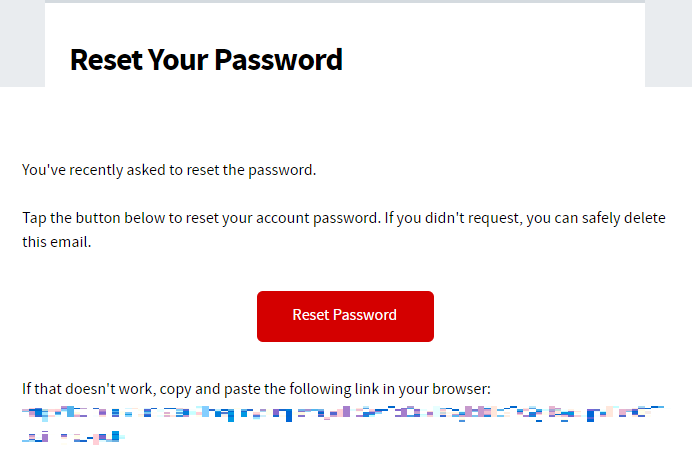
Fig. 3.24 Password Reset mail snapshot
Note
This link is valid only for a limited time period.
- You can either click on the Reset Password button or the link within the mail. Upon clicking, you will be directed to the Password Reset page.
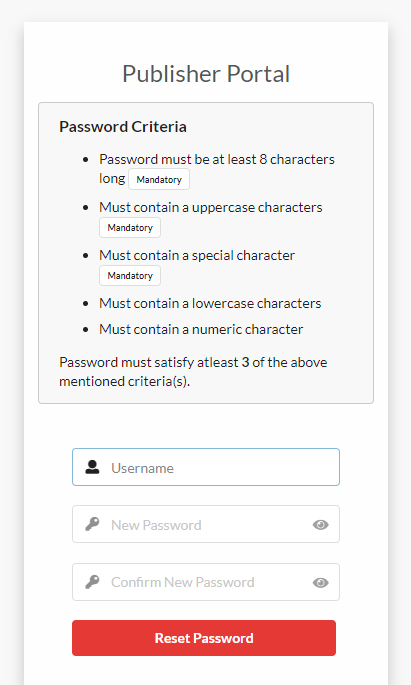
Fig. 3.25 Password Reset mail page
- In the Username box, type the username associated with your account.
- In the New Password box, type the new password. Retype the new password to confirm.
- Click Reset Password. Your password will be successfully reset and you will be redirected to the Login page.
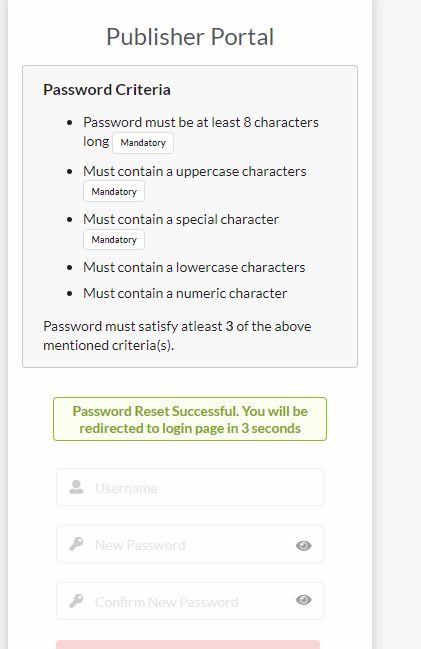
Fig. 3.26 Password Reset Confirmation
3.2.4.2. Unlock User Account
If you attempt to log in to your account using an incorrect password thrice, you will get locked out of your account. In such case, you can use the Unlock User Account feature to recover your account.
On the Login page, click Unable to Login.
Fig. 3.27 Unable to login
Upon clicking, the Unable to Login button displays two options:
- Forgot Password
- Unlock User Account
Follow the steps below to unlock your account.
Click Unlock User Account.

Fig. 3.28 Unlock Account
Enter your account Username and click Get Unlock Link.
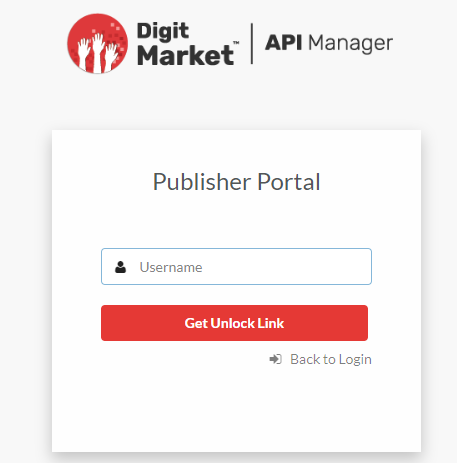
Fig. 3.29 Unlock Account
A link to unlock your account is sent to your registered email ID. A snapshot of the mail is displayed below.
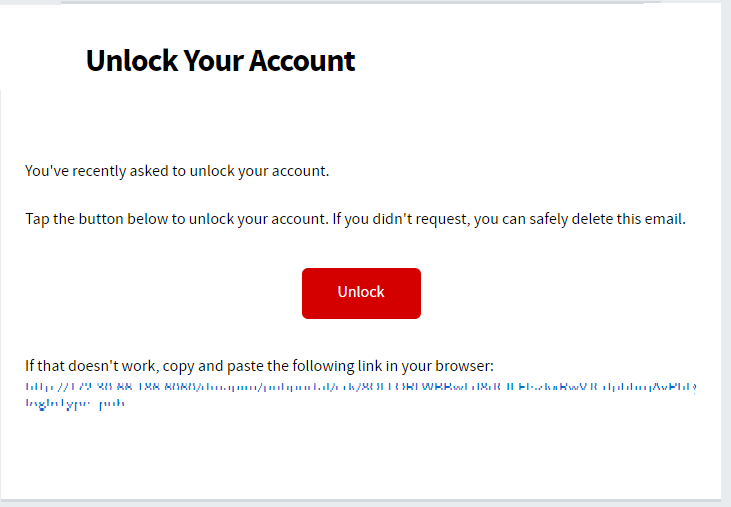
Fig. 3.30 Unlock account mail snapshot
Note
This link is valid only for a limited time period.
- You can either click on the Unlock button or the link within the mail. Upon clicking, you will be directed to the Unlock Account page.
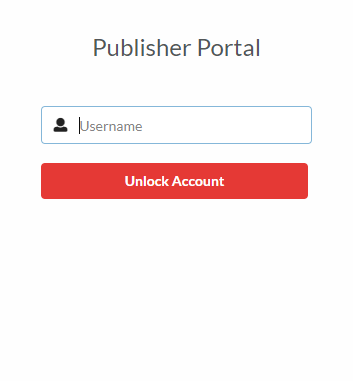
Fig. 3.31 Unlock account
- In the Username box, type the Username associated with your account.
- Click Unlock Account. You will have successfully unlocked your account, and you will be redirected to the login page.
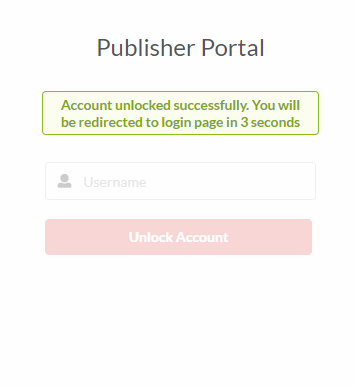
Fig. 3.32 Account unlocked confirmation
Note
If you did not find the above sections helpful and are still having trouble accessing DigitMarket™ API Manager, please contact our System Admin.
3.2.5. Password Expiry Notification
A password expiry notification alerts you to change your account password before it expires. A couple of days before your account password expires, you will see a notification displayed on your DigitMarket™ API Manager homepage every time you log in to your account. If that happens, you can:
- Change password
- Don’t show again
Change Password option allows you to change your account password immediately. Upon clicking this option, you will be redirected to the Change Password page, where you can change your account password.
Don’t show again option lets you turn off the password expiry notification. The notification will no longer appear on your homepage. However, we advise you to change your password at the earliest to avoid inconvenience.
Note
If your password is expiring on the very same day you login, then the time remaining until password expiry is displayed.
For Native Users:
When native users log onto their account, a message is displayed on the screen that states that the user’s password is about to expire. Users must click on the Change Password button in the message to change their password.
For LDAP Users:
LDAP property file has an LDAP data sync property that needs to be enabled in order to sync user data between LDAP database and local database.
When an LDAP user logs onto their account, and if the property LdapDataSyncEnabled=true, then a search is performed in the LDAP directory to compare the LDAP user data with the user data in local database. This LDAP user data is then synced with the user data in the local database. Any changes made to user data in LDAP directory will automatically be synced with the user data in local database when LDAP data sync is enabled. The number of days until the user’s password expires, and the number of days the notification will start displaying prior to password expiry can also be configured in the property file. If the property LdapDataSyncEnabled=false, then LDAP user data will not be synced with the user data in local database.
Note
Password expiry notification feature will work for LDAP users only if LdapDataSyncEnabled=true.
To change your password before expiry:
On your DigitMarket™ API Manager homepage, you will see a Password Expiry alert.
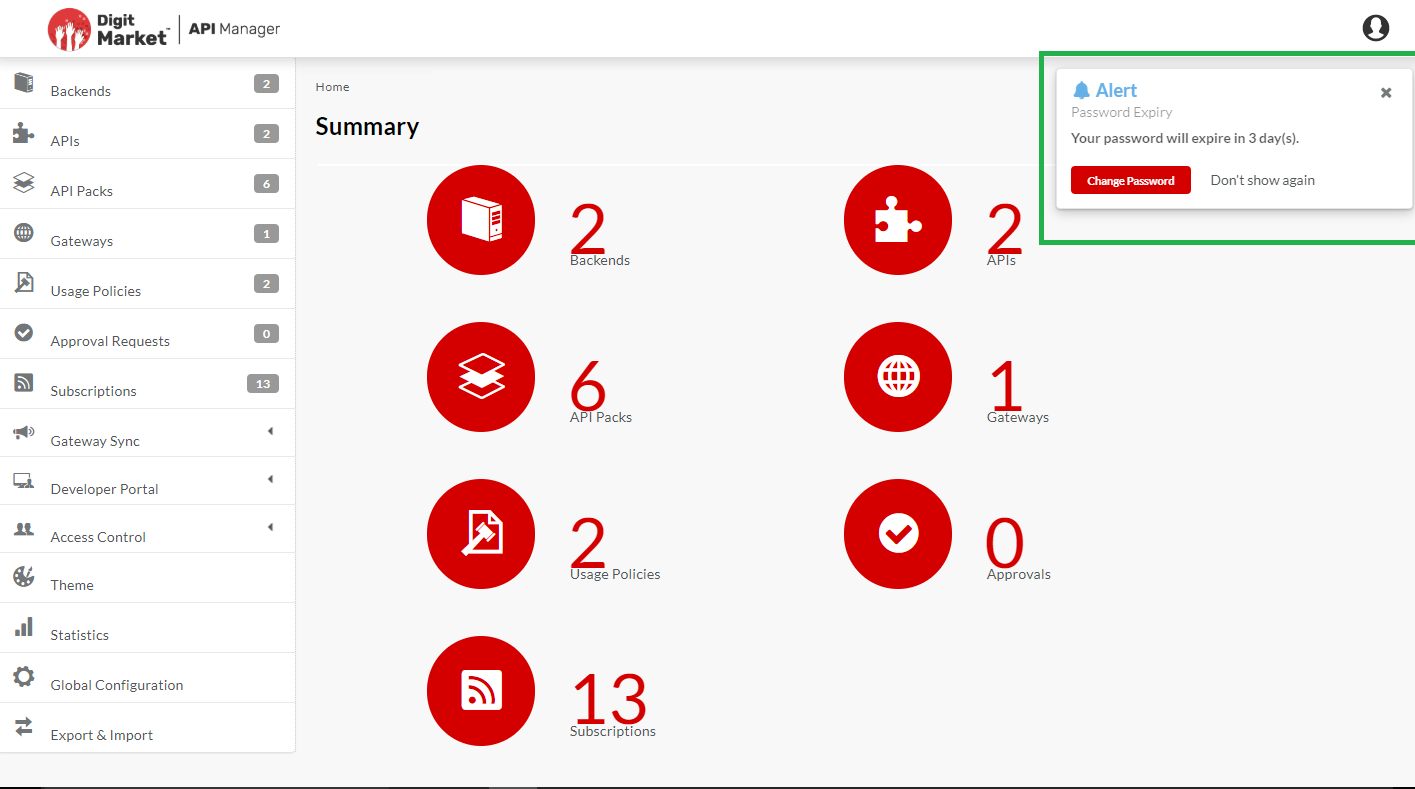
Fig. 3.33 Password Expiry Alert
Click the Change Password button. You will be directed to the Change Password page. The Change Password page will contain the password criteria to be followed while changing the password.
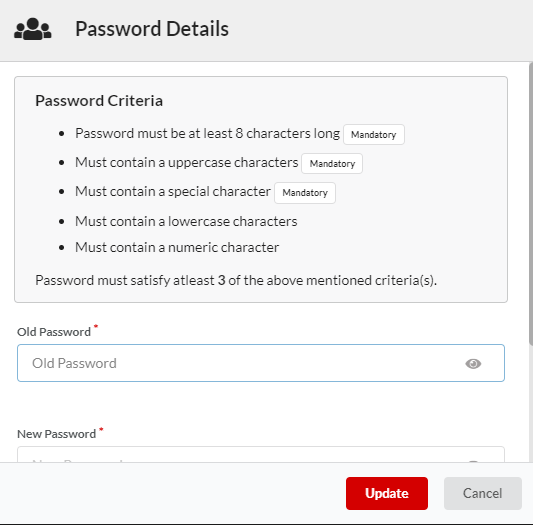
Fig. 3.34 Change Password
In the Old Password box, enter the old password.
In the New Password box, enter the new password.
Re-enter the new password in the Confirm New Password box.
Note
For more details, refer our Password Policy on Change/Reset Password.
- Click Update. You will have successfully changed your password. The password expiry alert will stop displaying on your homepage. You will get the next password expiry notification when your password is about to expire.
3.2.6. Changing Password after Expiry
When you try to log into your account with your login credentials, you will get a message stating that your password has expired, and a password reset link is sent to your registered email address.
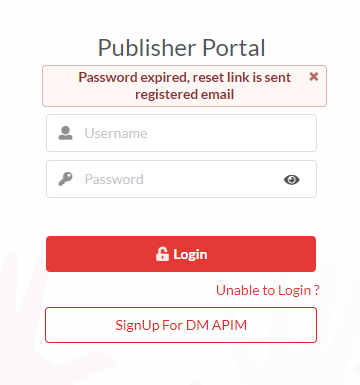
Fig. 3.35 Password Expired
For Native Users:
After password expiration, when a native user logs onto their account, a message is displayed on the screen that states that the user’s password has expired, and a password reset mail has been sent to their registered email address. Users must click on the link in the email to reset their password.
For LDAP Users:
When LDAP users try to log onto their account after password expiry, the LDAP server will inspect the property file to check if the status of the LDAP password update property.
If the IS_LDAP_UPDATE_PASSWORD_ENABLED=true, a message is displayed on the user’s login page. The message will state that the user’s password has expired, and a password reset mail is sent to the user’s registered email address. Users can click on the link in the email to update their password.
Note
If IS_LDAP_UPDATE_PASSWORD_ENABLED=true:
- Change Password button be visible to LDAP users.
- LDAP users will be able to reset their password using the Forgot Password option.
If IS_LDAP_UPDATE_PASSWORD_ENABLED=false, upon login, a message is displayed on the user’s homepage stating that the user’s password has expired, and they will have to contact the administrator to reset their password.
Note
If IS_LDAP_UPDATE_PASSWORD_ENABLED=false:
- Change Password button will not be visible to LDAP users.
- LDAP users will not be able to reset their password using the Forgot Password option.
3.2.7. Password Policy on Change/Reset Password
To meet our organization’s compliance needs and to ensure that your DigitMarket™ API Manager account remains secure, we advise you to follow the password complexity guidelines while changing or resetting your account password.
Given below is the password criteria that is followed across DigitMarket™ API Manager:
- Password must be at least eight characters long.
- Password must contain an uppercase character.
- Password must contain a special character.
- Password must contain a lowercase characters.
- Password must contain a numeric character.
Note
Password must satisfy at least three of the above mentioned criteria; of these, the first three criteria is mandatory.
3.2.8. Customized Login Failure Messages
DigitMarket™ API Manager login process involves user authentication. In case of a login error, the system displays the appropriate error message. If the error message is universal and ambiguous for all types of login failures, the user will not be able to understand the problem and rectify their mistake. DigitMarket™ API Manager provides its users with a list of ten login error messages for each of its ten login failure scenarios.
The login failure scenarios with its corresponding error messages are displayed in the table given below:
Table 3.2 Login Failure Scenarios and Error Messages¶ Login Failure Scenario Error Message LDAP user autoAddFlag is false. LDAP user role is empty Account is locked. User account is locked Invalid authentication credentials. Authentication failed as the credentials are invalid Invalid credentials for LDAP user. Invalid credentials! User password expired and mail notification with reset link is sent. Password expired, reset link is sent registered email LDAP property is not enabled. LDAP is not enabled LDAP connection has failed. LDAP Connection Failed LDAP account is locked. User account is locked Username does not exist in database. User name is invalid LDAP password has expired. Password expired, please contact administrator
While the default configuration comprises of a series of hard-coded login error messages for various scenarios, however users can customize their own login failure messages for each of the above-mentioned scenarios.
Note
At present, the login error messages can only be configured from the backend by contacting DigitMarket™ API Manager developers. However, this feature will soon be added to the user interface.
Next Steps
In the next section, you’ll learn to create and configure a Backend server.